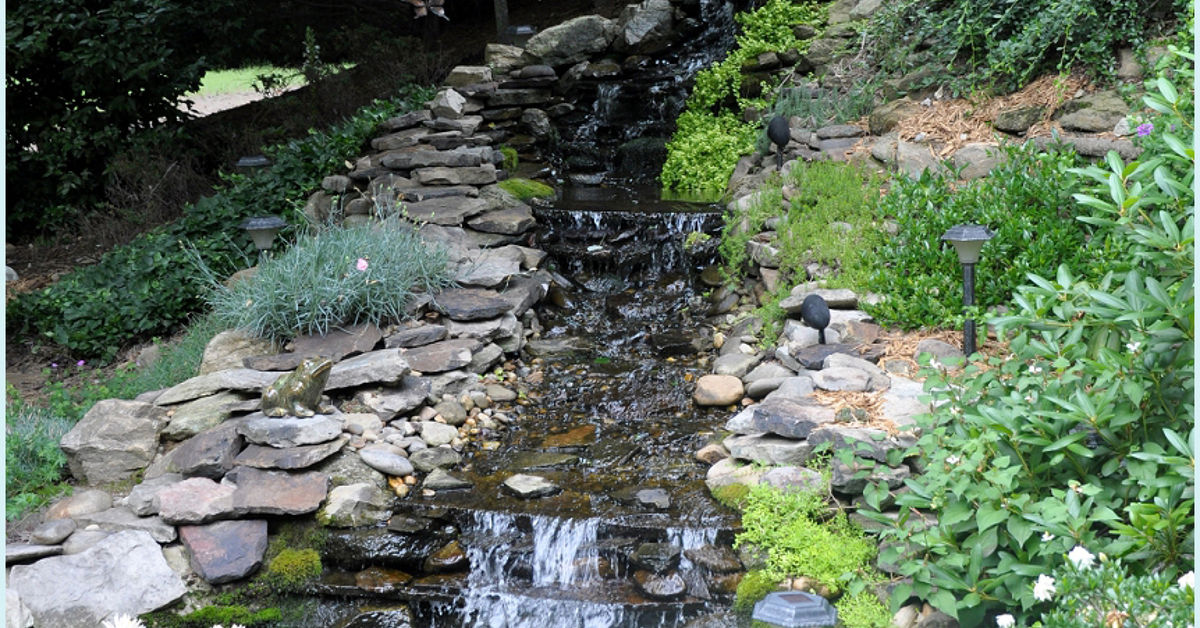

A DIY backyard waterfall and pond can turn an ordinary yard into the kind of place where morning coffee tastes better, evening stress melts faster, and neighbors suddenly remember they “meant to stop by.” The best part? You do not need a mansion, a landscaping crew, or a secret trust fund guarded by koi. With smart planning, the right materials, and a little weekend determination, you can build a beautiful backyard water feature that looks natural, sounds peaceful, and gives birds, butterflies, frogs, and tired humans a reason to linger.
This guide walks through how to design, build, and maintain a backyard pond with a waterfall, using practical methods that work for many American homes. Whether you want a compact garden pond near the patio or a larger natural-style pond tucked into the landscape, the goal is the same: moving water, healthy plants, solid edges, safe electrical setup, and a finished look that says “woodland retreat,” not “plastic kiddie pool having an identity crisis.”
Why Build a DIY Backyard Waterfall and Pond?
A backyard pond is more than decoration. It adds sound, motion, wildlife habitat, and a strong focal point to your outdoor space. A waterfall brings oxygen into the water, helps prevent stagnation, and creates that relaxing splash-and-trickle soundtrack that makes even a Monday feel slightly less Monday-ish.
From a design perspective, water features soften hard landscaping. They pair beautifully with stone paths, native plants, decks, patios, pergolas, and shade gardens. A pond can make a small yard feel deeper and a large yard feel more intentional. Add a waterfall, and the whole scene gains vertical interest, which is designer talk for “your yard finally has drama without requiring family drama.”
There are practical benefits too. A well-designed pond can support pollinators, birds, beneficial insects, and amphibians. It can also encourage homeowners to use more native plants and reduce unused lawn. Less lawn means less mowing, and less mowing means more time pretending you are “checking the pump” while actually sitting outside doing absolutely nothing. That is called wellness.
Planning Your Backyard Pond Before You Dig
The most important part of a DIY pond happens before the shovel hits the ground. Good planning prevents leaks, cloudy water, sad plants, awkward rock piles, and the classic DIY moment where you stand in a muddy hole wondering how your life got here.
Choose the Right Location
Pick a spot you can see and enjoy from places you already use: the patio, kitchen window, deck, garden path, or favorite outdoor chair. A pond hidden behind the shed may be technically peaceful, but if nobody sees it except the lawn mower, it is not doing its full job.
Look for a location with partial sun. Too much sun can heat shallow water and encourage algae. Too much shade can limit flowering aquatic plants and drop leaves into the pond. A balance of four to six hours of sunlight is often a comfortable target for many water gardens.
Avoid placing the pond in a low spot where lawn chemicals, fertilizer, mulch, or muddy runoff can wash into the water. Nutrients are algae’s favorite buffet. If your pond receives runoff from the yard, driveway, or roof, consider redirecting that water into a rain garden or planted drainage area instead of letting it pour into your pond.
Think About Power and Safety
Your waterfall pump needs electricity. Use an outdoor-rated GFCI-protected outlet installed according to local code. Do not run a sketchy indoor extension cord across the mulch and call it “temporary” for three summers. Water and electricity are not a buddy comedy.
Before digging, contact 811 to have underground utilities marked. Also check local rules, especially if your pond will be deep, close to a property line, or located where children may access it. Some municipalities treat deeper water features differently from shallow decorative ponds.
Decide on Pond Size and Depth
For beginners, a pond between 6 by 8 feet and 8 by 10 feet is manageable while still large enough to create a balanced look. A depth of 18 to 24 inches works for many small decorative water gardens. If you plan to keep fish year-round in colder climates, you may need more depth and regional winter planning.
Include planting shelves around the inside edge. Shelves give aquatic plants a place to sit, help create natural-looking margins, and make rock placement easier. A common layout includes a shallow shelf near the edge, a mid-level shelf, and a deeper central basin for the pump.
Materials and Tools You Will Need
Your exact shopping list will depend on the size and style of your pond, but most DIY backyard waterfall and pond projects use the same basic ingredients:
- Flexible EPDM pond liner or a preformed pond shell
- Protective underlayment or geotextile fabric
- Submersible pond pump sized for the waterfall and pond volume
- Flexible tubing or PVC pipe
- Waterfall spillway, filter box, or carefully built stone cascade
- River rock, fieldstone, boulders, and gravel
- Aquatic plants such as water lilies, rushes, sedges, iris, pickerelweed, or floating plants
- Shovel, level, tape measure, utility knife, wheelbarrow, gloves, and tamper
- Dechlorinator if filling with treated municipal water
- Outdoor GFCI-protected electrical supply
Do not skimp on the liner. A durable liner and protective underlayment are the difference between “tranquil backyard retreat” and “mysterious disappearing water every Tuesday.” Rocks, roots, burrowing animals, and shifting soil can damage cheap materials, so liner protection matters.
Step-by-Step: How to Build a DIY Backyard Waterfall and Pond
Step 1: Mark the Shape
Use a garden hose, rope, or marking paint to outline the pond. Avoid perfect circles unless your design is formal. Natural ponds usually look better with gentle curves and irregular edges. Stand back from several angles and check the shape from windows and seating areas. If it looks like a potato, adjust it until it becomes an elegant potato.
Step 2: Excavate the Pond Basin
Start digging from the outside edge inward. Create level shelves as you go. Use a long board and level to check that the pond rim is even. This is crucial because water will reveal an uneven edge immediately. Water is honest. Brutally honest.
Remove sharp stones, roots, and debris. Compact the soil gently. The deepest area should be large enough to hold the pump and allow easy access for cleaning. If your soil is sandy or unstable, create wider shelves and avoid steep vertical walls.
Step 3: Build the Waterfall Area
The waterfall can be built into a natural slope or formed from excavated soil. A height of 18 to 30 inches is enough for a satisfying sound in most backyard ponds. Higher waterfalls need stronger pumps, more rock, more careful construction, and more patience from everyone living with you.
Create a compacted mound or terraced streambed leading back to the pond. Shape a channel for water to flow through. Line this area separately or connect it carefully to the main liner so water cannot sneak behind rocks and escape into the soil.
Step 4: Install Underlayment and Liner
Lay underlayment across the excavated pond and waterfall channel. Then unfold the pond liner and let it relax in the sun if possible. Warm liner is easier to shape. Press it gently into shelves and corners, leaving plenty of overlap around the rim.
Avoid stretching the liner tight. It should settle into the pond contours with soft folds. Those folds may look annoying now, but many will disappear under stone, plants, and water. Trim excess liner only after the pond is filled and everything has settled.
Step 5: Place the Pump and Tubing
Set the pump in the deepest part of the pond, ideally on a flat stone or pump stand so it is not sitting directly in sediment. Run tubing from the pump to the waterfall spillway or top cascade. Hide tubing behind rocks or under gravel, but keep it accessible enough for future maintenance.
For waterfall flow, a common planning approach is to estimate pump output based on waterfall width and desired effect. A gentle trickle needs less flow; a wide sheet of water needs more. Also account for head height, which is the vertical distance the pump must push water upward. Pumps lose flow as height increases, so read pump charts instead of trusting the number printed in giant heroic font on the box.
Step 6: Rock the Edges and Waterfall
Start with larger stones around the perimeter and waterfall, then fill gaps with smaller rock and gravel. The best pond edges hide the liner, lock the shape in place, and look as if nature casually dropped the stones there, which is hilarious because you will know exactly how much sweating was involved.
Use flat stones for spillways where you want clean sheets of water. Use rounded cobbles for a babbling brook effect. Slightly tilt waterfall stones forward so water flows over them rather than behind them. Test frequently with a hose or temporary pump flow. Adjust rocks before everything is locked into place.
Step 7: Fill, Test, and Adjust
Fill the pond slowly. As the water rises, smooth liner folds and check that the edge remains level. Add dechlorinator if needed before adding plants or fish. Turn on the pump and watch the waterfall carefully. Look for leaks, splash-out, water sneaking under stones, or areas where the stream is escaping the liner.
Let the system run for a day before making final trims. If the water level drops, check the waterfall first. Many “pond leaks” are actually splash or water traveling outside the lined streambed. The pond is not always guilty; sometimes the waterfall is the little rascal.
Choosing Plants for a Healthy Backyard Pond
A balanced pond needs plants. They provide shade, compete with algae for nutrients, soften edges, and create habitat. Use a mix of plant types for the best effect.
Marginal Plants
Marginal plants grow at the pond edge or in shallow water. Good choices may include iris, rushes, sedges, arrowhead, pickerelweed, and marsh marigold depending on your region. Native plants are usually better for wildlife and easier to maintain once established.
Floating and Surface Plants
Water lilies are popular because their leaves shade the surface and their flowers look like the pond dressed up for brunch. Floating plants can help reduce sunlight penetration, but avoid aggressive species that can spread beyond control or become invasive in your area.
Submerged Plants
Submerged plants add structure below the water and help create habitat. They can be useful, but they should not take over the entire pond. Balance is the magic word. A pond with no plants struggles; a pond packed with plants becomes soup with stems.
Keeping Water Clear Without Fighting Nature
Every pond has some algae. That is normal. The goal is not sterile swimming-pool water; the goal is clear, healthy, balanced water. Algae grows when sunlight, nutrients, and warm water line up like they planned a tiny green festival.
To reduce algae, limit fertilizer use near the pond, keep leaves and grass clippings out, add plants for shade and nutrient uptake, and run the waterfall regularly to keep water moving. A filter, skimmer, or biological filtration system can make maintenance easier, especially for ponds with fish.
Do not overfeed fish if you add them. Extra food becomes extra nutrients, and extra nutrients become extra algae. Fish are charming, but they are not tiny accountants. They will not balance the ecosystem for you.
Maintenance Schedule for a DIY Pond and Waterfall
Weekly Tasks
Check the water level, remove floating leaves, inspect the pump intake, and make sure the waterfall is flowing correctly. In hot weather, evaporation can lower the pond level quickly. Top off as needed, treating tap water if plants or fish require it.
Monthly Tasks
Rinse mechanical filter pads if your system has them. Use pond water rather than chlorinated tap water when cleaning biological filter media, because beneficial bacteria help break down waste. Trim dead plant material before it decays in the water.
Seasonal Tasks
In spring, inspect rocks, tubing, pump performance, and liner edges. Remove winter debris. In fall, net out leaves and cut back plants as needed. In cold climates, decide whether to run the waterfall through winter or shut it down and store the pump according to manufacturer guidance.
Budget-Friendly Design Ideas
A beautiful DIY backyard waterfall and pond does not have to be enormous. A small patio pond with a single spillway can make a cozy seating area feel luxurious. A wildlife pond with shallow edges, logs, and native plants can support birds and beneficial insects. A tucked-away shade pond can become a quiet reading corner. A larger natural pond can anchor a whole backyard makeover.
Save money by using local stone when possible, designing around existing slopes, choosing a modest waterfall height, and buying the right pump the first time. Overspending often happens when the original design is too complicated or when cheap materials fail and need replacement.
Common DIY Pond Mistakes to Avoid
The first mistake is building too small. Tiny ponds heat quickly, collect debris quickly, and can be harder to balance. The second mistake is ignoring liner protection. The third is building edges that are not level. The fourth is choosing a weak pump and then wondering why the waterfall looks like a leaky faucet with ambition.
Another mistake is exposing liner around the edges. Use rocks, gravel, plants, and soil grading to hide it. Finally, do not forget access. You need to reach the pump, clean filters, trim plants, and retrieve the occasional dropped tool. A pond should look natural, but maintenance should not require yoga certification.
Real-World Experience: What Building a DIY Backyard Waterfall and Pond Teaches You
The first lesson of building a DIY backyard waterfall and pond is that water has opinions. You may design a graceful cascade on paper, but the water will decide whether it wants to glide over the stone, sneak around the side, splash onto the mulch, or vanish behind a boulder like a magician in a budget cape. Testing flow early and often saves time. Before mortaring, foaming, or locking rocks into place, run water through the system and watch carefully. The best builders are not the ones who never adjust; they are the ones who adjust before the pond is full, landscaped, and surrounded by witnesses.
The second lesson is that digging always looks easier in videos. Soil can be rocky, clay-heavy, root-filled, or weirdly determined to stay exactly where it is. A pond hole also looks enormous while you are digging and surprisingly reasonable once it is filled with liner, rock, shelves, plants, and water. Many homeowners wish they had built slightly bigger, especially if they want lush plants or fish. If space and budget allow, give the pond enough room to breathe.
The third lesson is that rocks are the soul of the project and also the reason your back may file a formal complaint. A few large stones look more natural than dozens of tiny ones lined up like a necklace. Bury part of each rock into the edge so it appears anchored in the landscape. Mix sizes. Use gravel to blend transitions. Step back frequently. A pond edge should not look like a bracelet dropped around a puddle.
The fourth lesson is patience. New ponds often go through an awkward stage. Water may cloud. Algae may appear. Plants may sulk before growing. The whole thing may look less like a magazine spread and more like an outdoor science project. Do not panic. As plants establish, beneficial bacteria develop, and debris is managed, the pond usually settles into balance. Quick chemical fixes are tempting, but long-term clarity comes from circulation, filtration, plant coverage, limited nutrients, and regular maintenance.
The fifth lesson is that the waterfall sound matters. A tall drop creates louder splashing. A gentle stream creates soft babbling. Flat spill stones create sheets of water, while rounded stones create lively movement. If the pond is near a bedroom window, test the sound before committing. “Peaceful mountain brook” is nice. “Dishwasher full of marbles” at midnight is less charming.
The sixth lesson is that wildlife will find the pond faster than expected. Birds may bathe at the edge. Dragonflies may patrol like tiny helicopters. Frogs may appear as if they received a group text. This is one of the best rewards of a backyard water feature. To make the pond safer for wildlife, include shallow access points, avoid steep slippery sides, use native plants where practical, and minimize chemical use around the water.
The seventh lesson is that maintenance is easier when designed into the project. Place the pump where it can be reached. Keep filter access clear. Avoid planting aggressive species where they will swallow the waterfall. Install a flat stepping stone or stable edge where you can kneel safely. Future you will be grateful, especially during leaf season when the pond tries to become soup.
Most of all, a DIY backyard waterfall and pond teaches you to slow down. You start by digging, hauling, measuring, and troubleshooting. Then one day the pump is running, the water is clear, the plants are growing, and you sit beside it longer than planned. That is when the project becomes more than landscaping. It becomes a place. A little backyard retreat. A private soundtrack. A reminder that sometimes the best home improvement is not another storage bin, another app-controlled gadget, or another “smart” device, but water moving over stone in a yard you built with your own two hands.
Conclusion
A DIY backyard waterfall and pond can transform your outdoor space into a peaceful, wildlife-friendly retreat. The key is to plan carefully, protect the liner, size the pump correctly, build stable rock edges, choose helpful aquatic plants, and maintain the system before small problems become swampy legends. You do not need perfection. You need moving water, thoughtful construction, and a willingness to adjust as you go.
Start with a realistic design, build in layers, and remember that natural-looking ponds are not supposed to look factory-made. A curve here, a mossy rock there, a few plants leaning casually over the edgethat is the charm. With the right setup, your backyard pond will give you years of soothing sound, seasonal beauty, and the quiet satisfaction of saying, “Yes, I built that,” while pretending not to notice how impressed everyone is.