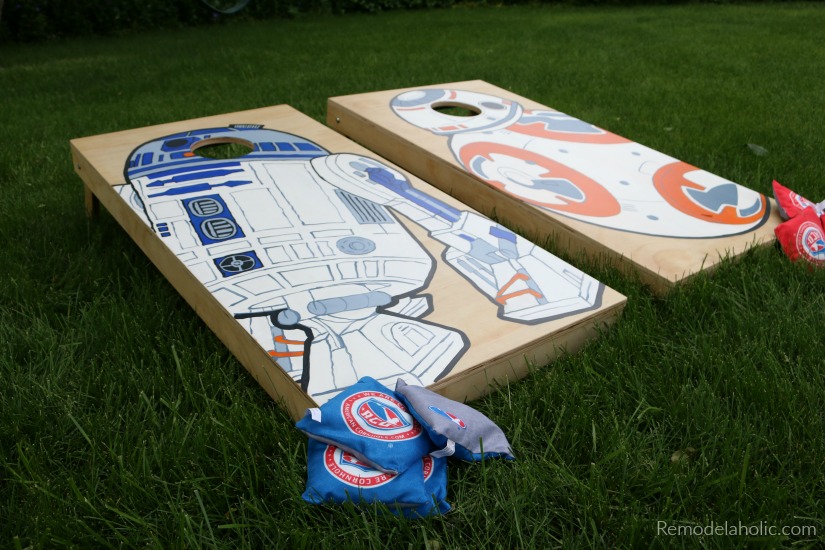

A long time ago, in a garage not particularly far away, a sheet of plywood dreamed of becoming something greater. Not a cabinet. Not another workbench shelf. It wanted to become a pair of custom Star Wars DIY cornhole boards capable of settling the galaxy’s most important question: Who has the better throwing arm, the light side or the dark side?
This project combines beginner-friendly woodworking, outdoor-game construction, and enough creative freedom to make even a protocol droid loosen up. You will build two regulation-size wooden boards, add folding legs, create Star Wars-inspired graphics, and protect everything with a smooth clear finish that lets the bags slide instead of stopping like a landspeeder with a dead power converter.
The finished set works for backyard parties, family tournaments, movie marathons, conventions, tailgates, and any gathering where someone is likely to say, “I could make that shot with my eyes closed.”
Start With Regulation Cornhole Dimensions
Great artwork cannot rescue a board that is undersized, overly bouncy, or equipped with a hole positioned somewhere near Alderaan. Build the playing surface correctly first and decorate it afterward.
A regulation cornhole board is approximately 24 inches wide and 48 inches long. Its hole measures 6 inches in diameter, is centered across the board, and has its center 9 inches from the rear edge. The rear of the playing surface should stand about 12 inches above the ground, while the front edge generally sits between 2.5 and 3.5 inches high. Competitive wooden boards also require a smooth finished surface so bags can travel consistently.
For casual backyard play, tiny measurement differences will not summon the rules committee. However, using regulation dimensions gives your homemade set a familiar throwing angle and allows you to practice on equipment that behaves like a proper cornhole board.
Recommended Cut List for Two Boards
| Part | Quantity | Suggested Size |
|---|---|---|
| Plywood playing surfaces | 2 | 24 x 48 x 1/2 inches |
| Long frame rails | 4 | 2×4 lumber cut to 48 inches |
| Short frame rails | 4 | 2×4 lumber cut to 21 inches |
| Folding legs | 4 | 2×4 lumber cut initially to 11 1/2–12 inches |
| Optional center braces | 2 | 2×4 lumber fitted between long rails |
Because a modern 2×4 is approximately 1 1/2 inches thick, placing a 21-inch rail between two long rails produces a 24-inch-wide frame. This simple arrangement is used in several established DIY cornhole plans.
Tools and Materials You Will Need
Woodworking Materials
- Two 24-by-48-inch sheets of smooth 1/2-inch birch or cabinet-grade plywood
- Enough straight 2×4 lumber for two frames and four legs
- Exterior-rated wood glue
- 3-inch exterior or deck screws for the frames
- 1 1/4- to 1 5/8-inch screws for attaching the plywood
- Four carriage bolts with washers and lock nuts or wing nuts
- Wood filler
- Sandpaper in approximately 80-, 120-, 180-, and 220-grit
- Primer suitable for bare wood
- Exterior or durable multipurpose paint
- Clear water-based polyurethane, polycrylic, or exterior spar urethane
- Painter’s tape, stencil material, or permanent adhesive vinyl
- Eight cornhole bags in two contrasting sets
Birch plywood is a popular playing-surface choice because it is relatively smooth, stiff, and receptive to paint. A 3/4-inch top can reduce bounce further, although it adds weight. Adding a center brace beneath a 1/2-inch surface also improves stiffness. Lowe’s recommends birch or poplar plywood and notes that thicker plywood can create a more rigid board.
Tools
- Tape measure and pencil
- Speed square
- Circular saw or miter saw
- Drill and driver bits
- Jigsaw or 6-inch hole saw
- Compass or circle template
- Clamps
- Orbital sander or sanding block
- Paint roller, quality brush, or spray equipment
- Safety glasses, hearing protection, and dust protection
Clamp work securely before cutting, follow each tool manufacturer’s instructions, and wear appropriate eye, hearing, and respiratory protection. Plywood dust is not a collectible, no matter how limited the edition.
Choose Your Star Wars Cornhole Design
Plan the graphics before cutting wood. The hole is part of the composition, so it can become the Death Star’s superlaser dish, a cockpit window, a droid eye, a moon, or the center of an Imperial-style emblem.
Light Side Versus Dark Side
Paint one board in cream, blue, gray, and weathered orange tones. Paint the second in black, deep gray, red, and metallic silver. Use original spacecraft silhouettes, star fields, energy-blade-inspired stripes, or symbols that evoke each side without covering every inch of the playing surface.
Death Star Trench Run
Create gray geometric panels leading toward the hole, which becomes the exhaust-port target. Thin red or orange lines can suggest targeting graphics. Keep the detailing flat and sealed; raised decorations may look impressive but can send a sliding bag into an unplanned hyperspace jump.
Droid Pair
Use white, blue, silver, orange, and black shapes to create two droid-inspired boards. Circular mechanical details work especially well around the cornhole opening. This approach is colorful, recognizable, and easier to stencil than a realistic character portrait.
Original Fan-Art Approach
Instead of downloading a low-resolution image and stretching it across four feet of plywood, draw your own simplified starship, helmet, planet, or mechanical pattern. Original line art usually cuts more cleanly as a stencil and looks intentional at a distance. Official Star Wars channels have long recognized fan-created artwork and crafts, but a backyard project should still be treated as a personal, noncommercial fan creation rather than licensed merchandise.
Step 1: Build Two Square Frames
Lay two 48-inch 2x4s parallel on a flat work surface. Fit a 21-inch crosspiece between them at each end, keeping all four boards on edge.
Measure the frame diagonally from corner to corner in both directions. When the two diagonal measurements match, the frame is square. Drill countersunk pilot holes through the long rails and into the ends of the short rails. Apply wood glue, then drive two 3-inch screws at every corner.
Repeat for the second frame. Compare the frames before moving on. They should match closely enough that nobody can blame a loss on “the suspicious dark-side board.”
Step 2: Attach the Plywood Tops
Place one plywood panel over each frame. Align the edges carefully and confirm that the assembly measures 24 by 48 inches.
Apply a thin bead of wood glue along the upper frame edges. Predrill holes around the plywood perimeter, spacing them roughly 6 to 8 inches apart. Countersink the screw heads slightly below the surface, but do not drive them so deeply that they crush the plywood veneer.
Attach the top with 1 1/4- or 1 5/8-inch screws. Fill every visible screw recess with wood filler. When the filler dries, sand it flush. A smooth playing surface is essential because bumps, exposed screws, and filler ridges can alter the path of a sliding bag.
Step 3: Mark and Cut the Six-Inch Holes
Measure 12 inches from either long side and 9 inches down from the rear edge. The intersection is the center of the cornhole opening.
Set a compass to a 3-inch radius and draw the circle. You can cut it in either of two ways:
- Jigsaw method: Drill a starter hole just inside the circle, insert the blade, and cut slowly along the line.
- Hole-saw method: Use a 6-inch hole saw centered on your mark, applying steady rather than heroic pressure.
If using a hole saw, consider cutting partway from one side and completing the cut from the opposite side. This can reduce tear-out. Sand the opening thoroughly, especially its upper edge, so bags do not catch on splinters. Bob Vila’s current DIY guidance likewise recommends smoothing the opening after either jigsaw or hole-saw cutting.
Step 4: Make the Folding Legs
Cut four leg blanks from 2×4 lumber. Round one end of each blank so it can rotate inside the frame. A common method is to mark a pivot point 1 3/4 inches from the top and both sides, draw a semicircle, and cut the rounded profile with a jigsaw.
Drill a bolt hole through the pivot mark. Position each leg inside a rear frame corner and use its hole as a guide for drilling through the frame. Install a carriage bolt with washers on both sides of the moving leg and a lock nut on the inside.
Do not tighten the nut until the leg becomes emotionally unavailable. It must pivot freely without wobbling excessively.
Open the legs and place the board on level ground. The top of the rear playing surface should measure approximately 12 inches high. Mark the bottom of each leg parallel to the ground, remove it, and cut along the mark. This fit-and-trim method accounts for slight differences in lumber, pivot placement, and hardware. Some plans use an approximately 11-degree cut at the foot to help it sit flat.
Step 5: Sand and Prime Everything
Begin with coarser paper only where necessary to level filler, rough edges, or saw marks. Move through 120-, 180-, and approximately 220-grit paper for a smooth finish. Ease sharp corners slightly, but do not round the playing-surface edges so aggressively that the boards lose their crisp shape.
Vacuum the boards and remove all remaining dust. Apply primer to the top, frame, legs, exposed plywood edges, and hole interior. Priming bare wood improves uniformity and helps prevent stains, grain patterns, and filler patches from showing through the design. Rust-Oleum specifically recommends primer on bare wood for improved adhesion and hiding.
Step 6: Paint the Base Colors
Apply thin, even coats using a foam roller, quality brush, or compatible spray paint. A small foam roller works especially well on broad plywood surfaces because it leaves less texture than a heavily loaded brush.
Allow each layer to dry according to the product label. Rushing this stage can cause painter’s tape to lift the base color or leave dents in paint that feels dry on top but remains soft underneath.
For a galaxy background, paint the board black or midnight blue. After it dries, lightly flick tiny droplets of white paint from a stiff brush. Practice on cardboard first unless you want your “distant stars” to resemble an interstellar dairy spill.
Step 7: Add the Star Wars-Inspired Graphics
Using Painter’s Tape
Painter’s tape is ideal for stripes, trench lines, geometric spacecraft panels, and energy-blade effects. Press tape edges firmly and apply paint in thin coats directed away from the tape edge. Remove the tape while the final coat is set but not fully hardened, following the paint manufacturer’s guidance.
Using Stencils
Cut stencils from reusable plastic, adhesive stencil film, or heavy cardstock. Apply paint with a nearly dry stencil brush or foam pouncer. Several light passes create cleaner edges than one thick coat.
Using Permanent Vinyl
For intricate lettering or line art, permanent adhesive vinyl can provide sharper results than hand painting. The surface should be flat, smooth, clean, and completely dry. Burnish the vinyl before slowly peeling away the transfer tape. Cricut’s current application guidance notes that flat surfaces are easier to cover and recommends burnishing again when vinyl tries to lift with the transfer tape.
Test vinyl, paint, and clear coat together on scrap wood. Some clear finishes may react with certain paints or adhesives, and a test piece is much less heartbreaking than watching your carefully cut starfighter wrinkle beneath the final coat.
Step 8: Apply a Smooth Protective Finish
The clear coat protects the graphics and determines how the bags move. Choose a compatible water-based polyurethane, polycrylic, or exterior-rated spar urethane. Water-based products are often preferred over pale colors because they are less likely to add a warm amber cast.
Apply several thin coats instead of one thick coat. Thick clear finish dries slowly, traps dust more easily, and is more likely to produce bubbles or uneven areas. Minwax recommends thin applications and removing sanding dust before recoating; its guidance also notes that light 220-grit sanding can improve smoothness between compatible coats.
Follow the exact drying, sanding, recoating, ventilation, and curing instructions printed on your chosen product. Outdoor spar urethane may require three coats and light sanding between applications.
Do not play as soon as the surface feels dry. A finish may be dry to the touch before it is sufficiently cured to withstand repeated impacts from one-pound bags.
Step 9: Test the Boards
Set both boards on level ground with their front edges 27 feet apart for standard adult play. Shorten the distance for children, new players, or yards that were apparently designed by Jawas. A bag resting on the board scores one point, while a bag passing through the opening scores three; cancellation scoring is normally used between opponents.
Throw several bags and watch for three things:
- Excessive bounce caused by a flexible top or lightweight frame
- Unexpectedly sticky areas caused by uneven paint or clear coat
- Board movement caused by slick feet or uneven ground
A center brace can reduce bounce. Non-slip pads can reduce sliding, while proper storage helps prevent moisture damage and warping. Coated wooden boards generally provide a more authentic playing experience than very light alternatives.
Common Mistakes to Avoid
Decorating Before Drilling the Hole
A hole saw does not respect your artwork. Complete all cutting, filling, and rough sanding before painting.
Using Rough Construction Plywood
Low-grade panels may contain deep voids, patches, splinters, and dramatic grain patterns that show through paint. Smooth birch or cabinet-grade plywood saves finishing time.
Applying Thick Paint
Heavy coats create roller texture and soft layers. Thin coats produce a flatter playing surface and cure more reliably.
Ignoring the Edges
Seal the plywood edges, hole interior, frame, and legs. Moisture does not politely limit itself to the decorated surface.
Adding Raised Decorations
Three-dimensional stars, metal emblems, and glued-on spaceship models may look spectacular, but they interfere with gameplay. Keep decorative elements flat and protected beneath the finish.
Experience-Based Lessons From Building Themed Cornhole Boards
A typical first attempt begins with enormous confidence. The plywood is clean, the design sketch looks cinematic, and the builder assumes the project will be finished before lunch. Then the first frame is assembled slightly out of square, the jigsaw wanders away from the circle, and a piece of painter’s tape removes half a laser-inspired stripe. This does not mean the project has joined the dark side. It means the useful lessons have started.
The most important practical lesson is to build both boards together. Cut matching parts during the same setup, assemble the frames side by side, and compare measurements after every major step. When one board is completed before the second begins, small differences tend to multiply. The second frame may receive slightly different rails, a different pivot location, or a new interpretation of what “centered” means. Building in pairs keeps the set consistent and usually saves time.
The next lesson is that surface preparation matters more than artistic complexity. A simple two-color board with carefully filled screw holes, smooth plywood, crisp tape lines, and thin clear coats usually looks better than an elaborate mural painted over dents and sanding scratches. Cornhole boards are viewed from nearly 30 feet away during play. Strong shapes, clean contrast, and readable silhouettes have more visual impact than tiny mechanical details that required three evenings and one minor existential crisis.
Design placement also deserves a full-size preview. Printing a small sketch can make the graphics look perfectly balanced, but the six-inch hole occupies a significant amount of space on the actual board. Lay paper templates directly on the plywood or project the design at full size before painting. Check the composition from the throwing end, not only from two feet away. A starship that appears bold at the workbench may become a mysterious gray potato from across the yard.
Paint testing prevents several common disappointments. Dark colors may require fewer coats over gray primer, while white and yellow graphics often need a lighter base. Metallic paint can behave differently from standard acrylic or exterior enamel. Permanent vinyl may adhere poorly to rough paint, and a clear coat may slightly change the sheen or color. A scrap-plywood sample lets the complete paint-and-finish system reveal its personality before it reaches the real boards.
Patience becomes most important near the end. Once the artwork is complete, the temptation to attach the legs, carry the boards outside, and begin the tournament is nearly overwhelming. However, soft paint can stick to folded legs, washers can imprint the finish, and bags can leave permanent marks. Waiting for the coating to cure is less exciting than throwing the first bag, but it is much more exciting than sanding and repainting a damaged board.
Storage is the final lesson that builders sometimes learn during the first rainstorm. Even exterior coatings do not turn plywood into starship armor. Store wooden boards indoors, off damp concrete, with airflow around them. Wipe away dirt rather than soaking the surface, inspect exposed edges occasionally, and repair chips before water reaches the wood.
The reward for that careful process is a set that feels personal without feeling homemade in the unfortunate sense. The frames sit firmly, the bags slide predictably, and the graphics survive repeated games. More importantly, the project becomes part woodworking exercise, part fan art, and part excuse to gather people outside. Whether the light side wins, the dark side wins, or Uncle Mike invents a scoring rule halfway through the game, the boards have already completed their mission.
Conclusion
Building custom Star Wars DIY cornhole boards is less complicated than navigating an asteroid field, provided you handle the steps in the right order. Start with regulation dimensions, create rigid square frames, cut accurate six-inch holes, fit folding legs, and prepare the wood until it is genuinely smooth. Add bold Star Wars-inspired graphics with paint, stencils, or permanent vinyl, then protect the artwork with compatible thin clear coats.
The best finished boards balance appearance with playability. Keep the graphics flat, seal every exposed surface, allow the finish to cure fully, and store the set somewhere dry. Follow those principles and your backyard will have a game worthy of movie night, summer cookouts, and many highly questionable claims about Force-assisted throwing.
Note: This tutorial describes a personal, noncommercial fan project. Star Wars names, logos, characters, and related imagery belong to their respective rights holders; obtain appropriate permission or licensing before producing themed boards for commercial sale.