
Cutting your own hair can feel like a bold act of independence, a money-saving miracle, or the beginning of a family group chat scandal. The good news: a simple at-home trim is absolutely possible when you use the right tools, work slowly, and respect one sacred rulehair is easier to remove than replace. The bad news: kitchen scissors, bathroom panic, and “just one more snip” have ruined more bangs than humidity ever could.
This guide explains how to cut your own hair at home, including long hair, short hair, and bangs, using beginner-friendly techniques inspired by professional hairstylist advice. It is not meant to replace a trained stylist for major transformations, precision bobs, fades, pixie reshaping, chemical-damaged hair, or complicated layers. Think of this as maintenance: trimming ends, cleaning up shape, refreshing bangs, and buying yourself time between salon appointments without accidentally inventing a new hairstyle called “regret with volume.”
Before You Cut: Set Yourself Up for Success
Use the Right Tools
The first rule of DIY haircuts is simple: do not use kitchen scissors. They are made for packaging, herbs, and emergency pizza situationsnot clean hair ends. Dull or bulky scissors can bend hair before cutting it, leaving rough, uneven ends that fray faster. For a cleaner result, use sharp haircutting shears, a fine-tooth comb, sectioning clips, a spray bottle, a cape or towel, and a handheld mirror.
For short hair, especially buzz cuts or clipper cuts, use real hair clippers with guard attachments. A beard trimmer is usually too small for an entire head and may create patchy results. If your clippers have numbered guards, remember that higher guard numbers leave more length. Beginners should always start longer than they think they need. You can go shorter; you cannot politely negotiate with hair already on the floor.
Choose the Right Lighting and Mirror Setup
Cut your hair in bright, even lighting. Natural light is great, but a well-lit bathroom works too. Use one large mirror in front and a handheld mirror behind you, especially for short hair or neckline cleanup. Avoid cutting hair when you are tired, rushed, emotionally dramatic, or five minutes away from leaving the house. Hair can sense panic. It thrives on it.
Decide: Dry Hair or Damp Hair?
Most at-home haircuts are safer on dry or slightly damp hair because you can see the real length and shape. Wet hair stretches, especially curly, wavy, or textured hair, so cutting it wet may lead to a much shorter result once it dries. Bangs are usually best trimmed dry because even a tiny length change can make a big difference. Long straight hair can be lightly misted to control flyaways, but avoid soaking it.
How to Cut Long Hair at Home
Long hair is usually the most forgiving for DIY trimming because you can make small adjustments without changing the entire shape. The goal is not to perform a salon-level makeover. The goal is to remove dry ends, clean the perimeter, and keep the style looking intentional.
Step 1: Start with Clean, Detangled Hair
Wash and dry your hair, or at least make sure it is clean, smooth, and completely detangled. Comb through gently from the ends upward to avoid breakage. If your hair is curly or coily, work with your natural curl pattern and consider trimming curl by curl rather than pulling everything straight. Your curls have their own personality, schedule, and legal department.
Step 2: Create a Center Part
Part your hair down the middle from the forehead to the nape of your neck. Bring both sides forward over your shoulders. Comb each side smooth, keeping your head upright and your shoulders relaxed. Tilting your head can create uneven results, so pretend you are posing for a passport photocalm, straight, and mildly suspicious.
Step 3: Trim Small Amounts
Hold one side between your index and middle fingers. Slide your fingers down to the amount you want to remove, then cut below your fingers using small, controlled snips. Instead of chopping straight across in one bold move, point-cut by holding the scissors vertically and making tiny upward snips into the ends. This creates a softer edge and helps hide minor unevenness.
Repeat on the other side, matching the length carefully. Bring both sections together under your chin to compare. If one side is longer, trim only the longer side. Do not bounce back and forth endlessly, or your “dusting” may become a shoulder-length plot twist.
Step 4: Check the Back
The back is the hardest part of cutting long hair yourself. For a tiny trim, you can check with a handheld mirror or ask someone you trust to look for obvious uneven pieces. Avoid aggressive cutting at the back unless you are experienced. Professional stylists build shape and structure into the back of a haircut, and it is easy to create holes, corners, or accidental steps when you cannot see clearly.
Optional: Dust Split Ends
If you want to remove split ends without losing much length, try hair dusting. Work in small sections, twist a strand loosely, and snip only the tiny split or frayed ends that stick out. This is slow but safer than taking off inches. It is also oddly satisfying, like cleaning crumbs from a keyboard, but with better lighting.
How to Cut Layers in Long Hair
Layers are trickier than a basic trim because they affect movement, shape, and volume. If you want dramatic layers, a butterfly cut, heavy face-framing, or a shag, a stylist is the better choice. For simple face-framing pieces, however, you can make small adjustments at home.
Face-Framing Layer Method
Start with dry hair in your natural part. Separate a small front section on each side, beginning near the temples. Clip the rest of your hair back. Pull one front section slightly forward and down, then point-cut into the ends at a soft diagonal angle. Repeat on the other side, matching the length. The first cut should be longer than you want the final result to be. You can refine gradually.
For a softer look, avoid a blunt diagonal chop. Instead, make tiny vertical snips into the ends. This helps the front pieces blend into the rest of your hair. If the section looks chunky, stop. Over-blending at home can quickly create thin, wispy pieces that refuse to cooperate unless bribed with a round brush.
How to Cut Short Hair at Home
Short hair is less forgiving than long hair because every uneven area is easier to see. That does not mean you cannot maintain it at home. It simply means you should choose simple shapes, use clippers carefully, and avoid advanced fades until you have practice.
Best Beginner Short Haircuts
The easiest short styles to maintain at home include buzz cuts, simple clipper cuts, crew-cut maintenance, and light cleanup around the sides. Precision bobs, pixies, undercuts with designs, skin fades, and sharp geometric cuts are much harder. If your haircut requires perfect symmetry, a clean weight line, or complex blending, your barber or stylist deserves the assignment.
Step 1: Wash, Dry, and Comb
Start with clean, dry hair. Clippers work better when hair is free of heavy styling product. Comb your hair in the direction it naturally grows. Study your head shape, cowlicks, and growth patterns before turning on the clippers. This is the haircut version of reading the instructions before assembling furniture.
Step 2: Start with a Longer Guard
Choose a guard longer than your target length. For example, if you think you want a #3, begin with a #4 or #5. Move the clippers upward from the sideburns toward the temples using smooth strokes. Flick outward slightly as you approach the upper sides to avoid creating a harsh line.
Work slowly around the sides and back. Use a handheld mirror to check the back after every few passes. Keep the clipper flat against the head for even cutting, but do not dig into the scalp. If you have thick or coarse hair, go over the same area from different angles to catch missed strands.
Step 3: Blend the Top Carefully
If you want the top longer than the sides, clip the top out of the way first. After trimming the sides, use a longer guard on top or trim with scissors. For scissor trimming, lift small sections between your fingers, cut a small amount, and use the previous section as a guide. Keep your cuts conservative. The top of short hair controls the overall style, so do not rush it.
Step 4: Clean the Neckline and Around the Ears
For neckline cleanup, use a trimmer only if you can see clearly. Keep the line soft rather than carving too high. Around the ears, fold the ear down gently and trim slowly. Do not chase perfection. A slightly natural edge usually looks better than an overcorrected line that climbs higher every time you “fix” it.
How to Cut Bangs at Home
Bangs are small, but they carry the emotional weight of a full renovation. The safest DIY bang trim is maintenance on bangs you already have. Cutting brand-new bangs from long hair is possible, but it is riskier because you must choose the right width, depth, density, and shape for your face and hair texture.
Rule One: Cut Bangs Dry
Trim bangs when they are dry and styled the way you normally wear them. This is especially important for curly, wavy, or cowlick-prone hair. Wet bangs can shrink upward after drying, turning “soft curtain fringe” into “surprised baby bird.”
Step 1: Section the Bangs
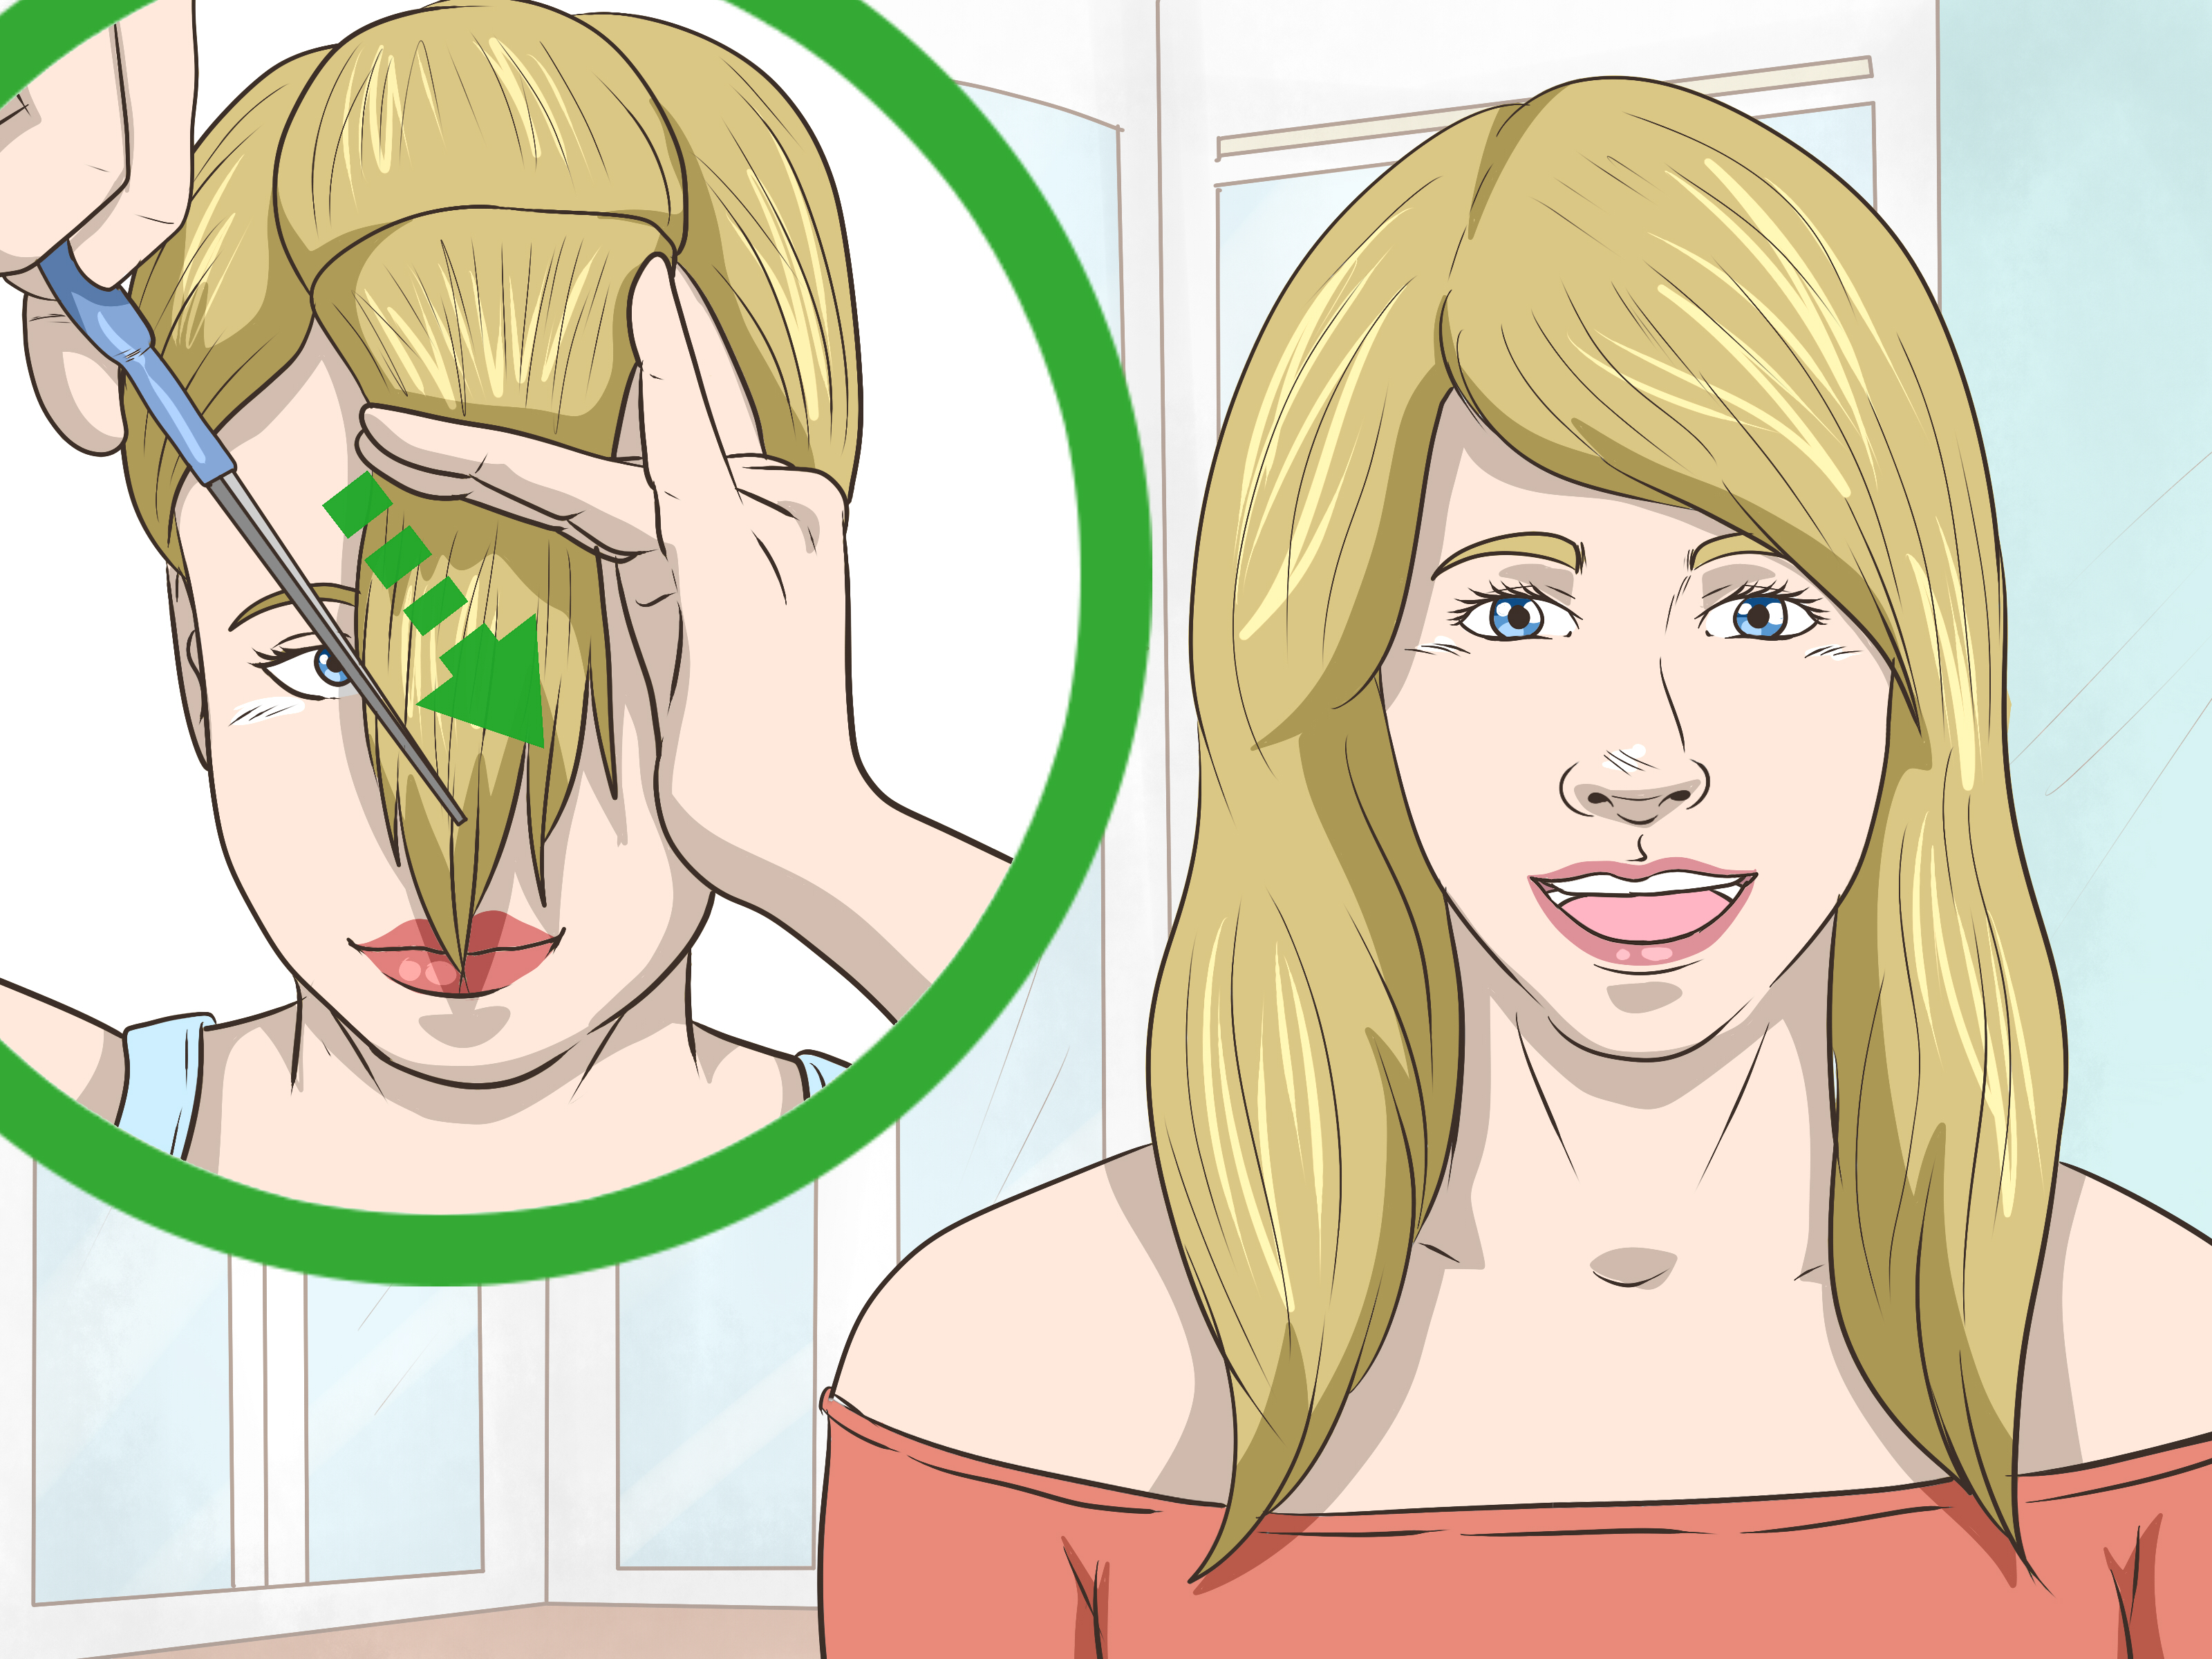
Separate your bangs from the rest of your hair. Clip the longer hair back so it cannot accidentally join the fringe club. For classic bangs, the section usually forms a shallow triangle from the top center of the head toward the outer corners of the eyebrows or temples. Do not make the triangle too deep unless you want very thick bangs.
Step 2: Start Longer Than Your Goal
Comb the bangs down lightly without pulling them tight. Hold the scissors vertically, not horizontally. Make tiny point-cuts into the ends, starting in the center and working outward. Keep the first trim below the desired final length. For most people, that means starting near the bridge of the nose or upper lashes, then gradually moving shorter if needed.
Step 3: Shape the Sides
For curtain bangs, the center should be shorter and the sides should gradually become longer. Angle the side pieces down toward the cheekbones so they blend into face-framing layers. For blunt bangs, resist the urge to cut one straight line across. Even blunt bangs usually need tiny vertical snips at the ends to prevent a helmet-like edge.
Step 4: Stop Early
The most professional thing you can do during a DIY bang trim is stop before you think you are finished. Brush them, shake them, style them, and live with them for a few minutes. Hair settles. Your eyes adjust. Your confidence may also return from wherever it fled during the first snip.
Tips for Curly, Wavy, and Textured Hair
Curly, wavy, and textured hair should usually be cut dry in its natural shape, especially for bangs and face-framing pieces. Each curl can spring differently, so pulling curls straight before cutting may create uneven results when they bounce back. Trim curl by curl, removing tiny amounts from the ends. For coily or tightly textured hair, section carefully and use moisturizing products after trimming to help the shape settle.
Do not cut curls when they are stretched unless you specifically wear your hair stretched most of the time. If you alternate between natural curls and straight styles, trim very cautiously or see a stylist who understands both looks. Hair that lives two styling lives needs diplomatic handling.
Common DIY Haircut Mistakes to Avoid
Cutting Too Much at Once
The classic DIY mistake is removing more hair than planned. Always start with less than half an inch unless you are experienced. You can repeat the process, but you cannot undo a dramatic first cut.
Using the Wrong Scissors
Household scissors can crush or bend hair, causing ragged ends. Haircutting shears are sharper and more precise. If you plan to cut your hair more than once, they are worth buying.
Pulling Hair Too Tight
When you stretch hair tightly between your fingers, it may spring back shorter after cutting. Use gentle tension, especially around bangs, curls, and face-framing pieces.
Ignoring Your Natural Part
Cut your hair in the way you normally wear it. If you cut bangs with a center part but wear a side part daily, the shape may look uneven in real life. Your haircut should serve your routine, not a fantasy version of you who wakes up with salon lighting.
Trying a Major Change First
A home haircut is best for maintenance, not reinvention. If you want to go from waist-length hair to a French bob or from long layers to a pixie, book the appointment. Big changes need professional eyes, especially in the back.
How Often Should You Trim Your Hair?
Trim frequency depends on your hair length, texture, health, and style. Bangs may need a refresh every two to four weeks. Short clipper cuts often need maintenance every three to six weeks. Long hair can usually go eight to twelve weeks between trims, especially if it is healthy and not heavily heat-styled. If your ends look frayed, tangle easily, or make your style look tired, it may be time for a small trim.
Healthy hair habits also make DIY trims easier. Use conditioner, detangle gently, limit excessive heat, avoid rough towel drying, and protect hair from unnecessary breakage. A haircut can remove split ends, but daily care helps prevent them from marching back like they own the place.
What to Do If You Make a Mistake
First, put the scissors down. This is not a small detail; this is emergency protocol. Most DIY haircut mistakes get worse because people keep trying to fix them. Style the hair, let it settle, and check it again later. A slightly uneven trim may disappear with waves, curls, or a different part.
If your bangs are too short, try styling them forward with a small brush, sweeping them to the side, or using clips and headbands while they grow. If one side of long hair is longer, trim only the longer side in tiny amounts. If a short haircut has visible patches or harsh lines, switch to a slightly shorter all-over guard rather than attempting a complex fade correction.
And if the mistake is obvious? Call a stylist. Professionals have seen everything. Your haircut emergency is probably not even in their top twenty.
Real-World Experiences: What Cutting Your Own Hair Teaches You
The first thing most people learn from cutting their own hair is that confidence and skill are not the same thing. You may begin with the energy of a celebrity stylist backstage at Fashion Week, but the mirror will quickly remind you that sectioning matters. A common experience is starting with “just a tiny trim” and then noticing one side looks longer. So you trim the other side. Then the first side looks suspicious again. Suddenly, you are negotiating with your reflection like it owes you money.
The best DIY haircuts usually happen when people treat the process like careful maintenance instead of a dramatic makeover. For long hair, the most successful home trims often involve dusting the ends, cleaning up face-framing pieces, or removing the driest half-inch. These small changes can make hair feel lighter, smoother, and easier to style without changing the overall look. Many people are surprised by how much healthier their hair feels after trimming only a small amount. The ends stop catching on each other, ponytails look neater, and curls or waves can bounce better.
Bangs create the most memorable experiences because the margin for error is tiny. One extra snip can change the entire mood of your face. People who succeed with DIY bangs usually follow three habits: they cut dry, they start long, and they use vertical point-cuts. People who struggle often cut wet, pull the hair too tight, or try to create a perfectly straight line in one pass. Bangs are less like mowing a lawn and more like trimming a bonsai tree. Small moves. Deep breaths. No sudden plot twists.
Short hair teaches another lesson: mirrors are both helpful and deeply confusing. The back of the head is difficult to judge because everything appears reversed, and it is easy to move the clippers in the wrong direction. Beginners who do well usually keep the style simple, use longer guards first, and avoid ambitious fades. A basic buzz cut or simple side cleanup is manageable. A skin fade with a seamless blend is a craft, not a casual Tuesday experiment.
Another real-world lesson is that hair texture changes the entire experience. Straight hair shows lines quickly, so precision matters. Wavy hair is more forgiving but can shrink and shift after styling. Curly and coily hair may hide tiny mistakes, but each curl has a different spring factor, which means cutting too much from one curl can leave a visible gap. People with textured hair often get better results by trimming individual curls in their natural pattern instead of trying to force every strand into one stretched length.
Finally, cutting your own hair teaches patience. The best results come from stopping early, styling the hair, and checking it again before making more cuts. Sometimes what looks uneven during the process looks completely fine after the hair is brushed, dried, or shaped with product. DIY haircuts are not about perfection. They are about learning your hair, maintaining your style, and knowing when to say, “That is enough for today.” That sentence alone has saved countless bangs, layers, and Saturday nights.
Conclusion
Learning how to cut your own hair can be practical, empowering, and even fun when you approach it with patience and realistic expectations. Long hair can often be trimmed safely at home with small point-cuts and careful sectioning. Short hair can be maintained with clippers if you start with longer guards and avoid complicated fades. Bangs can be refreshed between salon visits, but they demand dry hair, tiny snips, and emotional restraint.
The secret is not pretending to be a professional stylist. The secret is knowing what you can safely maintain and what deserves expert help. Use proper haircutting tools, cut less than you think, check your work often, and stop before perfection turns into a rescue mission. Your hair grows, yesbut your group chat screenshots are forever.