
Deleting something from a PDF sounds easy until the PDF looks back at you like a locked filing cabinet with opinions. Maybe you need to remove a typo, erase an outdated price, delete a logo, take out a blank page, or permanently remove private information before sending the document to a client, professor, court, HR department, or that one coworker who notices everything.
The good news: Adobe Acrobat gives you several ways to delete items in PDF documents. The slightly less glamorous news: the right method depends on what you are deleting. Removing a sentence is not the same as deleting a page. Cropping a margin is not the same as permanently erasing data. Drawing a black rectangle over a Social Security number is not redactionit is digital duct tape, and duct tape has betrayed many people.
This guide walks you through how to delete text, images, objects, pages, comments, hidden information, and sensitive content in Adobe Acrobat. It also explains when to use simple editing, when to use the Organize Pages tool, and when you must use redaction in Adobe Acrobat Pro. By the end, your PDF will be cleaner, safer, and less likely to cause a “please recall that attachment immediately” moment.
Understanding What “Delete” Means in a PDF
Before you start clicking the Delete key like it owes you money, it helps to understand how PDFs work. A PDF is not always like a Word document where every sentence flows naturally from top to bottom. It can contain text boxes, images, vector shapes, form fields, comments, metadata, layers, bookmarks, attachments, and invisible OCR text. In other words, a PDF can hide more things than a teenager’s browser history.
Adobe Acrobat handles different PDF elements with different tools. For ordinary content changes, use Edit a PDF. For full pages, use Organize Pages. For private information, use Redact a PDF in Acrobat Pro. For metadata and hidden content, use Sanitize Document or Remove Hidden Information. Choosing the right tool matters because some “deleted-looking” items may still be recoverable if you only cover them visually.
Method 1: Delete Text in a PDF with Adobe Acrobat
If you want to remove a word, sentence, heading, price, date, or paragraph, start with the Edit a PDF tool. This is the everyday method for fixing visible text in a PDF.
Steps to delete text in Adobe Acrobat
- Open your PDF in Adobe Acrobat.
- Select All tools or Tools, then choose Edit a PDF.
- Click the text you want to remove. Acrobat will usually place a box around the editable text area.
- Highlight the text you want to delete.
- Press Backspace on Windows or Delete on macOS.
- Click outside the text box to apply the change.
- Save the file under a new name so you keep the original.
This method works best when the PDF contains real editable text. If the PDF is a scanned image, Acrobat may need OCR before the text can be selected. If the original font is missing from your computer, Acrobat may allow only limited changes, such as adjusting size or color, rather than perfectly rewriting the text. That is not Acrobat being dramatic; it is just trying not to ruin the layout.
Example: deleting an outdated price
Imagine you have a product sheet that says “Annual Plan: $299,” but the price is no longer valid. Open Edit a PDF, click the price area, highlight “$299,” and press Backspace or Delete. If you want to replace it with a new price, type the updated amount in the same text box. Then check the spacing, because PDFs sometimes treat alignment like modern art.
Method 2: Delete Images, Logos, and Graphic Objects
Images and graphics in a PDF may include logos, screenshots, charts, icons, signatures, scanned stamps, decorative lines, and background elements. To remove them, use the editing tools in Acrobat.
Steps to delete an image or object
- Open the PDF in Adobe Acrobat.
- Choose Edit a PDF.
- Click the image, logo, or object you want to remove.
- When the object is selected, press Delete or Backspace.
- Review the surrounding layout. Removing an image may leave empty space.
- Save a copy of the edited PDF.
If the image will not select, it may be part of a scanned page, a background layer, or a flattened PDF. In that case, Acrobat may treat the whole page as one image. You can try OCR, use the Redact tool for permanent removal, or go back to the original source file if you have it.
When deleting objects gets tricky
Some PDFs are created from design programs, web pages, scanners, or office documents. A single visible element may actually be made from multiple small objects. For example, a chart might include separate bars, labels, lines, and text. Deleting one piece may leave behind little graphic crumbs. Zoom in and inspect the area after deleting, because PDF confetti is real, and it is annoying.
Method 3: Delete Entire Pages from a PDF
If the item you want to remove is an entire pagelike a blank page, duplicate page, old appendix, cover sheet, or confidential attachmentuse Organize Pages. This is cleaner than trying to highlight everything on the page and delete it piece by piece.
Steps to delete pages in Adobe Acrobat
- Open your PDF in Acrobat.
- Select All tools, then choose Organize Pages.
- Acrobat will show page thumbnails.
- Select the page or pages you want to delete.
- Click the trash can icon or choose Delete.
- Confirm the deletion when prompted.
- Save the edited document.
You can select multiple pages at once. Use Shift to select a range of pages, or use Ctrl on Windows and Command on Mac to select non-consecutive pages. Acrobat requires at least one page to remain in the file, so you cannot delete every page and call it a minimalist masterpiece.
Example: removing duplicate pages
Suppose your 20-page proposal accidentally includes the same pricing page twice. Open Organize Pages, select the duplicate page thumbnail, click the trash can, confirm, and save. Then scroll through the document to make sure page numbers, bookmarks, and table-of-contents references still make sense.
Method 4: Delete Comments, Highlights, and Markups
PDFs often collect comments like a refrigerator collects magnets. Review notes, sticky notes, highlights, stamps, shapes, and drawing markups can all remain in a PDF unless you remove them.
Steps to delete comments and annotations
- Open the PDF in Acrobat.
- Open the Comments panel.
- Select the comment, highlight, stamp, or markup you want to remove.
- Press Delete, or right-click and choose Delete.
- Repeat for other comments as needed.
- Save the file.
If there are many comments, review the comments list carefully. Deleting visible highlights on the page may not be enough if comments remain in the side panel. For business, legal, academic, and government documents, always inspect comments before sharing. A harmless-looking note can become an accidental confession if left behind.
Method 5: Delete Form Fields in a PDF
Fillable PDFs may include text boxes, checkboxes, radio buttons, dropdown menus, digital signature fields, and buttons. These are not always the same as normal text. If you want to remove a fillable field, use Acrobat’s form editing tools.
Steps to delete form fields
- Open the PDF in Adobe Acrobat.
- Go to All tools and select Prepare a form.
- Click the form field you want to remove.
- Press Delete or right-click and select Delete.
- Preview the form to make sure the field is gone.
- Save the updated PDF.
This is useful when a form has outdated fields, extra signature boxes, duplicate checkboxes, or questions that no longer apply. After deleting fields, test the form as a user would. Tab through it, type in the remaining fields, and make sure you did not accidentally remove something important.
Method 6: Use Redaction to Permanently Delete Sensitive Content
Here is the big rule: if the content is sensitive, do not simply delete it, cover it, crop it, or draw a black box over it. Use redaction. Redaction in Adobe Acrobat Pro is designed to permanently remove visible text and images from a PDF. This is the method to use for Social Security numbers, bank details, medical information, legal material, trade secrets, signatures, home addresses, confidential pricing, private emails, and anything else you would not want copied, searched, or recovered.
Steps to redact text or images in Adobe Acrobat Pro
- Open the PDF in Adobe Acrobat Pro.
- Select All tools, then choose Redact a PDF.
- Select Redact text and images.
- Drag over the text, image, or area you want to remove.
- Review the redaction marks carefully.
- Click Apply.
- Save the redacted PDF with a new file name.
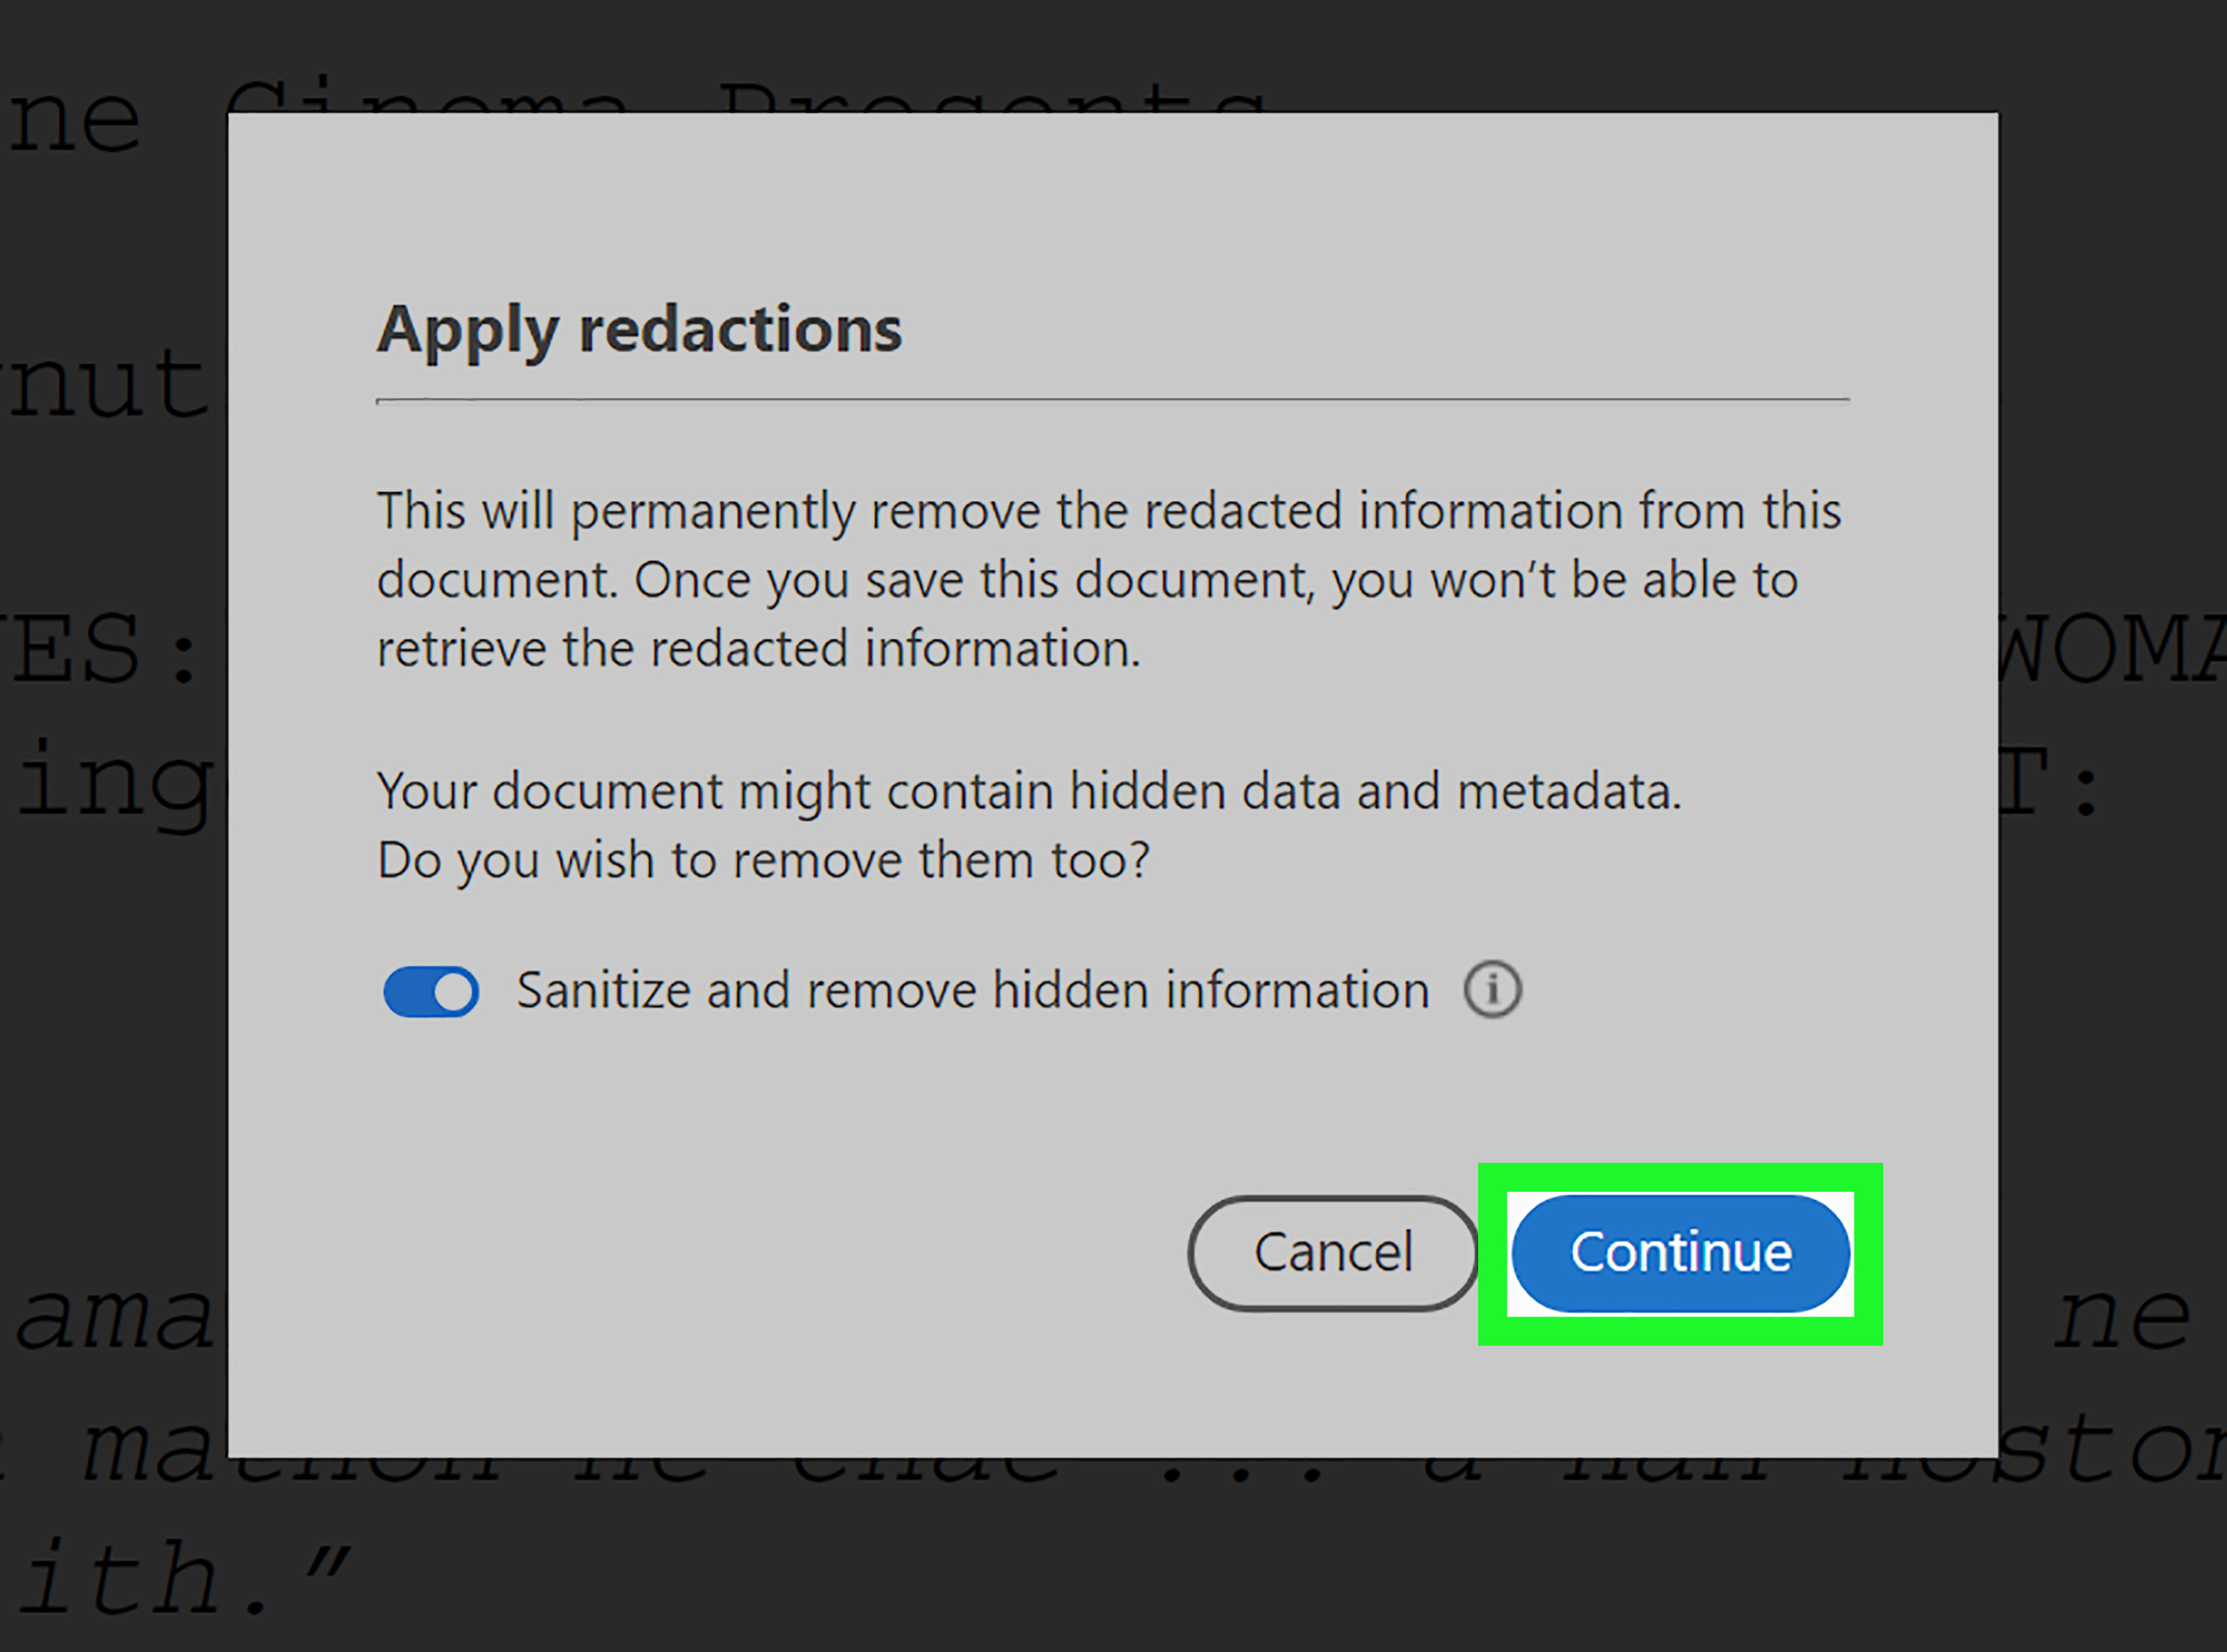
Redaction is usually a two-step process: first you mark the content, then you apply the redactions. Until you apply them, the content is only marked for removal. Think of it like putting sticky notes on things to throw away. Nothing leaves the house until you actually take out the trash.
Why black boxes are not enough
Many people try to hide sensitive text by placing a black rectangle over it. Visually, it may look fine. Technically, the text underneath may still exist. Someone may be able to select it, copy it, search for it, or extract it with another tool. That is why true PDF redaction matters. It removes the underlying content rather than merely hiding it under a digital curtain.
Method 7: Find and Redact Repeated Words or Numbers
If the same name, account number, email address, or phrase appears throughout the PDF, manually hunting it down can turn into a very boring treasure hunt. Acrobat Pro can help you search for text and mark matching results for redaction.
How to search and redact
- Open the PDF in Acrobat Pro.
- Choose Redact a PDF.
- Use the option to find text or search for specific words and phrases.
- Enter the term you want to redact, such as a name, phone number, or account number.
- Review every result before marking it.
- Apply the redactions.
- Save the redacted version separately.
Always review search results manually. A name like “May” could be a person, a month, or the PDF’s way of testing your patience. Automated search is helpful, but it should not replace human review.
Method 8: Remove Hidden Information and Metadata
Even after deleting visible content, a PDF may still contain hidden information. This can include metadata, author names, comments, hidden layers, embedded files, deleted content remnants, bookmarks, form data, and invisible OCR text. If you are publishing or sharing a sensitive PDF, removing hidden information is essential.
Common hidden items in PDFs
- Author name and organization metadata
- Comments and review notes
- Hidden layers
- File attachments
- Bookmarks and links
- Form field data
- Invisible OCR text behind scanned pages
- Previously edited content
How to remove hidden information
- Open the PDF in Adobe Acrobat Pro.
- Go to the protection or redaction tools.
- Choose Remove Hidden Information or Sanitize Document, depending on your Acrobat version and interface.
- Let Acrobat scan the PDF for hidden content.
- Review the items found.
- Remove the hidden information.
- Save a clean copy.
For public documents, legal files, HR records, financial PDFs, and medical documents, this step is not optional. It is the difference between “we removed the sensitive content” and “we removed the sensitive content from the part people can see.” Those are not the same sentence, and only one of them lets you sleep peacefully.
Method 9: Crop Content Carefully
Cropping a PDF changes what is visible on the page. It is great for trimming margins, removing scanner shadows, focusing on a section, or cleaning up page presentation. However, cropping does not always permanently delete the cropped-away content. In many cases, the hidden content may still exist outside the visible page boundary.
Use cropping for layout and appearance. Use redaction or sanitization when the content must be permanently removed. If you crop out a confidential sidebar, do not assume it is gone. Confirm with redaction tools, hidden information removal, and a final inspection.
Best Practices Before Saving the Edited PDF
Deleting items from a PDF is only half the job. The other half is checking that the document still works. A clean PDF should look right, read correctly, print properly, and contain no unwanted hidden data.
Use this final checklist
- Save a backup first: Keep the original file untouched.
- Use “Save As”: Create a new version, especially after redaction.
- Check every page: Look for layout gaps, broken headings, or orphaned graphics.
- Search the document: Try searching for the deleted word, name, number, or phrase.
- Copy and paste test: Try selecting the area where sensitive text used to be.
- Review comments: Remove notes, markups, and hidden review history.
- Inspect metadata: Remove author names and document properties if privacy matters.
- Test forms: Make sure remaining fields still work.
- Open in another PDF reader: Confirm the file looks correct outside Acrobat.
Common Problems and How to Fix Them
The text will not select
The PDF may be scanned, flattened, or image-based. Try running OCR in Acrobat, then use Edit a PDF. If the content is sensitive, use redaction rather than relying on simple editing.
The font changes after deleting text
Acrobat may not have access to the original font. Install the font if you have the rights to use it, or replace the text with a similar available font. For polished design documents, editing the original source file is often better.
The deleted image leaves a blank space
PDFs do not always reflow like Word documents. After removing an image, you may need to move nearby text or redesign the page. If layout matters, return to the original design file if possible.
The PDF file size is still large
Deleted-looking content may not always reduce file size dramatically. Use Acrobat’s optimization or compression tools after editing. If privacy is the issue, prioritize redaction and sanitization over file size.
The redaction mark is visible but the content is still there
You probably marked the content but did not apply the redaction. Go back to the Redact tool and click Apply. Then save the file with a new name.
Specific Examples of Deleting Items in PDFs
Deleting a blank page from a scanned contract
Use Organize Pages, select the blank page thumbnail, click the trash can icon, confirm the deletion, and save. This is faster and cleaner than trying to erase the blank page content.
Deleting a typo in a brochure
Use Edit a PDF, click the text box, highlight the typo, and press Delete or Backspace. If the layout shifts, adjust the text box or use the original design file for a cleaner edit.
Deleting a signature before public sharing
Use Redact a PDF in Acrobat Pro. Mark the signature area, apply the redaction, remove hidden information, and save the redacted copy. Do not just place a white rectangle over the signature.
Deleting confidential notes from a reviewed document
Open the Comments panel and delete visible comments. Then run Remove Hidden Information or Sanitize Document to catch review data, metadata, and other hidden leftovers.
Adobe Acrobat Standard vs. Acrobat Pro: Which One Do You Need?
For basic edits, deleting visible text, removing images, and deleting pages, many users can work with Adobe Acrobat Standard or Acrobat Pro, depending on the feature set available in their subscription. However, for proper redaction and sanitizing hidden information, Acrobat Pro is the safer choice. If your PDF contains confidential information, legal material, private records, or anything regulated, use Acrobat Pro’s redaction tools.
A simple way to decide is this: if you are improving the appearance of a PDF, editing tools may be enough. If you are protecting information, use redaction. If you are distributing the document publicly, remove hidden information too.
Extra Experience: Practical Lessons from Deleting PDF Items in Adobe Acrobat
After working with PDFs for long enough, you learn that deleting items is less about pressing a key and more about understanding the personality of the file. Some PDFs behave beautifully. You click a sentence, delete it, save the file, and everyone goes home happy. Other PDFs act like they were assembled during a thunderstorm by twelve different software programs and one haunted scanner.
The first practical lesson is to always keep the original. This sounds obvious, but it is the rule people remember five seconds after they overwrite the only copy. Before editing, save a duplicate with a clear file name such as proposal-edited-draft.pdf or contract-redacted-final.pdf. If redaction is involved, make the name unmistakable. Future you will appreciate the breadcrumb trail.
The second lesson is to zoom in. Many deletion mistakes happen because the page looks fine at 75% zoom. Then someone prints it, and suddenly there is a tiny leftover line, partial logo, or mysterious dot where an object used to be. Zoom to 150% or 200% and inspect the edited area. This is especially important with scanned PDFs, charts, signatures, and layered graphics.
The third lesson is to search after deleting. If you removed a client name, account number, address, or internal phrase, use Acrobat’s search function to look for it again. If the term still appears, it may exist somewhere else in the document, in hidden OCR text, in a comment, or in metadata. Search is the PDF equivalent of checking under the couch cushions before declaring the living room clean.
The fourth lesson is to treat cropping as cosmetic. Cropping can make a page look cleaner, but it is not a privacy strategy. If you crop out a margin containing confidential notes, those notes may still be present in the file structure. For harmless scanner edges, crop away. For sensitive information, redact and sanitize.
The fifth lesson is to review comments before sending. Comment balloons, highlights, sticky notes, and drawing marks often contain informal language that was never meant for the final audience. A polished report can quickly become awkward if a comment says, “Check this number; it seems wrong,” or “Do we really want to promise this?” Delete comments and remove hidden information before sharing the final version.
The sixth lesson is to use the right tool for the job. Delete pages with Organize Pages. Delete ordinary visible text with Edit a PDF. Delete private information with Redact a PDF. Remove invisible leftovers with Sanitize Document. This workflow may sound fussy, but it prevents the classic PDF disaster: the document looks clean, yet the removed information still exists underneath.
Finally, do one last reality check by opening the PDF in another reader or browser. If the file looks right outside Acrobat, the odds are better that your recipient will see what you intended. PDFs are popular because they preserve layout, but they are not magic. Give them a final inspection before sending them into the world wearing their little digital suit and tie.
Conclusion
Learning how to delete items in PDF documents with Adobe Acrobat is really about choosing the correct deletion method. Use Edit a PDF for everyday text, image, and object changes. Use Organize Pages when an entire page needs to go. Use Prepare a form for fillable fields. Use Redact a PDF in Acrobat Pro when information must be permanently removed. Then use hidden-information removal or sanitization before sharing sensitive files.
The golden rule is simple: if the deleted item is private, confidential, legal, financial, medical, or embarrassing enough to make your stomach perform gymnastics, do not merely hide it. Redact it, sanitize it, save a new copy, and test the result. Your PDF will be cleaner, safer, and much less likely to become the main character in an office horror story.
SEO Tags
Note: This article is based on current Adobe Acrobat workflows and widely accepted PDF redaction, editing, privacy, and document-cleanup practices.