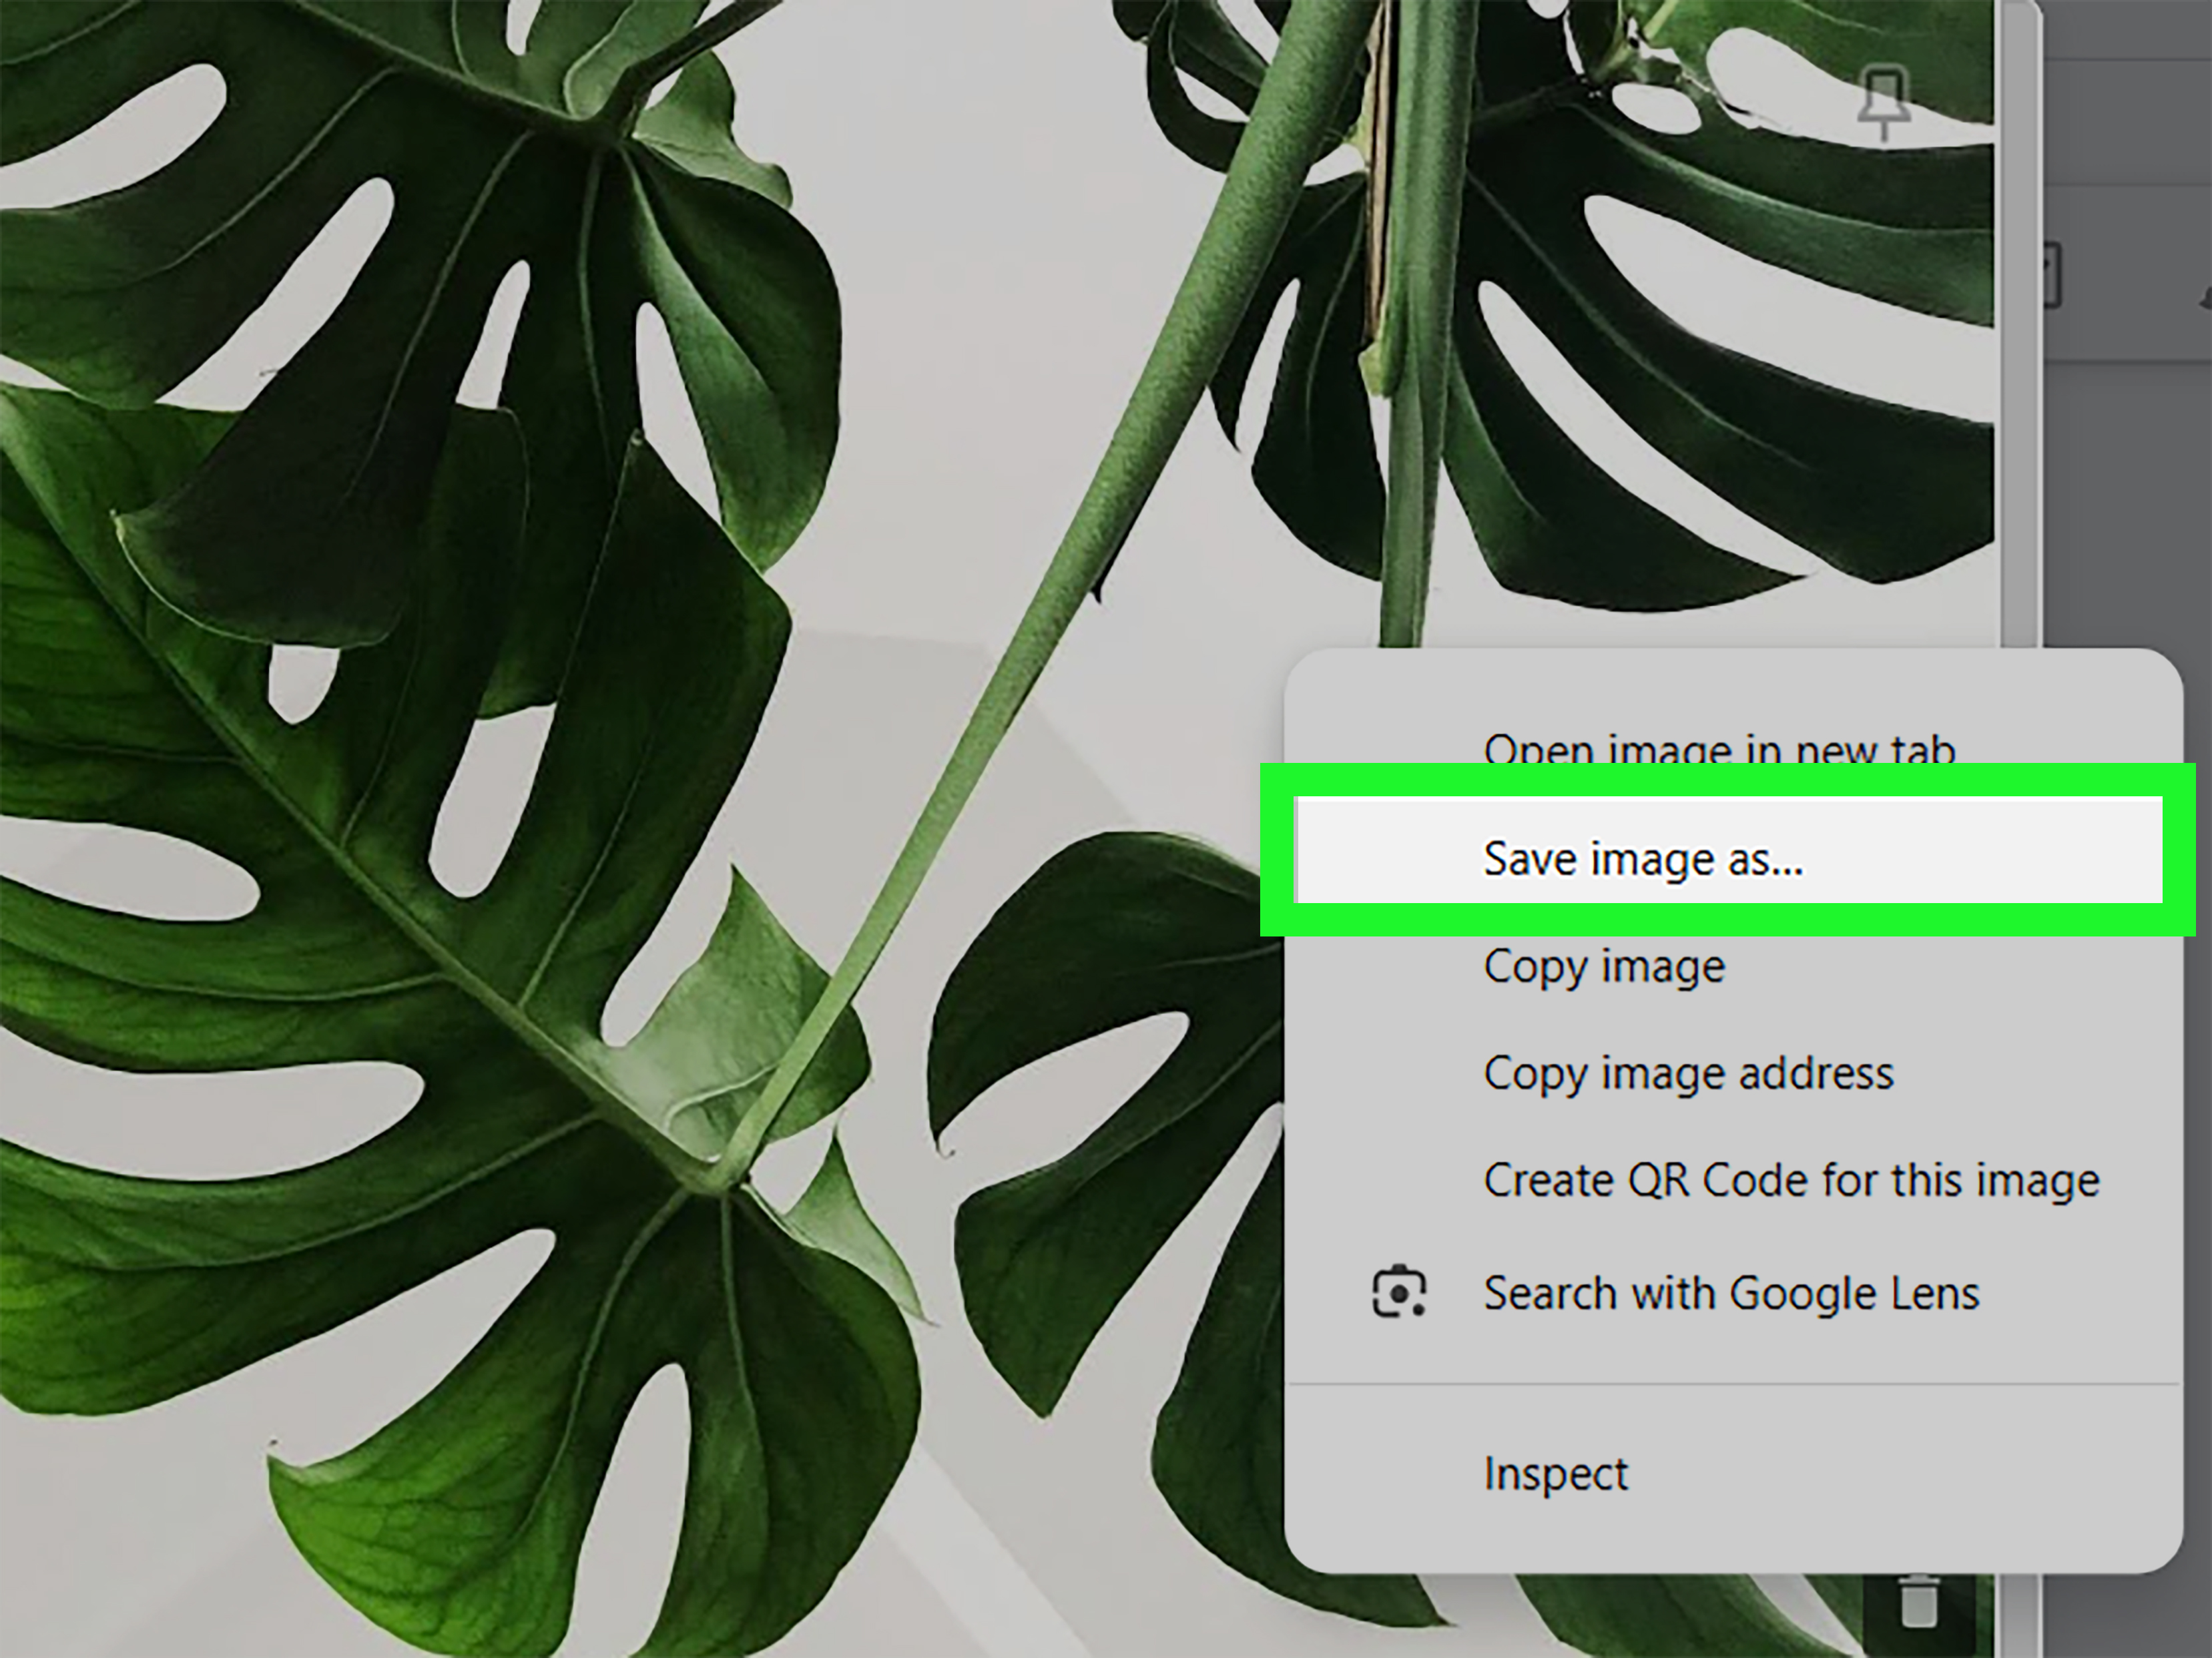

Google Docs is wonderful for writing, editing, collaborating, and pretending you are “almost done” with a project at 1:17 a.m. But when it comes to downloading an image from a Google Docs file, things get oddly mysterious. You right-click an image expecting the classic “Save image as” option, and Google Docs politely responds with the digital equivalent of a blank stare.
The good news? You are not trapped. Whether you need one picture, every image in a document, a quick visual copy, or a clean reusable file, there are several practical ways to save images from Google Docs without losing your sanity. This guide breaks down four reliable methods, explains when each one works best, and shares real-world tips for keeping image quality as sharp as possible.
Before jumping in, remember one important rule: only download and reuse images you own, created, licensed, or have permission to use. Google Docs makes it easy to share files, but copyright law does not magically disappear because an image is sitting next to a bullet list.
Why Google Docs Does Not Offer a Simple “Save Image As” Button
Unlike a normal web page, Google Docs is a live editing environment. Images are embedded inside a document canvas rather than displayed as standalone files you can easily grab with a browser right-click menu. That design makes collaboration smoother, but it also means the usual browser shortcut for saving images does not appear.
In plain English: Google Docs is built to edit documents, not act like an image gallery. So instead of a direct download button, you need to use a workaround. Luckily, these workarounds are not shady, complicated, or reserved for people who speak fluent keyboard shortcut. Most take less than a minute once you know where to click.
Quick Comparison: Which Method Should You Use?
| Method | Best For | Image Quality | Difficulty |
|---|---|---|---|
| Download as Web Page | Saving all images at once | Usually good, but may vary | Easy |
| Save to Google Keep | Downloading one or two images | Good for quick use | Easy |
| Publish to Web | Saving a visible image from a public-style page | Good for simple cases | Medium |
| Screenshot Method | Fast captures when quality is not critical | Screen-resolution only | Very easy |
Method 1: Download the Google Doc as a Web Page
If your document has several images, this is usually the best method. Instead of rescuing images one by one like a tiny digital firefighter, you can download the entire document as a zipped web page. Inside the ZIP file, Google Docs creates a folder containing the document’s images.
How to do it
- Open your Google Docs file.
- Click File in the top menu.
- Choose Download.
- Select Web Page (.html, zipped).
- Find the downloaded ZIP file on your computer.
- Extract or unzip the file.
- Open the extracted folder and look for an images folder.
- Copy or move the image files wherever you need them.
Why this method works so well
This method is efficient because it grabs every image in the document in one operation. If you are working with a report, tutorial, recipe, school handout, marketing draft, or long blog outline full of screenshots, this is the closest thing to a bulk image downloader built into Google Docs.
It is also cleaner than copying and pasting images into another program. You do not need to open Paint, Preview, Photoshop, Canva, or any other editor. The images are already separated for you, neatly tucked away in a folder like they packed their own little suitcases.
When to use it
Use the web page download method when you need multiple images, want to avoid screenshots, or need a relatively clean export from the original document. It is especially useful for content teams, bloggers, virtual assistants, students, teachers, and anyone who has inherited a Google Doc full of visuals and a deadline breathing dramatically nearby.
Possible downside
Image quality can vary depending on how the image was inserted and how Google exports the file. If the original image was already compressed, stretched, cropped, or pasted from another source, downloading the document as a web page will not magically restore it to premium billboard quality. Still, for most everyday uses, this method is the most practical and reliable.
Method 2: Save the Image to Google Keep
Google Keep is Google’s note-taking app, but it also works as a handy escape hatch for images trapped inside Google Docs. This method is great when you only need one or two pictures and do not want to download the whole document.
How to do it
- Open the Google Docs document.
- Right-click the image you want to download.
- Choose View more actions if that option appears.
- Select Save to Keep.
- A Google Keep sidebar should appear on the right.
- Right-click the image inside the Keep note.
- Choose Save image as.
- Name the file and save it to your computer.
Why this method is useful
The Google Keep trick feels like discovering a secret door behind a bookshelf. Google Docs itself does not hand you a normal image-saving option, but once the image appears in Keep, your browser usually treats it more like a regular image. That means you can right-click and save it like you expected to do in the first place.
This method is fast, simple, and does not create a folder full of extra HTML files. If your goal is to grab one logo, one chart, one photo, or one screenshot from a document, Google Keep is often the easiest route.
When to use it
Use Google Keep when you need a small number of images and want a quick save without exporting the entire document. It works especially well for profile photos, small illustrations, screenshots, and single graphics inserted into a shared Doc.
Possible downside
If you are handling ten, twenty, or fifty images, do not use this method unless you enjoy repetitive clicking as a lifestyle choice. For multiple images, the web page ZIP method is faster. Also, depending on your account settings, browser, and workspace permissions, the Keep sidebar may not always behave exactly the same for every user.
Method 3: Publish the Google Doc to the Web
Publishing a Google Doc to the web turns the document into a web-accessible page. Once the document appears as a published page, images may be easier to save with the browser’s right-click menu.
This method can be effective, but it comes with a giant blinking caution sign: publishing can make the document accessible through a public-style link. Do not use this method for private documents, confidential business materials, client files, personal records, unpublished research, school records, or anything that would make your stomach drop if the wrong person saw it.
How to do it
- Open your Google Docs file.
- Click File.
- Go to Share.
- Select Publish to web.
- Click Publish and confirm if prompted.
- Copy the published link.
- Open the link in a new browser tab.
- Right-click the image you want.
- Choose Save image as.
- Return to the document’s publish settings and stop publishing when finished.
Why this method works
A published document behaves more like a standard web page than an editable Google Doc. That makes browser image-saving options more likely to appear. In some cases, it is the quickest way to grab a visible image without downloading the entire file as a ZIP archive.
When to use it
Use this method only when the document is safe to publish, even temporarily. It can be useful for public newsletters, open educational resources, website drafts, press materials, public event pages, or documents that are already meant to be shared widely.
Possible downside
Privacy is the big issue. If the document contains sensitive information, skip this method immediately. Also, if the document has many images, saving them one by one from the published page can become tedious. In that case, the web page ZIP method is still the better choice.
Method 4: Take a Screenshot
The screenshot method is not technically downloading the original image. It captures what appears on your screen. Think of it as taking a photo of a photo. It is quick, it works almost everywhere, and it is perfect when you need a fast visual reference rather than a pristine original file.
How to do it on Windows
- Open the Google Docs file and zoom in so the image appears clearly.
- Press Windows + Shift + S.
- Select the rectangular snip option.
- Drag around the image area.
- Open the screenshot notification or paste the capture into an editor.
- Save the file as PNG or JPEG.
How to do it on Mac
- Open the image in Google Docs and make it as large and clear as possible.
- Press Shift + Command + 4.
- Drag to select the area around the image.
- Release the mouse or trackpad.
- Find the screenshot on your desktop unless your save location has been changed.
When to use it
Use screenshots for quick references, temporary files, annotations, mockups, visual notes, and situations where exact image quality is not essential. For example, if you only need to show a teammate which chart you mean, a screenshot is more than enough. If you are preparing a print brochure, product page, or professional design asset, do not rely on a screenshot unless there is no other option.
Possible downside
Screenshots capture screen resolution, not the original image file. That means the final result can be blurry, smaller than the source, or missing transparency. If you zoom in before taking the screenshot, you can improve the result, but it still will not match the original image quality in many cases.
Best Method by Situation
If you need all images
Choose File > Download > Web Page (.html, zipped). It is the most efficient method and avoids endless right-clicking.
If you need one image
Use Save to Keep. It is fast, tidy, and beginner-friendly.
If the document is already public
Use Publish to web, save the image, then stop publishing if the page does not need to remain live.
If you just need a quick visual
Use a screenshot. It is not perfect, but it is fast enough to save the day when the day is being dramatic.
How to Keep Image Quality as High as Possible
Downloading an image from Google Docs is only half the battle. The other half is making sure the image does not look like it was faxed through a potato. Here are a few practical ways to protect quality:
- Start with the original file when possible. If you can ask the document owner for the original image, do that first.
- Avoid screenshots for professional use. They are convenient, but they capture pixels from your screen rather than the original file.
- Do not enlarge small images. Stretching a tiny picture makes it blurry, not heroic.
- Use PNG for graphics and screenshots. PNG is often better for text, interface captures, icons, and transparent images.
- Use JPEG for photos. JPEG is usually fine for standard photographic images.
- Check the file after saving. Open it and zoom in before using it in a website, presentation, or printed material.
Common Problems and Easy Fixes
The image looks blurry after saving
The image may have been inserted at low resolution, compressed during export, or captured with a screenshot. Try downloading the document as a web page first. If that still looks poor, ask for the original upload.
The Keep option does not appear
Try opening the document in Google Chrome, make sure you are signed into the correct Google account, and check whether your school or workplace account restricts Keep access. If it still does not appear, use the web page ZIP method.
The ZIP file has too many files
That is normal. The export includes an HTML version of the document plus supporting files. Open the folder named something like “images” and ignore the rest unless you need the web page itself.
The image has a weird file name
Also normal. Exported images often have generic names. Rename them immediately with something descriptive, such as homepage-hero-image.png or team-photo-june.jpg. Future you will be grateful and possibly less cranky.
Real-World Experiences: What Actually Works Best
After working with Google Docs in content workflows, the biggest lesson is simple: the “best” method depends on how many images you need and what you plan to do with them. People often waste time trying three random tricks when the right choice was obvious from the beginning.
For example, when preparing blog content from a Google Doc, the web page ZIP method is usually the winner. Writers and editors often place screenshots, product photos, diagrams, or example graphics throughout a draft. Downloading each image manually is slow and easy to mess up. One missed screenshot can delay publishing, especially if the editor discovers it after formatting the article in WordPress. Exporting the Doc as a zipped web page gives you one folder to inspect, rename, compress, and upload. It turns a messy treasure hunt into a neat little production step.
For one-off saves, Google Keep feels faster. Suppose someone sends you a document with a single headshot, badge, chart, or classroom image. Exporting the whole document would work, but it is like renting a moving truck to carry one coffee mug. Right-clicking the image, sending it to Keep, and saving from there is usually quicker. It also avoids cluttering your Downloads folder with HTML files you will forget about until your computer starts judging you.
The publish-to-web method is more situational. It can be handy when a document is already public or intended for broad sharing, but it should not be your first choice for private material. The moment you publish a document to the web, you need to think about access. Even if the link is not promoted, it is still a published version. For internal company drafts, client documents, student work, personal records, or anything confidential, skip this method. Convenience is nice; accidental exposure is not.
Screenshotting is the emergency snack of image extraction. It is not fancy, but it is there when you need it. Screenshots are useful for quick messages, bug reports, visual explanations, and rough references. If a teammate asks, “Which image are you talking about?” a screenshot is perfect. But if you are building a landing page, printing a flyer, or creating a polished presentation, screenshot quality can disappoint you at the worst possible time. Use it when speed matters more than resolution.
A practical workflow is to first ask: “Do I need one image or all images?” If you need all images, download as a web page. If you need one image, try Google Keep. If Keep is unavailable, use the web page method anyway. If the document is public and simple, publishing can work. If you only need a visual reference, take a screenshot and move on with your life.
Another helpful habit is renaming files immediately after saving them. Exported images often come with generic names that mean nothing two days later. Instead of leaving files as image1.png and image2.jpg, rename them based on their purpose. Try names like google-docs-image-download-example.png, sales-chart-q2.png, or teacher-handout-diagram.jpg. This small step makes uploading, organizing, and SEO optimization much easier.
Finally, always check permissions. Just because an image is inside a Google Doc does not mean it is free to reuse. If you are publishing the image online, confirm that you own it, created it, purchased it, or have permission to use it. A clean workflow is not only about saving time; it is also about avoiding unpleasant copyright surprises later.
Conclusion
Google Docs may not offer a big shiny “Download image” button, but saving images from a document is completely possible. For most people, the best method is downloading the file as a zipped web page because it collects all images in one folder. For single images, Google Keep is quick and convenient. Publishing to the web works for public-safe files, while screenshots are best for fast references when image quality is not the top priority.
The trick is choosing the right method before you start clicking around like you are defusing a tiny office software bomb. Once you know the four options, downloading images from Google Docs becomes simple, repeatable, and far less annoying.