
Charging cables have a special talent: Leave three of them alone on a table, and by morning they will have formed a knot complicated enough to qualify for maritime certification. Phones disappear beneath tablets, earbuds wander away, and somebody inevitably steals the one USB-C cable that actually works.
A pallet scrap charging station solves this small but persistent household problem with reclaimed wood, a compact organizer, and sensible cable management. It provides designated spaces for phones, tablets, smartwatches, earbuds, and other everyday electronics while hiding most of the cord clutter behind a rustic wooden shell.
Better yet, this DIY charging station does not require expensive lumber or advanced cabinetmaking skills. With clean pallet boards, basic tools, and a carefully selected power strip or USB charger, you can build an attractive desktop or wall-mounted organizer in an afternoon. The project draws on proven ideas used in reclaimed-wood charging docks, device organizers, cable-management boxes, and compact entryway stations.
What Is a Pallet Scrap Charging Station?
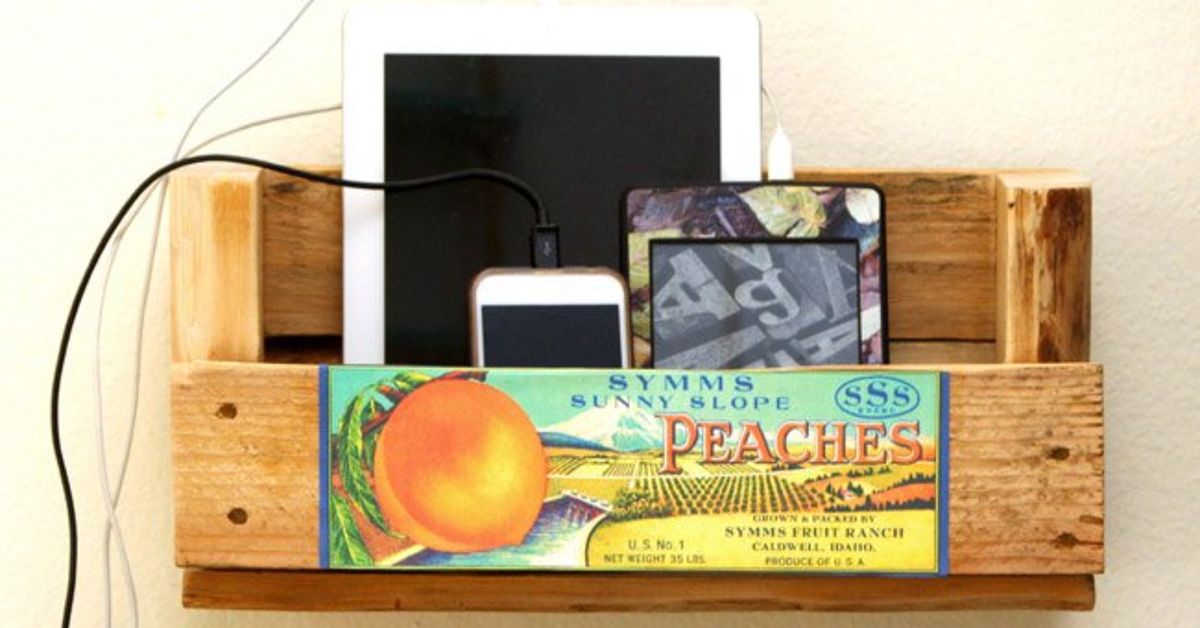
A pallet scrap charging station is a small wooden organizer constructed from boards salvaged from a shipping pallet. It normally contains several divided compartments for electronic devices, openings for charging cables, and a hidden or partially concealed area for a power strip and charging adapters.
The simplest version resembles a rustic mail sorter. Devices stand upright in separate slots while their cables pass through holes in the bottom or rear panel. A more elaborate version may include a hinged lid, a removable back, a smartwatch shelf, labeled compartments, or a wall-mounting cleat.
The design works especially well in an entryway, kitchen command center, bedroom, home office, or family room. Instead of scattering electronics across several outlets, everyone gets one predictable place to drop off and charge a device.
Why Build One From Pallet Scraps?
It reduces visible clutter
A dedicated charging organizer keeps devices upright, separates their cables, and prevents chargers from spreading across a countertop like electronic ivy. Rear cable openings and an enclosed cord area create the clean appearance found in many commercially made charging tables and device organizers.
It makes useful material out of scrap
Pallet boards often have nail holes, saw marks, knots, color variations, and weathered edges. Those imperfections are not defects in this project; they are the design department. Reclaimed lumber provides instant character while reducing the need to purchase new decorative wood.
It is easy to customize
You can size the station for two phones or an entire household collection. You can leave the wood rustic, paint it, stain it, stencil a vintage shipping label on the front, or add name tags for each family member. It can look like a farmhouse crate, an industrial organizer, or a compact modern dock.
It is beginner-friendly
The project consists mainly of straight cuts and simple butt joints. Minor gaps usually enhance the reclaimed appearance rather than ruin it. In other words, this is one of the rare woodworking projects where a slightly crooked board may be promoted to “authentic rustic detail.”
Plan the Charging Station Before Cutting
Begin by counting the devices you expect the station to hold. Include phones, tablets, wireless-earbud cases, smartwatches, portable batteries, and any other items that routinely compete for outlet space.
A practical four-device desktop station can be approximately 16 to 20 inches wide, 8 to 10 inches high, and 4 to 6 inches deep. These dimensions are only a starting point. Measure the actual devices with their protective cases installed because a phone wearing a rugged case may have the waistline of a small sandwich.
Allow approximately 1.25 to 1.75 inches of compartment width for each phone. Tablets may need 2 inches or more. Leave extra room around connectors so cables are not bent sharply where they enter the devices.
Decide whether the power strip will sit behind the station, beneath it, or inside a ventilated rear compartment. The safest and easiest approach is often to mount or secure a listed power strip to the back while leaving its switch, cord, and outlets accessible. Do not permanently wire electrical components into the wooden structure unless the work is designed and completed by a qualified professional.
Materials and Tools
Suggested materials
- Clean, dry pallet boards or other reclaimed wood scraps
- One thin plywood panel for the back, if desired
- Wood glue
- 1-inch or 1.25-inch wood screws
- Small finish nails or brads
- A safety-certified power strip or multiport USB charger
- Rubber grommets for cable holes
- Hook-and-loop cable straps
- Fine and medium-grit sandpaper
- Paint, stain, wax, oil, or clear water-based finish
- Wall anchors or a French cleat for a wall-mounted model
Useful tools
- Tape measure and pencil
- Combination square
- Circular saw, miter saw, jigsaw, or handsaw
- Drill and driver bits
- Hole saw or spade bit
- Orbital sander or sanding block
- Clamps
- Hammer and nail puller
- Safety glasses, hearing protection, gloves, and dust protection
Choose Pallet Wood Carefully
Not every abandoned pallet deserves a second career inside your home. Select boards from a known, clean source and reject wood with oil stains, chemical odors, mold, heavy discoloration, pest damage, or unidentified residue.
International shipping pallets may carry an IPPC treatment mark. USDA APHIS explains that the mark can include a treatment code such as “HT” for heat treatment or “MB” for methyl bromide fumigation. For an indoor DIY project, clean heat-treated wood is generally the preferred choice; avoid boards marked MB and avoid unmarked pallets when their history is unknown.
Inspect every board for embedded nails, staples, screws, and metal fragments before cutting or sanding. Reclaimed lumber may also contain dirt, biological residue, old coatings, or other contaminants that become airborne during machining, so work outdoors or in a well-ventilated shop and wear suitable protection.
How to Build a Pallet Scrap Charging Station
Step 1: Disassemble the pallet
Use a pallet breaker, pry bar, reciprocating saw, or hammer to separate the boards. Work slowly because dry pallet slats can split near the nails. If preserving every inch is not important, cutting through the nails with a metal-rated blade is often faster than trying to pull each board free.
Remove all visible hardware and pass a strong magnet over the wood to locate hidden metal. A forgotten nail can damage a saw blade and transform a peaceful afternoon project into an expensive vocabulary lesson.
Step 2: Clean and dry the boards
Brush away loose dirt and scrub acceptable boards with mild soap and water when necessary. Avoid soaking them. Let the wood dry completely before cutting, gluing, or finishing.
Reject any board that continues to smell unusual, shows spreading mold, or has deeply absorbed stains. A charging station is supposed to organize the kitchen counter, not introduce a mystery from the loading dock.
Step 3: Select the best faces
Lay the boards side by side and decide which surfaces should remain visible. Save interesting nail holes, saw marks, and color changes for the front and side panels. Position cracks, rough edges, and unattractive cuts where they can be trimmed away or hidden at the back.
Mixing boards of slightly different widths can produce a handcrafted appearance, but the bottom and divider pieces should be reasonably flat so devices remain stable.
Step 4: Cut the main components
For a basic desktop model, cut the following parts:
- One bottom panel
- One taller back panel
- One shorter front panel
- Two side panels
- Three to five internal dividers
- Optional narrow rails for supporting smaller devices
A sample four-slot station might use an 18-inch-wide bottom, a 9-inch-high back, a 4-inch-high front, and 5-inch-deep sides. Angle the front edges of the dividers or make the front panel lower so screens remain visible.
Step 5: Sand without erasing the character
Start with approximately 80-grit paper on splinters and severely rough areas, then move to 120 or 150 grit for touchable surfaces. Round over the top edges and compartment openings. There is no need to sand every weathered mark away; the goal is “pleasantly rustic,” not “recently attacked by a beaver.”
Vacuum the dust before finishing. Woodworking guidance commonly recommends progressing through appropriate grits instead of jumping directly to extremely fine paper, which can leave scratches behind or interfere with stain absorption.
Step 6: Drill the cable openings
Mark one cable hole beneath or behind each compartment. Holes between 3/4 inch and 1 inch usually accommodate common USB connectors, although larger plugs may require wider openings.
Drill slowly and support the back of the board with scrap wood to reduce tear-out. Sand every opening thoroughly or install rubber grommets. Sharp wooden edges can wear through cable insulation over time.
You can also cut narrow cable slots from the rear edge toward each hole. Slots make it possible to insert or replace cords without feeding the entire connector through the station.
Step 7: Dry-fit the structure
Assemble the pieces without glue and test them using the actual devices. Confirm that each phone fits with its case, cables connect without severe bends, and the station remains stable when a tablet is placed in the rear compartment.
This is the easiest moment to adjust divider spacing. After the glue dries, the phrase “I wish that slot were a quarter inch wider” becomes much less charming.
Step 8: Assemble the box
Apply wood glue to the joints, clamp the panels in position, and reinforce them with brads or small screws. Predrill screw holes near board ends because pallet wood can split easily.
Install the internal dividers after confirming their spacing. A square helps keep them upright, but slight visual variation is acceptable in a reclaimed-wood project.
For easier maintenance, make the back panel removable with screws rather than permanently gluing it. Access to the cables will be valuable when a connector standard changes again, which history suggests may happen approximately five minutes after you finish the project.
Step 9: Manage the charger and power strip
Secure the power strip with its manufacturer-approved mounting slots, a separate shelf, or removable hook-and-loop straps. Do not drive screws through the power strip housing. Keep the switch and plug accessible, and provide open space around charging adapters so heat can dissipate.
Bundle excess cable loosely with reusable straps. Avoid tight coils, sharp bends, pinched insulation, and cords trapped between the station and a wall. Labeling each cable at the rear saves time when replacing or troubleshooting chargers.
Step 10: Apply the finish
A clear water-based finish preserves the weathered appearance while making the surface easier to dust. Wax or oil creates a softer, more natural look. Paint provides the most flexibility when the boards have mismatched colors.
Apply thin coats and follow the manufacturer’s drying instructions. Keep finish out of cable holes and mounting slots. Reclaimed-lumber finishing techniques can preserve old patina while blending freshly cut edges into the original surface.
Electrical and Battery Safety
The wooden organizer is a holder, not a homemade electrical appliance. Use commercially manufactured chargers and power strips that carry certification from a recognized testing organization. UL advises looking for appropriate safety certification and inspecting cords, plugs, and strips periodically for damage.
- Do not daisy-chain one power strip into another.
- Do not use extension cords as permanent household wiring.
- Never staple, nail, crush, or sharply bend electrical cords.
- Keep the charging station away from sinks, wet counters, heaters, and direct sunlight.
- Do not place high-wattage appliances such as heaters on the same power strip.
- Leave airflow around chargers, power banks, phones, and tablets.
- Stop using cables with exposed wires, crushed connectors, or damaged insulation.
- Do not charge swollen, cracked, unusually hot, leaking, or recalled batteries.
- Use the charger specified or approved by the device manufacturer.
- Unplug the station before cleaning, modifying, or moving electrical components.
OSHA guidance emphasizes inspecting flexible cords for defects and protecting them from sharp edges, crushing, and improper fastening. CPSC recall notices also demonstrate that defective lithium-ion batteries and poorly made charging products can overheat and create fire or burn hazards.
Design Ideas and Useful Upgrades
Add a smartwatch platform
Attach a small raised shelf or wooden peg to hold a magnetic watch charger. Make the piece removable so you can replace the charging puck when upgrading the watch.
Create a wall-mounted version
A wall-mounted charging station frees countertop space and works well near an entryway outlet. Use a French cleat or properly rated wall anchors, and position the station where cords will not cross a walkway.
Install a hinged cable compartment
A hinged rear or bottom panel hides charging blocks while preserving access. Include generous ventilation openings and never pack adapters tightly together.
Add labels
Small metal label holders, painted names, or stenciled numbers make shared charging stations easier to use. Labels can identify family members, device types, or cable connections.
Build a removable divider system
Cut shallow grooves or attach narrow wooden guides so the dividers slide in and out. This allows the station to adapt when phones become wider, tablets become thinner, or someone purchases a protective case that appears capable of surviving reentry from orbit.
Add a tray for small accessories
A shallow front drawer or side cup can hold adapters, styluses, memory cards, spare cables, and earbuds. Keep loose metal objects away from exposed connectors and charging contacts.
Common Mistakes to Avoid
Using questionable pallet wood: Attractive grain is not worth bringing chemical residue, mold, or pests indoors.
Making compartments too narrow: Measure devices with their cases and leave room for your fingers.
Hiding the power strip completely: You should be able to reach the switch, inspect the strip, and disconnect it quickly.
Blocking ventilation: A charging compartment should conceal clutter without becoming an insulated wooden oven.
Skipping cable-edge protection: Sand holes smooth and add grommets where cords contact rough wood.
Gluing every panel permanently: Chargers fail, cables wear out, and device connectors change. Removable access panels make repairs much easier.
Overloading the strip: Phones and small electronics generally draw modest power, but the station should not become the neighborhood headquarters for space heaters, coffee makers, and toaster ovens.
Maintaining the Charging Station
Disconnect the power before cleaning. Remove dust with a dry microfiber cloth or vacuum fitted with a soft brush. Dust buildup around adapters can trap heat, so inspect the hidden cable compartment regularly.
Every few months, check that screws remain tight, wall mounts are secure, cords have not become pinched, and cable openings remain smooth. Examine the power strip and charging adapters for discoloration, cracking, loose connections, buzzing, unusual odors, or excessive heat.
Replace worn components instead of attempting improvised electrical repairs. The pallet enclosure may last for years, but chargers and cables are consumable parts that deserve periodic inspection.
Conclusion
A pallet scrap charging station turns an ordinary pile of reclaimed boards into a practical home organizer. It provides a predictable landing place for electronics, reduces cable clutter, and adds warmth that plastic charging docks rarely offer.
The most successful design is not necessarily the fanciest. A stable box, comfortably sized compartments, smooth cable openings, accessible certified charging equipment, and adequate airflow are more valuable than complicated built-in electronics. Start with a simple layout, test it with your real devices, and make the back removable. Future youand future you’s collection of mysteriously incompatible cableswill be grateful.
Experience Notes: Lessons From Building and Using a Pallet Scrap Charging Station
The biggest lesson from building a pallet scrap charging station is that choosing the wood takes longer than assembling the box. A pallet may look beautifully weathered from ten feet away, but close inspection often reveals split ends, twisted boards, stubborn nails, and stains that deserve no further investigation. Sorting several pieces before committing to a layout produces a cleaner, stronger result.
It is also worth preparing more wood than the cutting list requires. Pallet boards are unpredictable. One may split while a nail is removed, another may reveal hidden metal during cutting, and a third may warp after it is brought into a dry indoor space. Having two or three spare pieces prevents the project from stopping halfway through.
During layout, actual devices are more useful than measurements alone. A compartment that appears generous on paper can feel tight when a charging plug, protective case, pop-out grip, and camera bump are added. Placing the phones and tablets inside a temporary cardboard mockup is an easy way to test dimensions before cutting wood.
Cable routing deserves equal attention. On an early layout, placing holes directly beneath the center of each phone seemed logical. In practice, the cables rubbed against the front panel and bent sharply. Moving the openings slightly toward the rear produced a gentler cable path and made devices easier to remove.
Another practical improvement is to make the rear access panel removable. Charging blocks come in awkward shapes, and cables occasionally need replacement. A screwed-on panel takes seconds to open, while a permanently glued box requires the patience of a safecracker and the language of a frustrated carpenter.
Finishing the station lightly usually produces the best appearance. Aggressive sanding can remove the gray surface, saw marks, and color variations that made the pallet boards interesting in the first place. Sanding only until the wood is safe to touch preserves the reclaimed character. A matte clear coat then seals loose fibers without making the project look like shiny imitation barn wood.
Daily use reveals small changes worth making. Short cables reduce clutter but may pull devices sideways. Extremely long cables create bulky coils behind the station. Medium-length cords secured with reusable straps offer the best compromise. Small labels at both ends of each cable are surprisingly helpful, especially when several black USB cables gather together and pretend they have never met you.
Ventilation is another real-world concern. Charging adapters may feel warm during normal operation, particularly when powering several devices. An open back or large ventilation cutouts provide better airflow than a tightly enclosed compartment. The wooden shell should organize the electrical equipment, not smother it.
Finally, placement matters. A station near the door encourages family members to use it, but it should not sit where bags, coats, drinks, or keys are routinely dropped on top. A dry countertop corner, console table, or wall near an existing outlet works well. Once everyone develops the habit of using the station, missing chargers become less common, surfaces remain clearer, and the nightly search for a working cable becomes wonderfully boring.
Note: This project is intended to organize commercially manufactured charging equipment. It is not a substitute for permanent electrical wiring or professional electrical work. Follow all charger and power-strip instructions, applicable local requirements, and product recall notices.