
Note: This article is written for web publication and is based on real maker, robotics, SVG, pen-plotter, and Doctor Who cultural information. It does not include source links inside the publishable body content.
When a Drawing Robot Meets a Sci-Fi Icon
A plotterbot drawing Daleks sounds like something a very caffeinated engineering student would pitch at 2 a.m.: “What if a wall-mounted robot used strings, motors, and math to draw one of the most recognizable villains in science fiction?” Strangely enough, that is not just a late-night idea. It is a perfect example of what makes the maker movement so entertaining: a small machine, a big sheet of paper, a pen, and just enough nerdy ambition to turn a pop-culture silhouette into mechanical choreography.
At its heart, a plotterbot is a drawing robot. Instead of printing with ink jets or toner, it physically moves a pen across a surface. That difference matters. A printed Dalek image may look clean, but a plotted Dalek has a different personality. You can see the pauses, the direction changes, the pressure variation, and the slightly imperfect rhythm of the machine. It is digital art wearing fingerprints.
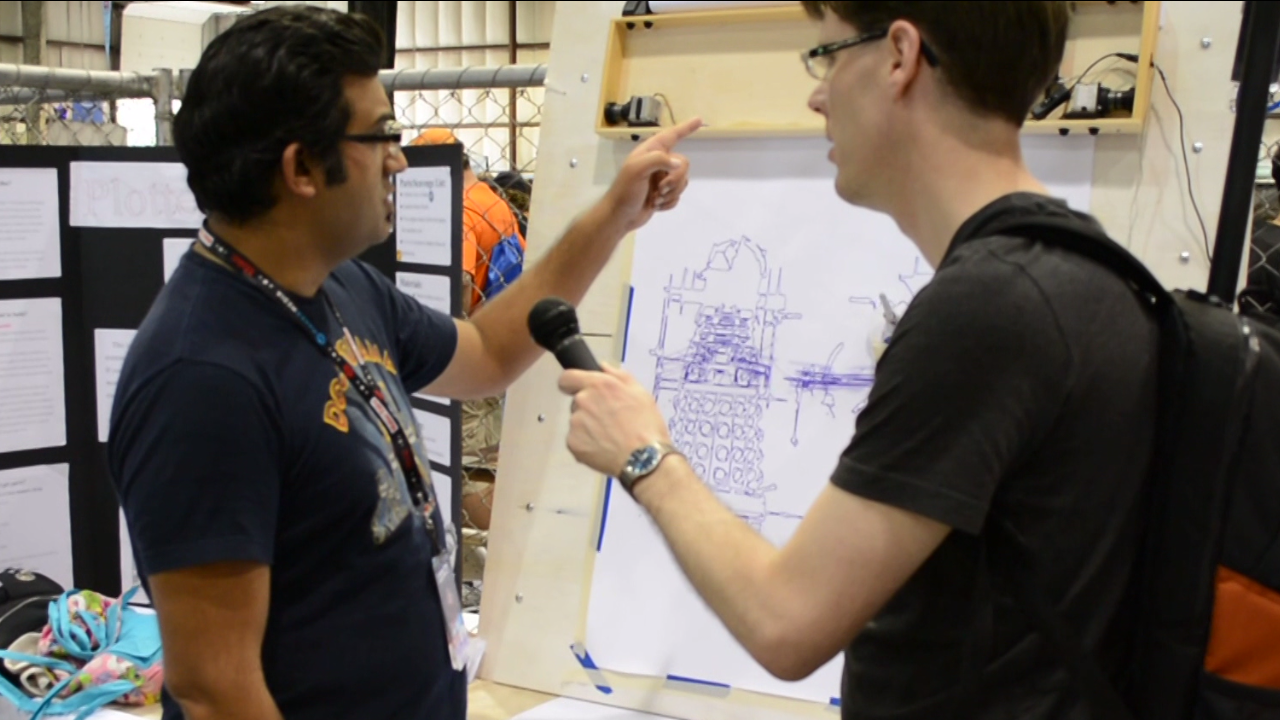
The phrase “Plotterbot Drawing Daleks” became memorable in maker circles because it combines three irresistible things: robotics, fan art, and public demonstration. A wall-mounted PlotterBot shown at Maker Faire used two strings, two motors, Arduino-based control, and clever software to move a pen over paper. One of the drawings it produced was a Dalek-inspired poster, turning a classic Doctor Who design into a slow, hypnotic performance.
What Is a Plotterbot?
A plotterbot is a computer-controlled drawing machine. In many DIY versions, the robot uses stepper motors or servo motors to move a pen along X and Y coordinates. Unlike a regular printer, which hides most of its work inside a plastic shell, a plotterbot performs in public. The viewer watches the artwork appear line by line, which is half the charm.
The PlotterBot associated with the Dalek drawing was a vertical, wall-based machine. Instead of using rigid rails like a desktop CNC plotter, it relied on two strings connected to a pen carriage. Each string wound around a motorized spool. By changing the length of the left and right strings, the robot could position the pen anywhere within its drawing area. Gravity helped keep tension on the system, and software translated drawing coordinates into motor movement.
The Simple Genius of Two Strings and Two Motors
The two-string design is wonderfully minimal. The machine does not need a heavy gantry, long metal rails, or an industrial frame. It can be mounted above a sheet of paper, making it ideal for large vertical drawings. That simplicity also creates engineering challenges. The robot must calculate how much string to release or retract on each side. Because the pen moves in arcs and diagonals rather than along fixed rails, the math is more interesting than “move right, move down.”
In practical terms, this means the machine needs calibration. The distance between motors, the paper size, pen position, string tension, and motor steps all affect the final drawing. If one measurement is wrong, your mighty Dalek may come out looking like it has been through a washing machine. Charming? Maybe. Accurate? Not quite.
Why Daleks Are Perfect for Plotter Art
Daleks are visually ideal for pen plotting because their design is bold, geometric, and instantly recognizable. The classic Dalek form includes a domed head, eyestalk, armored body, horizontal bands, and rows of circular details. For a drawing robot, that is a delicious buffet of lines, curves, repeated shapes, and high-contrast structure.
A Dalek also gives a plotterbot a chance to show off both precision and patience. The dome demands smooth arcs. The body requires straight verticals and angles. The circular bumps test repetition. The eyestalk and appendages require clean directional changes. A messy drawing still looks vaguely robotic, but a well-plotted Dalek looks like a machine drew another machine, which is the kind of poetic geekery the internet was invented for.
The Pop-Culture Advantage
Doctor Who has been part of television history since the 1960s, and Daleks quickly became among the show’s most famous creations. Their shape is so iconic that even a simplified outline can be recognized by fans. That makes them perfect for maker demonstrations. A random test pattern may impress engineers, but a Dalek makes people stop, smile, point, and say, “Wait, is that a drawing robot making Doctor Who art?”
That emotional reaction matters. Robotics can feel intimidating when presented as equations, boards, drivers, and firmware. But when the machine draws something funny, familiar, and dramatic, the technology becomes approachable. A Dalek drawing turns a robotics demo into a story.
How a Plotterbot Draws a Dalek
The process usually begins with a digital drawing. For pen plotters, vector graphics are especially useful because they describe shapes as paths, curves, and lines rather than pixels. SVG, or Scalable Vector Graphics, is one of the most common formats for this kind of work. A vector Dalek can be scaled up or down without becoming blurry, which is perfect when moving from a computer screen to a large sheet of paper.
Once the artwork is prepared, the file must be converted into instructions the robot can follow. This may involve simplifying paths, removing unnecessary details, ordering lines efficiently, and deciding when the pen should lift or touch the paper. The robot does not “see” a Dalek. It sees motion commands. To the machine, the fearsome sci-fi villain is basically a long to-do list of coordinates.
Step 1: Prepare the Vector Art
A clean Dalek plot starts with clean vector artwork. Too many tiny details can slow the machine down or create shaky results. Thick filled areas may need to be converted into outlines, hatching, stippling, or repeated line patterns. Since a pen plotter draws with a physical tip, the artist must think differently from a digital illustrator. Every line costs time. Every extra detail increases the chance of error. The best plotter art often balances detail with restraint.
Step 2: Choose the Pen and Paper
Pen choice can transform the final piece. A fine technical pen creates crisp mechanical detail. A Sharpie gives bold, poster-like confidence. A fountain pen adds beautiful variation but may require smoother paper and slower motion. For a Dalek drawing, a red marker can make the piece feel like a vintage warning poster, while black ink gives it a blueprint or comic-panel mood.
Step 3: Calibrate the Machine
Calibration is where the glamour temporarily leaves the room. The maker checks the motor spacing, confirms the drawing area, tests string tension, and makes sure the pen carriage moves smoothly. This step is not flashy, but it is the difference between a sharp Dalek and an accidental abstract pepper shaker.
Step 4: Let the Robot Perform
Once the file is loaded, the plotterbot begins its slow dance. The motors turn, the strings adjust, and the pen glides across the page. A large drawing can take hours. That is not a weakness; it is part of the appeal. Watching a plotterbot work is like watching a mechanical monk illuminate a manuscript, except the monk is powered by microcontrollers and has strong opinions about vector paths.
The Maker Hardware Behind the Magic
The famous PlotterBot setup used maker-friendly electronics, including an Arduino Mega and custom motor-control hardware. The Arduino Mega is popular in robotics projects because it provides many input and output pins, giving builders room to connect motors, displays, storage modules, buttons, sensors, and other components. In the PlotterBot example, the machine also used an SD card for drawing files and a small touchscreen interface for selecting what to draw.
This is an important part of the story. The project was not just a robot that drew a Dalek; it was a self-contained drawing system. Instead of requiring a laptop to babysit every movement, the robot could read drawing files and offer a simple user interface. That makes it more practical for exhibitions, classrooms, and maker events.
Why Arduino Works Well for Plotterbots
Arduino boards became popular because they lowered the barrier to building interactive electronics. For a plotterbot, the microcontroller’s job is to coordinate motion. It sends signals to motor drivers, interprets drawing data, manages pen lifts, and may handle buttons or screens. The code does not need to be glamorous. It needs to be reliable, predictable, and patient enough to draw hundreds or thousands of line segments without losing its place.
Modern Alternatives: Desktop Pen Plotters
Today, makers can build a DIY plotterbot or buy a polished pen plotter such as an AxiDraw-style machine. Commercial pen plotters are often more precise, easier to set up, and better supported, while DIY machines offer deeper learning and more tinkering joy. In other words, buying a machine gets you to the art faster; building one teaches you why the art was hard in the first place.
Design Lessons from Plotterbot Dalek Art
A Dalek drawing teaches several useful lessons about robotic art. First, not every digital image is plotter-friendly. Photographs, shaded illustrations, and highly detailed fan art may need major simplification. Second, line order matters. If the robot jumps randomly across the page, the drawing takes longer and may create more pen-lift marks. Third, scale changes everything. A line that looks smooth at postcard size may wobble when enlarged to poster size.
The PlotterBot Dalek poster reportedly took many hours to draw, which highlights one of the most charming truths about plotter art: speed is not the point. A robot can be slow and still be impressive. In fact, slowness makes the process easier to appreciate. The drawing becomes a performance, not just an output.
Fan Art and Copyright Awareness
Daleks are part of a copyrighted entertainment universe, so anyone publishing or selling Dalek-inspired plotter art should be careful. Making a personal fan project, classroom demonstration, or noncommercial maker experiment is different from selling posters or using official imagery without permission. The safest approach for web publication is to discuss the project, show original process photos if available, and avoid distributing copied artwork files based on protected source images.
That does not make the topic less exciting. It simply means makers should respect the creative worlds they love. A Dalek-inspired original robot sketch, a geometric homage, or a discussion of the engineering process can still be fun, educational, and publishable without pretending intellectual property does not exist.
Why People Still Love Drawing Robots
Drawing robots sit at a sweet spot between art and engineering. They are easier to understand than humanoid robots, safer than heavy CNC machines, and more expressive than a blinking LED project. When a plotterbot draws, it gives immediate feedback. If the motor skips, you see it. If the pen dries out, you see it. If the vector path is messy, you definitely see it, usually right in the middle of the robot’s face.
For beginners, plotterbots are a friendly gateway into robotics. They introduce motors, coordinates, mechanical design, calibration, file formats, and creative coding. For artists, they offer a new kind of mark-making. The machine is not just a tool; it becomes a collaborator with quirks. Some artists lean into those quirks, using pen wobble, imperfect registration, and layered passes as part of the final style.
Plotter Art in the Age of AI Images
In a world overflowing with instant digital images, a pen plotter feels refreshingly physical. It cannot generate a thousand polished pictures in ten seconds. It has to move through space. It has to drag ink across paper. It can fail in visible, sometimes hilarious ways. That physical limitation gives plotter art character.
A plotterbot drawing Daleks is especially interesting because it reverses expectations. The Dalek is a fictional machine famous for cold, relentless purpose. The plotterbot is a real machine doing something delicate, slow, and artistic. One machine symbolizes menace; the other carefully holds a pen. That contrast is delightful.
How to Create Your Own Plotterbot Dalek-Style Project
If you want to create a Dalek-style plotter project, begin with the concept rather than the hardware. Decide whether you want a clean poster, a technical blueprint look, a geometric abstraction, or a playful robot-made fan sketch. Then build the workflow around that goal.
Choose Your Machine
A DIY hanging plotter is great for large wall art and maker learning. A desktop pen plotter is better for precision and repeatability. A tiny CNC-style drawing robot is excellent for beginners who want a small, affordable project. The right choice depends on whether your priority is size, accuracy, cost, portability, or educational value.
Create Original Vector Paths
Use vector software to create your own Dalek-inspired design. Keep the silhouette bold and the internal details organized. Convert strokes to paths only when needed, simplify unnecessary nodes, and test small before plotting large. A five-minute mini test can save you from an eight-hour poster disaster.
Test With Simple Shapes First
Before drawing a full Dalek, test circles, diagonals, rectangles, and repeated dots. These shapes reveal calibration problems quickly. If circles become eggs or vertical lines lean like they are tired, fix the machine before sending it into battle against a full poster.
Document the Process
For web content, photos and short videos of the robot working are often more compelling than the finished drawing alone. Show the pen carriage, the string system, the software screen, the failed tests, and the final plot. Readers love seeing the mess behind the magic. Also, failure photos are weirdly comforting. They say, “Yes, this impressive robot also had a Tuesday.”
Common Problems and Practical Fixes
Plotterbot projects can be wonderfully satisfying, but they are rarely perfect on the first try. Here are the issues makers commonly face when producing large, detailed drawings such as Daleks.
Wobbly Lines
Wobbly lines often come from loose string tension, a pen holder that flexes, or a drawing surface that moves. Make sure the paper is taped firmly, the pen carriage hangs consistently, and the strings do not slip on the spools.
Distorted Shapes
If the Dalek dome looks stretched or the circular details become ovals, check calibration. The machine needs accurate measurements for motor spacing and drawing area. Even small errors can become obvious on large plots.
Ink Skips
Ink skipping can happen when the pen angle is wrong, the paper is too textured, or the robot moves too fast. Try a smoother paper, reduce speed, or use a pen with more reliable flow. Markers are forgiving, but they can bleed. Technical pens are crisp, but they can be picky. Choose your tiny ink sword wisely.
Overly Long Plot Times
If the drawing takes forever, simplify the vector file. Remove hidden paths, reduce tiny details, and optimize line order. Plotter time is precious. Do not make the robot draw a hundred invisible lines just because your design file has a secret junk drawer.
Experience Notes: What It Feels Like to Make a Plotterbot Draw Daleks
The first experience related to a project like Plotterbot Drawing Daleks is usually surprise. You may understand the concept intellectually: motors move, strings pull, pen draws. Fine. But the first time the pen actually glides across the paper and produces a recognizable curve, the room changes. Suddenly the machine is not just parts. It has intention, or at least it does a very convincing impression of intention.
The second experience is humility. A plotterbot teaches patience by refusing to care about your schedule. You may want a perfect Dalek poster right now. The robot wants calibration, clean paths, good tension, and a pen that has not quietly dried out since last weekend. It will reveal every shortcut. If the vector file is sloppy, the robot will draw the sloppiness with absolute commitment. If the paper is crooked, the finished piece will look like it is trying to escape the wall.
One of the most memorable parts is the waiting. A large plot can take hours, and during that time you become strangely attached to the machine’s progress. You check on it like it is baking bread. You listen for odd motor sounds. You watch the Dalek slowly emerge from disconnected lines. At first it is just a dome, then a body, then the eyestalk, then the repeating details. Somewhere halfway through, the drawing stops being a technical test and becomes a character appearing on paper.
There is also a social experience. A plotterbot at a maker event attracts people because it is understandable at a glance. Visitors do not need a robotics degree to enjoy it. They can see the strings moving and the pen drawing. Children notice the robot first. Engineers notice the mechanism. Artists notice the line quality. Doctor Who fans notice the Dalek and immediately become emotionally invested. A good plotterbot project creates a tiny crowd of people who all understand it from different angles.
Mistakes become part of the story. A slightly misaligned line may feel disastrous in the moment, but later it becomes proof that the drawing was made physically, not simply printed. A pen blob, a pause mark, or a faint vibration line gives the artwork a handmade-machine quality. That is the magic of plotter art: it is neither fully human nor fully automated. It lives in the collaboration between code, mechanics, materials, and the person brave enough to press start.
Drawing Daleks adds an extra layer of humor. The subject is a fictional machine obsessed with control, yet the real drawing machine is constantly negotiating with friction, gravity, ink, and math. The Dalek may look severe, but the process is full of tiny practical dramas. Will the pen lift correctly? Will the string slip? Will the robot finish the row of circular panels before bedtime? This is maker comedy at its finest: high-concept science fiction meeting masking tape.
The final experience is satisfaction. When the robot finishes and the pen lifts for the last time, the artwork feels earned. You do not just have a Dalek drawing. You have a record of a system working: software translated into motion, motion translated into marks, marks translated into a recognizable image. Whether the result is clean enough for framing or odd enough to make you laugh, it carries a story. That story is why plotterbots remain fascinating. They do not merely make images. They make the process visible.
Conclusion: A Tiny Robot, a Big Poster, and a Lot of Charm
Plotterbot Drawing Daleks is more than a quirky maker headline. It captures a beautiful intersection of robotics, vector art, fan culture, and hands-on learning. A plotterbot turns digital instructions into physical motion, and a Dalek gives that motion a bold, recognizable subject. Together, they show how creative technology can be educational, funny, imperfect, and surprisingly expressive.
For makers, the project is a reminder that sophisticated results can come from simple mechanisms. Two strings, two motors, a microcontroller, and smart software can create large-scale artwork that feels alive as it appears. For artists, it proves that machines can add texture and performance to the creative process. For fans, it is simply delightful to watch a robot draw one of television’s most famous robots. That is not just art. That is peak nerd poetry.
Whether you build your own hanging plotter, experiment with a desktop pen plotter, or simply admire the engineering from a safe distance, the lesson is the same: creative machines are most interesting when they reveal how they work. A plotterbot does not hide the process. It celebrates it, one line at a time.