
That old tile has been staring at you for years. Maybe it is avocado green, dusty pink, builder beige, or decorated with tiny flld be satisfying, but demolition is noisy, messy, expensive, and remarkably good at revealing three additional problems behind the first one.
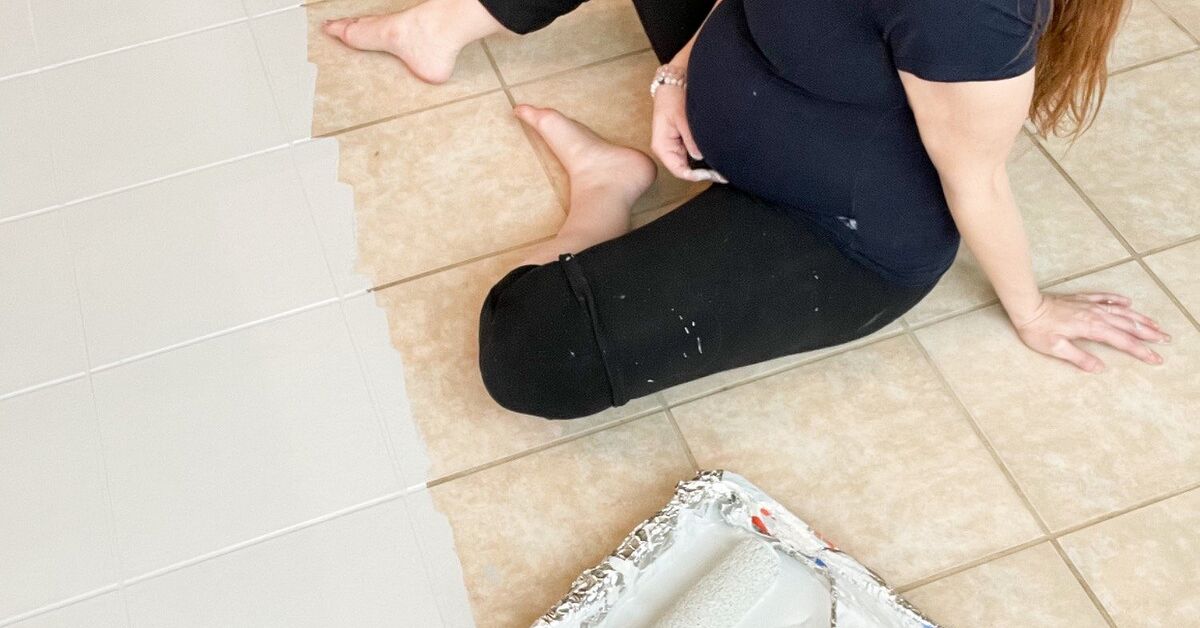
Fortunately, painting tile can provide a dramatic, budget-friendly update without requiring a sledgehammer or a temporary relocation. With the right tile paint, careful surface preparation, and enough curing time, you can refresh a backsplash, bathroom wall, fireplace surround, laundry-room floor, or other suitable tiled surface.
The catch is that tile is deliberately manufactured to resist stains and moisture. In other words, it is also very good at resisting paint. Success depends less on artistic talent and more on cleaning, dulling the glossy finish, choosing a compatible bonding primer, applying thin coats, and resisting the urge to use the room before the coating has cured.
Can You Really Paint Over Tile?
Yes, many ceramic and porcelain tiles can be painted. However, painting tile is best viewed as a refinishing project rather than an ordinary paint job. Standard interior wall paint is not designed to grip a slick glazed surface, tolerate repeated scrubbing, or survive shoes, water, grease, and dropped shampoo bottles.
A successful project requires a coating system approved for the tile’s location and level of use. A lightly used wall backsplash has different performance requirements from a busy entryway floor. A tub surround exposed to frequent water needs a specialized refinishing product, not leftover eggshell paint from the guest bedroom.
Good Candidates for Tile Painting
- Kitchen backsplashes that are structurally sound and can be thoroughly degreased
- Bathroom walls outside areas of constant direct water exposure
- Vanity backsplashes and decorative tile borders
- Laundry-room and powder-room floors when a dedicated floor coating is used
- Low-traffic ceramic or porcelain floors
- Decorative fireplace-surround tile, provided the chosen coating is approved for the expected temperature
Surfaces That Need More Caution
Paint is less dependable on shower floors, heavily used countertops, damaged tile, loose tile, or surfaces that remain wet for long periods. Constant moisture can eventually cause blistering or peeling. Countertops also face scratches, hot cookware, knives, food spills, and cleaning chemicals that can quickly punish a painted finish.
Do not simply coat over loose tile, crumbling grout, active mildew, water damage, or movement in the underlying surface. Paint may change the color, but it cannot perform structural therapy. Repair the underlying problem first.
Choose the Right Tile Paint for the Job
The phrase “tile paint” covers several different products. Always read the label and confirm that the coating is approved for your tile material, location, and expected exposure.
Paint for Wall Tile and Backsplashes
Vertical tile may be refinished with a tile-specific coating or a compatible high-adhesion paint system applied over bonding primer. Acrylic urethane, specialty enamel, and two-part epoxy products are common choices. A kitchen backsplash needs a washable finish that can handle occasional moisture and grease.
Paint for Tile Floors
Floors require a dedicated floor-coating system. Many systems include a pigmented base coat followed by a required clear topcoat. The topcoat is not an optional decorative flourish; it supplies much of the resistance to foot traffic, moisture, and routine cleaning.
Verify whether the product is suitable for ceramic, porcelain, vinyl, concrete, or other surfaces. Follow the complete system from one manufacturer rather than combining a random primer, furniture paint, and mystery sealer discovered in the garage.
Tub and Tile Refinishing Products
Bathtubs and surrounding wall tile generally require a specialized tub-and-tile refinishing kit. These products may use a two-part formula that begins curing after the components are mixed. They can also produce strong odors, making ventilation, protective equipment, and strict adherence to label instructions essential.
A tub-and-tile coating intended for walls and tubs should not automatically be used on a floor. Likewise, a floor paint should not be assumed suitable for a bathtub. Paint labels are not light reading, but they are cheaper than completing the project twice.
Tools and Materials
Your exact supply list will depend on the coating system, but most tile-painting projects require the following:
- Tile-compatible cleaner or degreaser
- Scrub brush, sponges, and clean microfiber cloths
- Paintable epoxy repair filler for chips or small cracks
- Manufacturer-recommended sandpaper or abrasive pads
- Vacuum and lint-free cloths
- Painter’s tape and protective drop cloths
- High-adhesion bonding primer, when required
- Tile paint, floor coating, or refinishing kit approved for the application
- High-density foam roller and quality angled brush
- Clear protective topcoat, if required by the system
- Gloves, eye protection, and appropriate respiratory protection
- Fans or other equipment for safe ventilation
How to Paint Ugly Tile Step by Step
1. Inspect the Tile Before Buying Paint
Check every tile and grout line. Tap suspicious tiles lightly and look for movement, hollow sounds, cracking, missing grout, or moisture damage. Replace loose or badly broken tiles before painting. Fill small cosmetic chips with a paintable repair product approved for the surface.
Decide whether the grout will be painted with the tile or remain a contrasting color. Painting everything together creates a clean, unified finish. Preserving contrasting grout lines requires additional detail work and careful masking. Another option is to paint the tiles first and apply a separate grout colorant after the coating has cured.
2. Remove Hardware, Caulk, and Obstacles
Take off outlet covers, towel bars, switch plates, and removable fixtures. Protect anything that must remain in place. Old silicone caulk should usually be removed because paint does not adhere reliably to silicone. After the painted surface has fully cured, apply fresh caulk where needed.
Cover nearby cabinets, plumbing fixtures, appliances, and flooring. Tile refinishing products can be difficult to remove after curing, so this is not the moment for optimistic taping.
3. Clean More Thoroughly Than Seems Reasonable
Cleaning is the most important stage of painting ceramic tile. Kitchen tile may hold an invisible film of cooking oil, while bathroom tile collects soap residue, personal-care products, mineral deposits, and mildew. Any remaining contamination can interfere with adhesion.
Use a cleaner or degreaser compatible with both the tile and the coating manufacturer’s directions. Scrub the tile faces, grout lines, corners, and edges. Rinse thoroughly so no cleaning residue remains. Repeat the process when necessary.
Resolve mildew problems instead of painting over them. Allow the tile, grout, and surrounding joints to dry completely. Moisture trapped beneath a coating is an enthusiastic contributor to bubbling and peeling.
4. Dull the Glossy Surface
Glazed tile is too slick for many coatings to grip properly. Lightly sand or abrade the surface using the grit or abrasive method recommended for your chosen product. The goal is not to carve trenches into the tile. You are creating a uniformly dull surface with microscopic texture.
Pay extra attention to corners, edges, and recessed grout lines. A tiny untouched glossy area may become the starting point for a future chip.
5. Remove Every Trace of Dust
Vacuum the entire area, including grout joints and nearby trim. Wipe it with clean, lint-free cloths as directed by the coating manufacturer. Do not leave sanding dust behind and assume primer will absorb it. It will not. It will simply become a crunchy layer between the tile and your paint.
6. Test the Coating System
Apply primer and paint to a small, inconspicuous area before coating the whole room. Allow the test area to dry for the specified period, then perform the manufacturer’s recommended adhesion test. Testing can reveal contamination, incompatibility, or weak bonding before the problem covers 120 square feet.
7. Apply Bonding Primer When Required
Use a primer designed to adhere to hard, glossy surfaces. Brush primer into grout lines, corners, and edges, then roll the tile faces with a high-density foam roller. Avoid heavy application, puddles, and thick ridges.
Allow the primer to dry for the full period listed on the label. Some systems require more than one coat, while others are specifically designed to work without separate primer. Follow your product instructions rather than applying universal advice to a specialized coating.
8. Paint in Thin, Controlled Coats
Stir the paint as directed. Cut in around edges and work paint into grout lines with a quality brush. Follow with a foam roller on the broad tile surfaces. Work in manageable sections and maintain a wet edge to minimize roller marks.
Several thin coats generally produce a smoother, stronger result than one heavy coat. Thick paint may sag, collect in grout lines, dry unevenly, or remain soft beneath the surface. Respect the stated recoat window. Applying the next coat too early can disturb the previous layer; waiting too long may require additional preparation.
9. Add a Stenciled Pattern if Desired
A stencil can give plain square tile the look of patterned cement or encaustic tile. First apply and cure the base color. Choose a stencil that matches the tile dimensions, secure it with low-tack tape or repositionable adhesive, and remove excess paint from the stencil roller before touching the surface.
Too much paint causes bleeding beneath the stencil. Use light pressure and build coverage gradually. Stagger the tiles you stencil so you do not place the stencil over wet paint. Small errors can usually be corrected later with an artist’s brush and the base color.
10. Apply the Required Topcoat
When the floor or decorative coating system calls for a clear topcoat, apply the specified product rather than substituting a general-purpose polyurethane. Compatibility matters. An unsuitable clear coat can yellow, remain tacky, reduce adhesion, or react with the base layer.
Apply the number of coats required for the expected level of wear. Consider an approved slip-resistant additive for floors when recommended by the coating manufacturer, especially in areas where water may reach the surface.
11. Let the Paint Cure Completely
Dry paint and cured paint are not the same thing. A surface may feel dry while remaining soft and vulnerable underneath. Avoid water, rugs, bath mats, furniture, cleaning, and heavy foot traffic until the complete curing period has passed.
Some refinishing products require several days before water exposure. Cool temperatures, high humidity, and limited airflow can slow curing. Do not celebrate a finished bathroom by immediately taking the steamiest shower in recorded history.
Common Tile-Painting Mistakes
Using Ordinary Wall Paint
Wall paint is designed for drywall and plaster, not glazed tile, standing water, or shoes. Choose a coating rated for the actual surface and conditions.
Skipping Degreasing or Sanding
Primer cannot create a reliable bond through soap film or cooking oil. It also performs poorly on an untouched glossy surface unless the product specifically says otherwise.
Painting Over Flexible Caulk
Many paints cannot bond to silicone. Remove old caulk and replace it after the coating has cured.
Applying Heavy Coats
Heavy coats may look efficient for approximately seven minutes. Then they sag, trap solvents, fill grout lines, or dry with an uneven texture.
Returning the Surface to Service Too Soon
Premature use is one of the easiest ways to scratch or imprint a new coating. Build the complete cure period into your schedule before starting.
Expecting Permanent Perfection
Painted tile is a surface coating. It may eventually show wear, especially on floors, near water, and in high-traffic areas. A successful painted floor can last well with appropriate products and maintenance, but it should not be expected to behave exactly like newly installed porcelain tile.
How to Care for Painted Tile
Use gentle, nonabrasive cleaners approved for the coating. Avoid steel wool, harsh scouring powders, aggressive scrub pads, and strong chemicals unless the manufacturer specifically permits them. Wipe up standing water and spills promptly.
Place protective pads beneath furniture and avoid dragging heavy objects across painted floors. Use breathable mats rather than rubber-backed products that may trap moisture or react with the coating. When the finish eventually develops a small chip, repair it promptly before moisture or wear enlarges the damaged area.
A Realistic Painted-Tile Experience: What the Project Actually Feels Like
The following is a composite project diary based on common DIY experiences and recurring lessons from tile-refinishing projects.
The Optimistic Beginning
The project usually begins with a cheerful thought: “It is only a small bathroom.” This sentence has launched many memorable weekends. The room may be small, but the tile contains dozens of grout lines, two awkward corners, a toilet, plumbing penetrations, and one mysterious area behind the door that cannot be reached without folding yourself into a shape generally associated with advanced yoga.
The first surprise is how long cleaning takes. A floor that looked reasonably clean may release years of residue once it meets degreaser and a scrub brush. Grout lines demand special attention. The water in the cleaning bucket becomes alarming. At this stage, DIYers often realize that the cleaning phase is not delaying the project; it is the project’s foundation.
The Moment the Tile Looks Worse
After sanding, the once-shiny tile becomes cloudy and unimpressive. This is normal, although it can feel like a dramatic decline in property value. Dust appears in corners that seemed physically incapable of holding dust. Careful vacuuming and wiping take longer than expected, but the uniformly dull finish is encouraging because it gives the bonding primer a better surface to grip.
Primer is often the first emotional reward. The outdated color begins to disappear, and the room suddenly looks brighter. It may also look streaky, patchy, or slightly terrifying. Primer is not the final finish, and trying to make it behave like one can lead to overly thick application.
The Second Coat Changes Everything
The first paint coat rarely looks perfect. Dark grout may show through, the color can appear uneven, and every roller line seems visible under work lights. The second thin coat usually creates the transformation people imagined at the beginning. Grout lines become consistent, the old pattern disappears, and the room starts to feel intentional rather than inherited.
Stenciling adds another emotional cycle. The first tile receives ten minutes of nervous measuring. By the fifth tile, confidence arrives. By the twentieth, overconfidence arrives, usually accompanied by too much paint on the roller. Keeping a small detail brush nearby makes tiny corrections easy and prevents one imperfect corner from becoming a household legend.
The Hardest Part Is Doing Nothing
Once the final coat is applied, the room looks finished, but the coating is still curing. This waiting period is surprisingly difficult. Walking across the floor “just once” or replacing a bath mat early can leave an imprint in a surface that felt dry to the touch.
Successful DIYers plan around this stage. They create an alternate path, keep pets away, and resist reinstalling furniture until the stated cure time has passed. That patience often makes the difference between a smooth, durable result and a finish that begins its new life with scratches.
Living With the Finished Surface
The biggest benefit is not that painted tile becomes indistinguishable from brand-new tile. It is that an unattractive surface can become cleaner, calmer, and more compatible with the rest of the room without demolition. A soft white can brighten a dark bathroom. Charcoal can modernize a tired entry. A restrained stencil can turn plain squares into a focal point.
Painted tile also teaches realistic maintenance. Owners tend to wipe spills sooner, choose gentler cleaners, and stop dragging furniture as though auditioning for a moving-company commercial. Minor wear may eventually appear, but keeping leftover labeled paint makes touch-ups manageable.
The practical lesson is simple: preparation feels slow, painting feels fast, and curing feels endless. Yet when all three stages receive equal respect, the result can deliver an impressive visual improvement for far less disruption than removing and replacing sound tile.
Conclusion: Give the Tile a Second Chance
You do not necessarily need to demolish every ugly tiled surface in your home. When the tile is firmly attached, structurally sound, and located in an appropriate area, paint can provide an affordable and highly customizable update.
The secret is not a magical paint color. It is a complete process: identify the surface, choose a coating rated for that application, repair damage, remove grease and soap residue, dull glossy tile, test adhesion, apply thin coats, ventilate the room, and allow the finish to cure completely.
Approach painted tile as a durable decorative coating rather than indestructible new flooring. Care for it gently, repair chips when they appear, and accept that high-traffic surfaces may eventually need touch-ups. With sensible expectations and patient preparation, those dated tiles can stop controlling the room without being introduced to a jackhammer.
Note: Coating formulas, preparation requirements, ventilation instructions, recoat windows, and curing times vary. Always follow the current label and technical instructions for the exact primer, paint, refinishing kit, and topcoat being used.