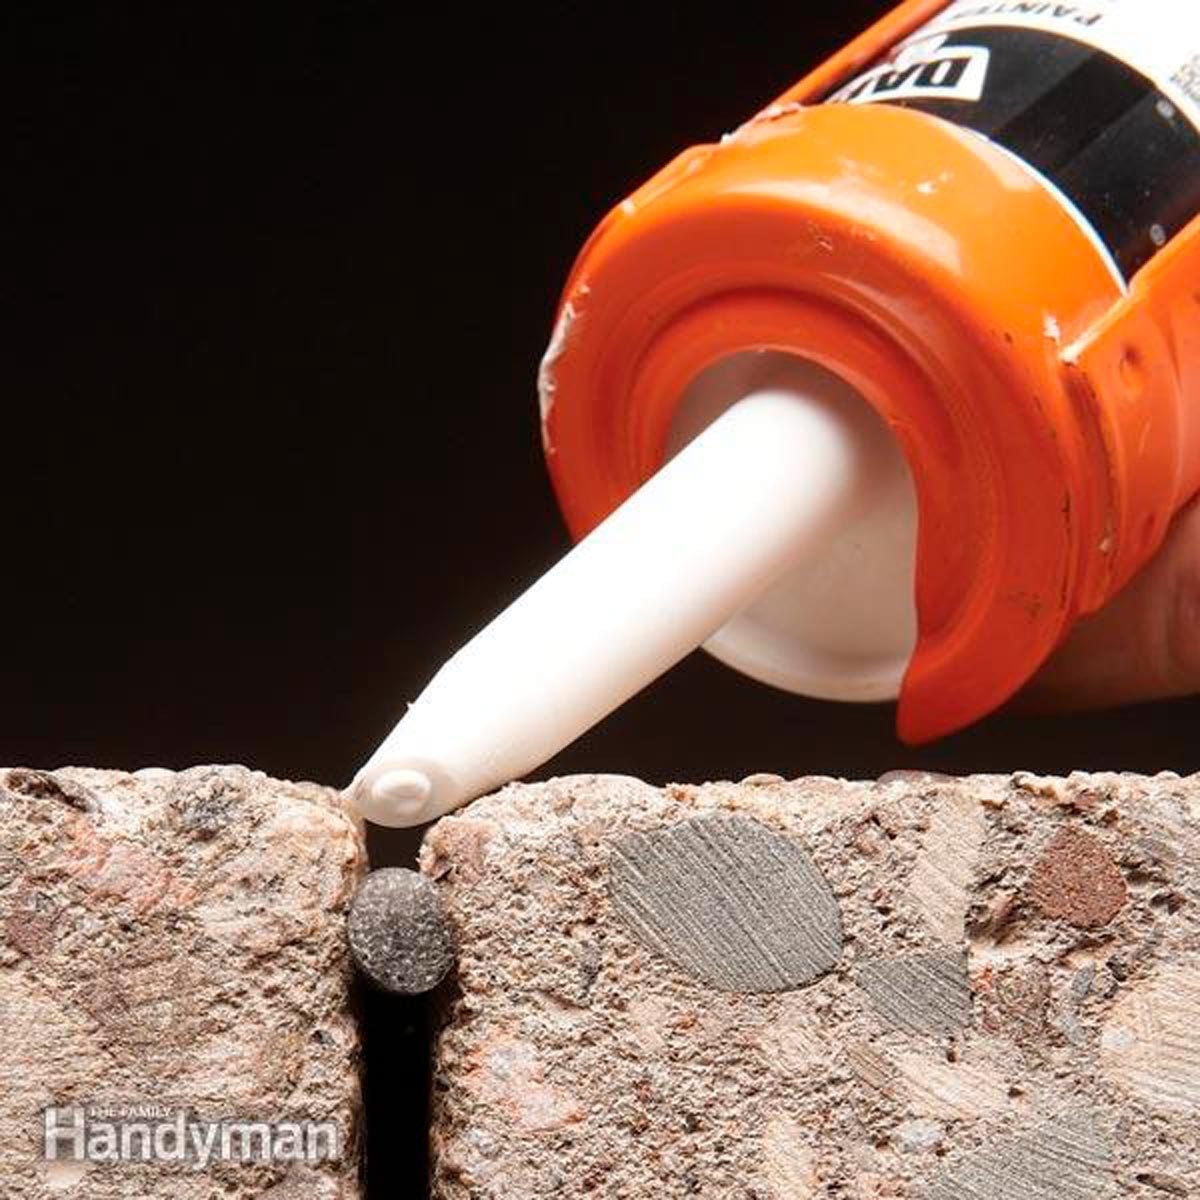

Concrete is tough, stubborn, and usually the last thing in your house to admit it has a problem. But when a crack opens in a driveway, patio, sidewalk, garage floor, or gap between concrete and the house, water can sneak in, freeze, expand, collect dirt, invite weeds, and slowly turn a small nuisance into a bigger repair bill. That is where concrete caulk comes in.
Learning how to caulk concrete is one of the most useful DIY skills for homeowners because it is affordable, beginner-friendly, and surprisingly satisfying. A clean bead of concrete sealant can stop moisture, improve curb appeal, and help joints move without crumbling apart like a cookie left in a toddler’s pocket.
The key is using the right material. Regular bathroom caulk is not designed for driveways, sidewalks, patios, or concrete expansion joints. For most exterior concrete cracks and joints, you want a flexible concrete and masonry sealant, often polyurethane, advanced polymer, or textured acrylic latex, depending on the project. The goal is not to glue the entire slab together forever. The goal is to seal the opening while allowing the concrete to expand and contract naturally.
What Does Caulking Concrete Actually Do?
Concrete caulking fills gaps, cracks, control joints, and expansion joints with a flexible sealant. Unlike rigid patching compounds, concrete caulk stretches slightly as temperatures change and slabs move. That flexibility matters because concrete expands in heat, contracts in cold, and shifts with soil movement, moisture, and normal wear.
Caulking concrete helps prevent water from entering cracks. Water is the sneaky villain here. It seeps into openings, carries dirt below the slab, freezes in colder climates, and can widen cracks over time. Sealing the crack early is like putting a raincoat on your concrete before it starts complaining.
Concrete caulk is commonly used for:
- Driveway cracks
- Sidewalk and walkway joints
- Garage floor cracks
- Patio slab gaps
- Pool deck joints
- Gaps where concrete meets a foundation, steps, curb, or garage apron
- Expansion joints between concrete slabs
When to Caulk Concrete vs. Patch Concrete
Before you grab a caulk gun like a weekend warrior in full battle mode, inspect the damage. Caulk is excellent for cracks and joints that need to remain flexible. Patching compound is better for missing chunks, deep spalls, holes, broken corners, and areas where the concrete surface has crumbled away.
Use concrete caulk when:
- The crack is narrow to moderately wide.
- The gap is a joint between slabs.
- The crack needs a waterproof, flexible seal.
- The area expands and contracts with temperature changes.
- You are sealing, not rebuilding, the surface.
Use concrete patch when:
- A chunk of concrete is missing.
- The edge of a step or slab is broken.
- The surface is flaking, scaling, or deeply pitted.
- The repair needs structural rebuilding.
- The crack is caused by major settlement or heaving.
If one side of a crack is significantly higher than the other, or the slab is sinking toward the house, caulk will not solve the real problem. It may seal water temporarily, but you should consider professional concrete leveling, drainage correction, or foundation evaluation.
Best Caulk for Concrete
The best caulk for concrete depends on where the crack is located and how much movement the area gets. For most outdoor concrete repairs, choose a product clearly labeled for concrete, masonry, driveways, sidewalks, patios, or expansion joints.
Polyurethane Concrete Sealant
Polyurethane concrete caulk is a favorite for driveways, garage floors, patios, and expansion joints because it stays flexible, resists weather, and bonds well to masonry surfaces. It is especially useful for joints that experience movement. Some polyurethane sealants are self-leveling, which means they flow into horizontal cracks and flatten themselves. That sounds fancy because it is. It also means they should not be used on vertical cracks unless the product specifically says it is non-sag.
Self-Leveling Concrete Caulk
Self-leveling concrete sealant is ideal for horizontal surfaces such as driveways, sidewalks, garage floors, and patios. Once applied, it settles into the gap and forms a smooth surface without heavy tooling. The catch? It behaves like syrup with a mission. If the joint is sloped, open at the end, or too deep, it can run where you do not want it. Always block the ends of the joint and use backer rod when needed.
Non-Sag Concrete Sealant
Non-sag concrete caulk is thicker and designed for vertical or angled surfaces. Use it for foundation wall cracks, stair risers, vertical masonry gaps, and sloped joints where self-leveling sealant would wander off like it has weekend plans.
Textured Acrylic Latex Concrete Caulk
Textured acrylic latex concrete sealant is easier to clean up and often blends nicely with concrete. It may be a good choice for smaller cracks in lower-traffic areas. However, for heavily used exterior joints, vehicle traffic, or large expansion joints, flexible polyurethane or advanced polymer sealants are usually more durable.
Tools and Materials You Will Need
A good concrete caulking job depends more on preparation than brute strength. Concrete does not care how enthusiastic you are. It cares whether the crack is clean, dry, and properly filled.
- Concrete and masonry caulk or sealant
- Caulk gun
- Foam backer rod
- Utility knife
- Wire brush or stiff-bristle brush
- Shop vacuum or leaf blower
- Painter’s tape
- Putty knife, caulk tooling tool, or gloved finger
- Mineral spirits or water for cleanup, depending on the sealant
- Gloves and safety glasses
- Cardboard or scrap wood to block open joint ends
Why Backer Rod Matters
Backer rod is a flexible foam rope inserted into wider or deeper cracks before caulking. It controls the depth of the sealant, saves material, and helps the caulk bond to the sides of the joint instead of sticking to the bottom. That is important because three-sided adhesion can cause the sealant to tear when the concrete moves.
Think of backer rod as the tiny gym coach inside the crack telling the sealant, “Stretch correctly, please.” Without it, you may waste tubes of caulk filling a deep void, and the finished repair may fail sooner.
As a general DIY rule, use backer rod when the joint is wider than about 1/4 inch or deeper than about 1/2 inch. Choose backer rod slightly larger than the gap so it fits snugly. Push it down with a blunt tool, not a screwdriver or knife that could puncture the foam. The top of the rod should sit low enough to leave room for the recommended sealant depth.
How to Caulk Concrete Step by Step
Step 1: Check the Weather
Choose a dry day with moderate temperatures. Most concrete sealants have a recommended application range listed on the tube. Avoid caulking in rain, extreme heat, freezing temperatures, or when the concrete is damp unless the product specifically allows damp application. Dry concrete gives the sealant a better chance to bond.
Step 2: Clean Out the Crack or Joint
Remove dirt, weeds, old filler, loose concrete, pebbles, and mystery debris. Use a wire brush, stiff brush, scraper, or oscillating tool if needed. Vacuum the crack thoroughly. A leaf blower also works, but be respectful unless your neighbors enjoy surprise dust storms.
This step matters. Sealant sticks to concrete, not to dust. If the sides of the crack are dirty, the bead may peel away later.
Step 3: Remove Old Failed Caulk
If the joint has old sealant that is cracked, brittle, or pulling loose, remove as much as possible. New caulk over failing caulk is like painting over peeling wallpaper. It may look acceptable for a minute, but the drama returns quickly.
Step 4: Insert Backer Rod
For wide or deep joints, press foam backer rod into the crack. It should fit firmly without being stretched. Use a putty knife, paint stir stick, or other blunt tool to push it down evenly. The rod should create a consistent base so the caulk bead has uniform thickness from one end of the crack to the other.
For very deep gaps, do not fill the entire void with sealant. That wastes product and can prevent proper curing. Backer rod or clean sand can reduce depth, but backer rod is usually preferred for moving joints because it also prevents bonding at the bottom.
Step 5: Tape the Edges for a Neat Finish
Painter’s tape is optional, but it makes the final job cleaner. Apply tape along both sides of the crack, leaving the gap exposed. This is especially helpful on patios, pool decks, walkways, and visible concrete where you want the bead to look intentional instead of “I fought the caulk gun and the caulk gun won.”
Step 6: Cut the Nozzle
Cut the caulk tube nozzle at a 45-degree angle. Start with a smaller opening than you think you need. You can always cut more, but you cannot un-cut the nozzle unless you have invented time travel, in which case please start with lottery numbers.
Puncture the inner seal if the tube has one. Load the tube into the caulk gun and squeeze gently until sealant appears at the tip.
Step 7: Apply the Concrete Caulk
Hold the caulk gun at a steady angle and move slowly along the crack. Keep even pressure on the trigger. For narrow cracks, one bead may be enough. For wider joints, apply sealant in a way that fills the gap and contacts both sidewalls.
If using self-leveling caulk, do not overfill. The sealant will settle. Stop slightly below or flush with the concrete surface, depending on the product instructions. If using non-sag sealant, apply a smooth bead and prepare to tool it before it skins over.
Step 8: Tool the Bead
Tooling presses the sealant against the concrete sides and improves the finished look. Use a caulk tool, putty knife, foam brush, or gloved finger. For some self-leveling products, tooling may not be needed, but you should still make sure the sealant fully contacts the edges.
Remove painter’s tape before the sealant skins over. Pull it away slowly at an angle for a crisp edge.
Step 9: Let It Cure
Concrete caulk may feel dry on the surface long before it is fully cured. Cure time depends on the product, bead size, temperature, humidity, and joint depth. Keep foot traffic, vehicles, water, pets, leaves, and curious children away until the sealant has cured according to the label.
For driveways, do not drive over the repair too soon. Tires are not gentle critics. They will happily ruin uncured sealant and leave you with a repair that looks like modern art, but not the expensive kind.
Common Concrete Caulking Mistakes
Using the Wrong Caulk
Kitchen and bathroom caulk does not belong in driveway cracks. Choose a sealant designed for concrete, masonry, exterior movement, and traffic exposure.
Skipping Surface Prep
Dust, loose grit, old sealant, oil, and moisture can weaken adhesion. Cleaning is not glamorous, but it is the difference between a repair that lasts and a bead that peels up like string cheese.
Forgetting Backer Rod
Deep cracks need depth control. Without backer rod, sealant may sink, cure poorly, bond to the bottom, or require far more product than expected.
Overfilling the Joint
More caulk is not always better. Too much sealant can bulge above the surface, collect dirt, and wear down faster. Follow the product’s recommended joint size and depth.
Caulking Active Structural Cracks
If the crack is growing rapidly, leaking heavily, offset, or connected to foundation movement, call a professional. Caulk is a sealant, not a magic wand with a nozzle.
Where Concrete Caulk Works Best
Concrete caulk performs well in control joints, expansion joints, narrow driveway cracks, sidewalk gaps, patio cracks, garage floor joints, and the seam where concrete meets another hard surface. It is especially useful when the goal is to keep water out while preserving movement.
It is not the best fix for potholes, broken slab corners, major settlement, severe spalling, or large structural damage. In those cases, use a concrete repair mortar, resurfacer, leveling service, or professional repair method.
Maintenance After Caulking Concrete
Inspect repaired joints at least once or twice a year. Spring and fall are good times because temperature changes reveal movement. Look for peeling, cracking, gaps at the edges, or areas where the sealant has sunk. Small touch-ups are much easier than waiting until water has been sneaking under the slab for several seasons.
Keep the area clean. Remove weeds before they widen cracks. Avoid aggressive pressure washing directly against fresh or aging sealant. If you use deicing products in winter, rinse the surface when weather allows because salts can be hard on concrete and surrounding materials.
DIY Experience Notes: What Homeowners Learn the First Time
The first time you caulk concrete, the project usually looks easier in your head than it does once you are crouched beside a driveway with dusty knees and a caulk gun that suddenly feels like gym equipment. That is normal. Concrete work has a way of humbling everyone, including people who watched three videos and felt spiritually ready.
One common experience is discovering that cracks are deeper than they appear. From above, a driveway joint may look like a neat little line. Once you clean it out, it becomes a canyon with pebbles, old leaves, ant evidence, and possibly a receipt from 2017. This is where backer rod becomes the hero. Instead of pumping an entire tube into a bottomless gap, you press foam rod into place and create a controlled channel for the sealant. The job becomes cleaner, cheaper, and more reliable.
Another lesson is that cleaning takes longer than caulking. Many DIYers expect the caulk application to be the big event, but the real work is scraping, brushing, vacuuming, and checking the sidewalls. The sealant bead only performs as well as the surface underneath. If you rush prep, the repair may look fine for a few weeks and then start pulling away at the edges. That little failure line is the concrete equivalent of saying, “We need to talk.”
Self-leveling sealant is also a memorable teacher. On a flat garage floor or driveway joint, it can create a beautiful smooth finish. On a sloped joint, it can run downhill with surprising confidence. Before applying it, block open ends with cardboard, foam, or removable barriers. Work in sections, watch the flow, and resist the urge to squeeze too much at once. With self-leveling products, slow and boring wins.
Tooling non-sag sealant takes practice. The first bead may look lumpy. The second improves. By the third, you may start nodding like a professional, even though your glove is covered in gray goo. A light touch and steady motion help. Painter’s tape can make beginners look much better than they feel. Pull the tape before the sealant skins over, and you will get cleaner edges.
Patience during curing is another hard-earned lesson. The repair may look dry, but that does not mean it is ready for car tires, patio furniture, rainwater, or the family dog. Always follow the label. If the product says to wait before traffic, wait. Nothing ruins a tidy repair faster than a tire track, paw print, or leaf permanently embedded like a fossil from the Age of Bad Timing.
The best DIY mindset is simple: do not try to make the repair invisible; try to make it clean, flexible, and durable. Concrete is already full of color variation, texture, and small imperfections. A neat gray sealant line usually blends in better over time, especially once dust and weather soften the look. The real victory is keeping water out, slowing crack growth, and making the slab look cared for.
After doing one concrete caulking project, many homeowners start noticing every unsealed joint in the neighborhood. This is both empowering and mildly annoying. But it means you have learned something valuable: small maintenance jobs protect big surfaces. A few tubes of concrete caulk, a roll of backer rod, and one focused afternoon can help extend the life of a driveway, patio, or walkway without calling in a crew or renting equipment.
Conclusion
Caulking concrete is one of those DIY projects that delivers more value than expected. It is affordable, approachable, and practical. The process is simple: choose the right concrete sealant, clean the crack thoroughly, insert backer rod when needed, apply the caulk carefully, tool the bead if required, and allow proper curing time.
The biggest secret is preparation. A clean, dry, well-supported joint gives the sealant a fighting chance against water, weather, and movement. Whether you are sealing a driveway crack, patio joint, sidewalk gap, or garage floor seam, the right technique can make your concrete look better and last longer. Your slab may never send a thank-you card, but it will be less likely to crack dramatically in public.