
If you have ever spotted shiny metal wall art in a boutique and thought, “That looks expensive, but also suspiciously like something I could make after drinking sparkling water,” you are in the right place. This soda can wall art copycat DIY turns empty aluminum cans into modern, dimensional wall decor using simple tools, a little patience, and the kind of creativity that makes your recycling bin nervous.
The beauty of this project is that it looks far more polished than the materials suggest. Aluminum cans are thin, lightweight, easy to cut, and naturally reflective. Once cleaned, flattened, shaped, and arranged, they can mimic brushed metal, mosaic tiles, botanical cutouts, geometric sculptures, or abstract gallery art. In other words, yesterday’s ginger ale can can become tomorrow’s “Where did you buy that?” conversation starter.
This guide walks you through how to make soda can wall art inspired by high-end home decor, without copying a specific artist’s protected design. You will learn how to safely prepare aluminum cans, create a layout, cut and shape pieces, mount them cleanly, and finish the art so it looks intentional instead of “craft night got loose.”
What Is Soda Can Wall Art?
Soda can wall art is a form of upcycled home decor made by transforming empty aluminum cans into decorative wall pieces. The cans may be cut into strips, petals, scales, squares, circles, or custom silhouettes, then mounted onto canvas, wood, mat board, or framed cardstock. Some designs highlight the colorful printed labels, while others use the plain silver interior for a sleek metallic look.
A “copycat DIY” version usually means creating a store-bought-inspired look on a budget. Think metallic botanical panels, abstract mosaics, sunbursts, layered feathers, minimalist mountain scenes, or a set of small framed silhouettes. The goal is not to steal someone’s exact artwork. The goal is to capture the style: texture, shine, repetition, and dimension.
Why Aluminum Cans Are Perfect for DIY Wall Decor
Aluminum cans are surprisingly craft-friendly. They are thin enough to cut with heavy-duty scissors, flexible enough to bend into shape, and rigid enough to hold a crease. They also offer two completely different design options. The outside of the can gives you color, typography, logos, and bold graphics. The inside gives you a clean silver surface that can pass for craft metal sheets when used thoughtfully.
Another bonus: this is an affordable project. You can make an impressive piece using cans you already have, a thrifted frame, scrap cardboard, paint, and basic adhesive. It is also a satisfying way to practice creative reuse. Instead of buying more decor that looks handmade, you actually make it by hand. Imagine that.
Supplies You Will Need
Basic Materials
- 6 to 20 clean empty soda cans, depending on the size of your project
- Wood panel, stretched canvas, foam board, mat board, or sturdy cardboard
- Picture frame, shadow box, or wood cradle panel
- Heavy-duty scissors or craft snips
- Utility knife or craft knife
- Cut-resistant gloves
- Safety glasses
- Ruler and pencil
- Painter’s tape or masking tape
- Fine-grit sandpaper or a small metal file
- Hot glue, E6000-style craft adhesive, super glue gel, or strong double-sided mounting tape
- Acrylic paint or spray paint for the background
- Optional: clear acrylic sealer
Optional Tools for a More Polished Look
- Paper cutter for straight aluminum strips
- Circle punch, metal punch, or craft die-cutting machine
- Embossing stylus or empty ballpoint pen
- Self-healing cutting mat
- Foam sheet for embossing texture
- Template paper for drawing shapes before cutting metal
- Small clamps or clothespins for holding glued pieces while they dry
Safety First: Aluminum Cans Are Cute, But Sharp
Before we get crafty, let’s have the tiny safety lecture. Cut aluminum cans can have sharp edges. They are not terrifying, but they can slice skin if handled carelessly. Wear cut-resistant gloves when cutting and flattening the cans, and wear safety glasses when using snips, a utility knife, or any tool that could send small bits of metal flying.
Keep your work area clean and bright. Place a cutting mat or scrap board under your project. Do not leave curved aluminum scraps scattered around the table, especially if you share your home with children, pets, or adults who wander around barefoot like they are in a shampoo commercial.
After cutting your pieces, lightly sand or file any sharp corners. If the design will be touched often, fold the edges under, cover them with tape on the back, or frame the piece behind glass with space between the glass and metal.
Step 1: Collect, Wash, and Dry the Cans
Start by collecting empty soda, sparkling water, beer, or energy drink cans. Rinse each can thoroughly with warm water and a little dish soap. Sticky residue can interfere with glue and may attract insects, which is not the kind of wildlife your wall art needs.
Let the cans dry completely. If you want the silver side to show, choose cans with clean, unwrinkled interiors. If you want colorful art, group cans by color family. Red and silver can look bold and graphic. Green, blue, and white can feel coastal. Gold, black, and copper tones look surprisingly high-end.
Step 2: Break Down the Cans Into Flat Sheets
Put on gloves and safety glasses. Use a utility knife to carefully pierce the can near the top, then cut around the top rim with scissors or snips. Repeat near the bottom. Once the top and bottom are removed, cut vertically down the side of the can. You now have a curled rectangle of aluminum.
To flatten it, place the sheet printed-side down and gently pull it over the edge of a table in the opposite direction of the curl. Rotate and repeat until it relaxes. You do not need it perfectly flat at this stage. Slight movement can actually make the final wall art look more dimensional.
Step 3: Choose Your Copycat-Inspired Design
Before cutting anything fancy, decide what style you want. Here are five easy soda can wall art ideas that look boutique-inspired without requiring professional tools:
1. Metallic Botanical Panel
Cut leaves, petals, vines, or simple flower shapes from the silver side of the cans. Arrange them on a painted background for a modern nature-inspired piece. This works beautifully in a shadow box.
2. Abstract Mosaic
Cut small rectangles, triangles, or irregular tiles. Mount them in waves, color blocks, or a loose gradient. This is the most forgiving design because imperfect pieces make it look artistic. Translation: mistakes get promoted to “texture.”
3. Sunburst Wall Art
Cut long pointed strips from aluminum sheets and arrange them around a small mirror, wood circle, or painted center. This design gives strong midcentury-modern energy and costs far less than buying a metal sunburst piece.
4. Framed Silhouette Set
Create simple shapes such as birds, mountains, leaves, fish, stars, or city skylines. Mount each shape on cardstock inside a small frame. A set of three or four frames can look clean, modern, and intentional.
5. Embossed Metal Tiles
Place aluminum sheets on a foam pad and draw patterns into them with an embossing stylus or empty ballpoint pen. Cut the embossed metal into squares and mount the tiles in a grid for a faux pressed-metal look.
Step 4: Make a Paper Template
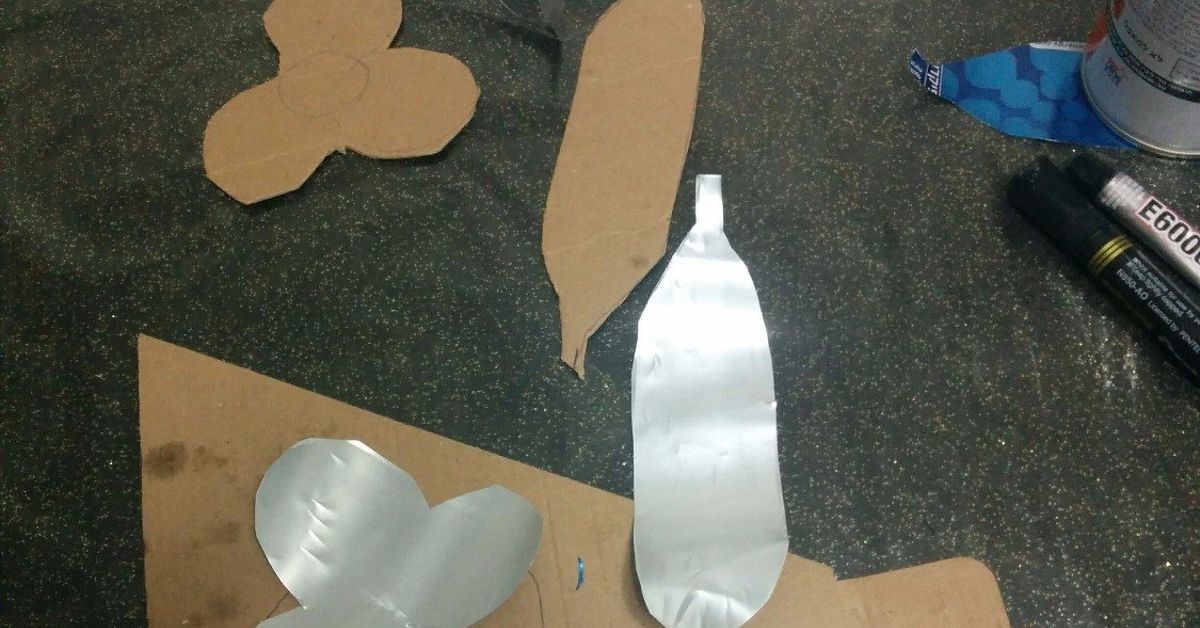
A template is the difference between “custom wall decor” and “why is that leaf shaped like a confused shrimp?” Draw your shapes on scrap paper first. Cut them out, test the arrangement on your backing board, and adjust the size before tracing onto the aluminum.
For geometric art, mark guidelines on the backing board with a ruler and pencil. For organic art, arrange the paper templates loosely until the composition feels balanced. Take a quick photo before removing the templates, because memory is a delightful liar.
Step 5: Cut the Aluminum Shapes
Trace the templates onto the aluminum with a fine marker. Cut slowly with sharp scissors or craft snips. For smooth curves, rotate the aluminum sheet while keeping the scissors steady. For straight strips, use a ruler and paper cutter if you have one.
If the edges feel too sharp, lightly sand them. For petals and leaves, you can soften the look by gently curling the pieces around a pencil. For a hammered-metal effect, press dots, lines, or veins into the aluminum from the back side leaves, you can soften the look by gently curling the using a stylus on a foam pad.
Step 6: Prepare the Background
Your background matters as much as the metal. A flat black background makes silver aluminum pop. White gives a clean gallery feel. Navy, forest green, charcoal, terracotta, and deep burgundy can make the art look rich and expensive.
Paint your wood panel, canvas, or mat board and let it dry fully. If using cardstock inside a frame, choose a heavyweight paper so it does not ripple under adhesive. For framed art, acid-free mat board is a good choice because it helps reduce discoloration over time.
Step 7: Arrange Before You Glue
Lay out all your aluminum pieces before touching the glue. This is the stage where you can adjust spacing, direction, color balance, and layering. For a high-end look, repeat shapes consistently. Repetition is what makes inexpensive materials look designed rather than random.
Try leaving negative space around the main design. Empty space gives the eye a place to rest and makes the art feel more sophisticated. A crowded soda can mosaic can still be fun, but if every inch is screaming, the wall may politely ask for a break.
Step 8: Glue the Pieces Down
Choose adhesive based on your design. Hot glue works well for dimensional pieces, but it can leave thick blobs if overused. Strong craft adhesive gives a cleaner bond but needs more drying time. Double-sided foam tape adds instant dimension and works especially well for mosaic tiles or floating shapes.
Apply adhesive sparingly. A tiny dot or thin strip is usually enough. Press each piece into place and hold it for a few seconds. If pieces lift at the corners, use painter’s tape to hold them down temporarily while the glue cures. Remove the tape gently once dry.
Step 9: Add Dimension Like a Designer
The secret to making soda can wall art look expensive is dimension. Bend leaves down the center to create a vein. Curl petals upward. Layer small pieces over larger ones. Raise some shapes with foam tape while gluing others flat. These small height differences create shadows, and shadows are basically free drama.
For a mosaic design, vary the direction of the aluminum grain. Even if all the pieces are silver, rotating them slightly will catch light differently and make the finished art shimmer.
Step 10: Frame, Seal, and Hang
If your artwork has raised metal pieces, use a shadow box or remove the glass from a standard frame. If the art is flat enough, you can frame it behind glass, but make sure the metal does not press hard against the glass. A little breathing room helps prevent scratches and dents.
A clear acrylic sealer can help protect painted backgrounds and reduce smudging, but test it first on a scrap piece. Some sealers may change the look of painted aluminum or printed can graphics. Once the piece is dry, add hanging hardware if needed and hang it at eye level for the best display.
Design Variations to Try
Modern Black-and-Silver Wall Art
Use only the silver interior of the cans and mount the pieces on a matte black board. Try a moon phase design, palm leaves, abstract waves, or a mountain range.
Colorful Pop-Art Can Collage
Use the printed sides of cans and lean into the labels. Cut bold blocks of red, blue, green, yellow, and silver. Arrange them like a graphic poster or comic-inspired mosaic.
Faux Metal Feather Art
Cut long feather shapes, snip small angled cuts along the edges, and score a center line. Layer them in rows to create a wing, wreath, or boho-inspired panel.
Kitchen or Bar Decor
Use cans from favorite drinks to create personalized art for a kitchen, game room, garage bar, or patio. This is also a fun gift idea, especially when the cans have a story behind them.
Common Mistakes and How to Avoid Them
Using Dirty Cans
Sticky cans make poor craft materials. Wash and dry everything first so adhesive bonds properly and the final piece stays fresh.
Skipping Gloves
Aluminum edges are sharper than they look. Gloves are not optional unless your hobby is collecting tiny cuts.
Overcrowding the Design
Leave some blank space. A balanced layout often looks more expensive than a packed one.
Using Too Much Glue
Extra glue can squeeze out and make the project look messy. Use small amounts and add more only if needed.
Not Testing the Frame Depth
If your design has raised pieces, check the depth before assembling the frame. Shadow boxes are your friend.
Budget Breakdown
This soda can wall art DIY can be extremely affordable. The cans are free if you save them. A thrifted frame may cost just a few dollars. Cardstock, foam tape, and glue are inexpensive and often already hiding in craft drawers. Even if you buy a wood panel, paint, and sealer, the finished piece will usually cost far less than store-bought metal wall art.
For the most budget-friendly version, use a dollar-store frame, black cardstock, double-sided tape, and silver can interiors. For a more elevated version, use a wood cradle board, deep matte paint, layered embossed aluminum, and a floating frame.
Experience Notes: What I Learned Making Soda Can Wall Art
The first thing you learn when making soda can wall art is that the can has a personality. It wants to curl. It wants to spring back. It wants to remind you that, not long ago, it was holding orange soda and minding its business. Do not fight it too hard. Work with the curve. In fact, some of the best pieces come from letting the aluminum keep a little bend. A flat piece looks neat, but a slightly curled leaf or raised tile catches light in a way that feels much more alive.
My best results came from sorting the cans before cutting. At first, I tossed every aluminum sheet into one pile, which made the table look like a raccoon had started an Etsy shop. Later, I grouped them by color, silver side, printed side, and usable flat areas. That one small step made the design process easier and saved a lot of squinting.
I also learned that bigger is not always better. Small framed sets often look more polished than one huge beginner piece. A trio of 5-by-7 frames with simple silver botanical silhouettes can look boutique-worthy with very little effort. If you are new to cutting aluminum, start with leaves, feathers, triangles, or rectangles. Save intricate butterflies and detailed skylines for your second project, when your scissors and your confidence are on speaking terms.
Another useful lesson: background color changes everything. Silver aluminum on white can look clean, but it may disappear in bright rooms. Silver on black looks bold and dramatic. Silver on navy feels elegant. Printed can pieces on white look playful and modern. If a layout feels wrong, do not immediately blame the metal. Try changing the background first.
Foam tape became my favorite shortcut. It adds height without the stringy chaos of hot glue, and it makes even simple rectangles look like intentional dimensional tiles. For mosaic art, I liked mixing flat glued pieces with raised foam-taped pieces. The result looked more expensive, even though the materials were still basically “recycling bin plus craft drawer.”
The final lesson is to stop before the piece feels overworked. Soda can art has natural shine, color, and texture, so it does not need much decoration. A clean layout, safe edges, strong contrast, and a decent frame do most of the heavy lifting. When in doubt, remove a few pieces, step back, and let the aluminum sparkle without trying too hard. Like good jewelry, good soda can wall art knows when to shine and when to chill.
Conclusion
Making soda can wall art is one of those DIY projects that feels almost too good to be true: it is cheap, creative, customizable, and surprisingly stylish. With clean cans, safe cutting habits, a strong layout, and the right background, you can turn everyday aluminum into wall decor that looks modern, personal, and far more expensive than it is.
Whether you create a sleek black-and-silver botanical panel, a colorful pop-art mosaic, a dimensional sunburst, or a framed set of silhouettes, the process is flexible enough for beginners and rewarding enough for experienced crafters. The secret is simple: treat the cans like real art material, not trash. Cut carefully, arrange thoughtfully, and frame proudly.
So the next time you finish a soda, do not just toss the can away. Rinse it, save it, and imagine what it could become. Your next piece of wall art might already be sitting in the recycling bin, wearing a cola label and waiting for its big break.
SEO Tags