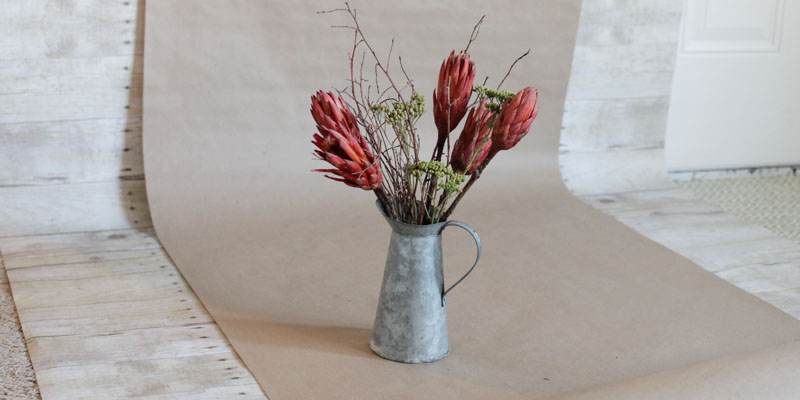

Paper photography backdrops are the studio equivalent of a perfectly clean kitchen counter: simple, useful, and secretly responsible for making everything look more expensive than it is. Whether you are photographing headshots, handmade candles, newborn portraits, fashion campaigns, YouTube thumbnails, or a suspiciously photogenic sandwich, a roll of seamless paper can turn an ordinary room into a controlled visual environment.
The magic is not that paper is complicated. It is the opposite. A good paper backdrop gives you a smooth, matte, non-distracting background that lets the subject do the talking. No wrinkled bedsheet drama. No wall outlet photobombing your product shot. No “I swear this looked better in person” excuses. Just color, shape, light, and a clean surface that behaves predictably when you know how to use it.
Still, paper backdrops are not indestructible. They tear, scuff, crease, curl, collect footprints, and occasionally unroll with the enthusiasm of a golden retriever seeing a tennis ball. This guide explains how to choose, set up, light, use, maintain, and troubleshoot paper photography backdrops so your shoots look polished instead of like your studio lost a fight with a wrapping-paper aisle.
What Is a Paper Photography Backdrop?
A paper photography backdrop, often called seamless paper, is a roll of thick, matte paper used behind and sometimes beneath a subject. It is usually mounted on a crossbar, wall system, or background stand, then rolled down vertically and swept onto the floor in a smooth curve. That curve is the “seamless” part. Instead of a visible corner where wall meets floor, the paper creates a continuous background that looks clean and professional on camera.
Paper backdrops come in many widths and colors. Smaller rolls work well for tabletop product photography, tight headshots, cosmetics, food, and social media content. Medium rolls are useful for portraits, children, pets, and seated subjects. Wider rolls are better for full-body portraits, fashion, dance, family sessions, and video work where the subject needs room to move.
The most common finishes are matte or lightly textured. This matters because glossy surfaces bounce light back into the lens and can create glare. A matte paper backdrop absorbs and diffuses light more evenly, giving photographers better control over exposure, contrast, and color.
Why Photographers Love Paper Backdrops
They Create a Clean, Seamless Look
The biggest reason photographers use paper backdrops is visual simplicity. A seamless paper background removes clutter and gives the subject immediate importance. In portraits, that means the viewer notices the face, expression, clothing, and pose. In product photography, it means the object looks intentional rather than “placed on the nearest table because lunch was in five minutes.”
This clean look is especially helpful for e-commerce, catalog photography, beauty work, professional headshots, and branding sessions. White, gray, black, and neutral paper colors are industry staples because they adapt to many subjects and lighting styles. Bold colors, meanwhile, can make editorial portraits and social media images feel fresh, graphic, and memorable.
They Are Wrinkle-Resistant Compared With Fabric
Fabric backdrops are portable and reusable, but they wrinkle. Muslin in particular can look charmingly textured or like it spent a long weekend in a suitcase, depending on your luck. Paper backdrops stay smooth because they live on a roll. As long as the paper has not been crushed, bent, or stored poorly, it unrolls with a naturally clean surface.
This is a huge advantage when clients are waiting, toddlers are melting down, or a product shoot has 80 items and your patience has left the building. Paper saves time in setup and post-production because you are not constantly removing folds, waves, and fabric shadows.
They Offer Consistent Color
Seamless paper is available in a wide range of colors, from classic white and thundercloud gray to soft pastels, earthy neutrals, saturated reds, moody blues, and chroma key green. Good paper should have consistent color across the roll, which helps keep a series of images visually cohesive.
For brands, that consistency is gold. If a skincare company uses a pale beige background for one product collection, the next shoot can match it closely. If a photographer develops a signature look using warm gray paper and soft side light, that style can be repeated without reinventing the entire set every Tuesday.
Choosing the Right Paper Backdrop Size
Small Rolls for Products and Tight Spaces
Small paper rolls are perfect for tabletop work. Jewelry, candles, ceramics, stationery, cosmetics, food, toys, tech accessories, and handmade goods all photograph beautifully on paper. For small products, you can tape the paper to a wall, clamp it to a stand, or curve it gently onto a table to create a mini sweep.
A small roll is also friendlier for home studios. It takes less space, costs less, and is easier to store. If your studio is also your guest room, office, laundry command center, and emotional-support coffee station, small rolls are a practical place to start.
Medium Rolls for Headshots and Half-Body Portraits
Medium-width paper is a favorite for headshots, beauty portraits, maternity details, kids, pets, and seated branding images. It gives enough room to compose comfortably without needing a massive studio. For one-person portraits, a medium roll often provides the right balance between coverage and manageability.
When photographing people, leave space between the subject and the backdrop. This reduces shadows, helps separate the subject from the background, and gives you more control over whether the paper appears light, dark, or richly colored.
Wide Rolls for Full-Body and Group Work
Wide seamless paper is the better choice for full-length portraits, fashion, dancers, athletes, families, and video. It allows the subject to stand, step, pose, and move without instantly wandering off the background like a confused stage actor.
The tradeoff is weight and space. Wide rolls need sturdy stands, sandbags, room to sweep forward, and enough ceiling height to avoid awkward framing. Before buying the biggest roll available, measure your room. A backdrop that cannot be unrolled properly is not a backdrop; it is a very dramatic tube.
How to Set Up a Paper Photography Backdrop
Use a Strong Support System
Paper rolls are heavier than they look. Mount them on a reliable backdrop stand, wall-mounted roller system, ceiling system, or crossbar supported by sturdy light stands. For safety, use sandbags on the stand legs. This is especially important around children, pets, busy clients, and assistants who walk backward while staring at a camera screen.
Make sure the roll is centered on the crossbar and secured so it does not slide. Clamps can help stop the roll from unspooling too far. If you are working alone, unroll slowly and evenly from both sides. Fast, uneven pulling can cause the paper to twist, crease, or tear.
Create a Smooth Sweep
To create the seamless look, pull the paper down behind the subject and forward onto the floor in a gentle curve. Do not sharply fold the paper where it meets the floor. A hard crease will catch light and appear as a line in the photograph. The curve should be soft enough that the camera reads it as one continuous surface.
For portraits, extend the sweep far enough that the subject can stand or sit fully on the paper without stepping near the back curve. For full-body shots, add more floor coverage than you think you need. Feet, shoes, stools, posing boxes, and props all require space.
Tape the Edges Down
Once the paper is swept onto the floor, tape the front and side edges with gaffer tape. Gaffer tape is preferred because it removes more cleanly than duct tape and is less likely to leave a sticky mess. Taping helps prevent curling, sliding, and tripping. It also keeps the paper flat, which makes retouching easier later.
Do not skip this step. A curled paper edge is not just annoying; it is a tiny ramp of chaos waiting for someone to trip, drag a stool, or introduce a fresh crease directly through the best frame of the day.
Lighting Paper Backdrops Like a Pro
Separate the Subject From the Background
Lighting a paper backdrop begins with distance. If your subject stands too close, shadows will fall directly behind them. Sometimes that is a creative choice, especially for dramatic portraits. But if you want a clean commercial look, move the subject several feet forward and light the backdrop separately if possible.
For headshots, placing the subject away from the paper also creates natural depth. The background can blur slightly at wider apertures, while the face stays crisp. This makes even a simple gray backdrop feel polished.
Control Background Brightness
A paper backdrop does not have one fixed look. White paper can appear bright white, soft gray, or nearly black depending on light. Gray paper can become silver, charcoal, or moody blue-gray. Colored paper can look pastel with strong exposure or rich and saturated with less light.
To make a white backdrop pure white, light it evenly and expose it brighter than the subject without causing flare or edge spill. To keep detail and softness, avoid blasting the background so hard that light wraps around the subject. For darker tones, reduce the light hitting the paper or move the subject farther forward.
Watch for Color Spill
Colored paper can reflect color onto skin, clothing, and products. This can be beautiful or deeply inconvenient. A red backdrop may warm the shadows on a face. A green backdrop can contaminate reflective products. A blue backdrop might cool the edges of white clothing.
To control color spill, increase subject-to-background distance, use flags or V-flats, adjust the angle of your lights, and check skin tones on a calibrated monitor when possible. If the background color is part of the concept, let it contribute. If it starts making people look like they joined a very stylish alien delegation, dial it back.
Best Paper Backdrop Colors for Different Shoots
White Paper
White is the workhorse. It is ideal for e-commerce, clean branding photos, headshots, product images, and high-key portraits. It can look modern, airy, and minimal. It is also unforgiving. Dirt, footprints, shadows, and exposure mistakes show up quickly, so keep shoes clean and lighting even.
Gray Paper
Gray is one of the most flexible paper backdrop colors. It flatters many skin tones, works for corporate portraits, and can be lit to look lighter or darker. Medium gray is especially useful because it does not demand attention but still gives more depth than plain white.
Black Paper
Black paper creates drama, contrast, and elegance. It works well for fine art portraits, fitness photography, luxury products, musicians, and moody editorial work. Keep stray light off the black paper if you want it to stay rich. Any light hitting it will reveal texture and turn it into dark gray.
Neutral and Earth-Tone Paper
Beige, tan, cocoa, almond, stone, and warm gray backdrops are excellent for lifestyle branding, maternity, beauty, wellness, handmade products, and natural-light-inspired studio work. These colors feel warm and approachable without stealing the show.
Bold Color Paper
Bright pink, orange, blue, yellow, red, purple, and green paper can make images pop instantly. Bold colors are perfect for fashion, kids, music artists, social campaigns, cosmetics, candy, sports, and creative portraits. Use them intentionally. A loud background should support the subject, not tackle it for attention.
Paper Backdrops for Product Photography
Paper is a fantastic choice for product photography because it creates a clean surface and a seamless horizon. For small products, tape the paper high on a wall or clamp it to a tabletop stand, then curve it onto the table. Place the product on the sweep and light from the side, front, or above depending on the shape and material.
Matte products such as ceramics, books, fabric goods, candles, and packaging are usually easy to photograph on paper. Reflective products such as glass, jewelry, polished metal, and glossy cosmetics require more care. The backdrop may reflect in the product, so use diffusion, white cards, black cards, and careful angles to shape reflections.
For e-commerce, keep the paper color consistent across the full product line. For social media, experiment with color blocking. A lemon-yellow backdrop behind blue packaging, for example, can create a bold complementary look. A soft pink backdrop behind skincare can feel gentle and beauty-focused. A dark gray sweep behind a watch can create a premium, masculine, or technical mood.
How to Keep Paper Backdrops Clean
Control Shoes and Footprints
Footprints are the natural predator of paper backdrops. Ask subjects to clean their shoes before stepping onto the sweep. For fashion or full-body portraits, keep a lint roller, microfiber cloth, and clean towel nearby. Some studios use shoe covers until the subject is in position, then remove them right before shooting.
If shoes are part of the outfit, photograph the full-body frames first while the paper is clean. Save seated poses, close-ups, and messier movement for later. This simple order can extend the life of your paper dramatically.
Cut Off Damaged Sections
One advantage of paper is that damaged sections can be cut away. When the floor area becomes dirty, torn, or creased, slice it off with a sharp utility knife or scissors and roll out a fresh section. Use a straight edge when possible so the new front edge tapes down neatly.
This is also why paper is popular in busy studios. It is not precious. It is a working surface. Use it, protect it where reasonable, and replace the worn section when it has clearly given its all.
Store Rolls Properly
Store paper rolls in a dry place away from direct sunlight and moisture. Humidity can warp paper, and sunlight can fade colors over time. Keep rolls in their original boxes or protective tubes when possible. If you store them vertically, make sure they are secure and not leaning in a way that bends the core. If you store them horizontally, support the roll evenly so it does not sag.
Never let a roll sit on a damp floor. Paper remembers mistreatment. It may forgive you emotionally, but structurally, no.
Common Mistakes When Using Paper Backdrops
Using Paper on Carpet
Paper needs a flat, hard surface. Carpet allows heels, chair legs, and posing stools to press into the paper, causing wrinkles, dents, and tears. If you must shoot in a carpeted room, place a hard surface underneath the sweep, such as a smooth board, acrylic sheet, or studio floor mat.
Standing Too Close to the Background
When the subject is too close, every shadow becomes more obvious. This can make the photo look cramped and amateur. Move the subject forward, adjust the light angle, and let the background breathe.
Unrolling Too Much Paper
More paper is not always better. Unroll enough for the shot, but avoid wasting large sections unless the subject needs room to move. For kids, pets, dancers, and action poses, use more. For tight portraits, save the roll. Your future self, holding the invoice for replacement paper, will thank you.
Forgetting to Clamp the Roll
Paper rolls can keep unrolling if they are not secured. Use clamps on both sides after setting the desired length. This keeps tension on the roll and prevents surprise paper avalanches, which are funny only when they happen to someone else.
Paper Backdrops vs. Fabric, Vinyl, and Canvas
Paper is best when you want a smooth, clean, modern look with minimal texture. It is affordable, widely available, and easy to refresh by cutting off damaged portions. Its main disadvantages are that it can tear, it is not washable, and deep creases cannot be steamed out the way fabric wrinkles can.
Fabric backdrops are reusable and portable, but they often need steaming or stretching. Vinyl is easier to wipe clean, making it useful for messy shoots, food, pets, or kids, but it can be reflective under certain lights. Canvas is durable and beautiful, especially for painted portrait backgrounds, but it is heavier and usually more expensive.
The best backdrop depends on the job. For clean commercial work, paper is often the fastest route. For location portraits, collapsible fabric may be easier. For newborns and cake-smash sessions, washable materials may win. For classic painterly portraits, canvas has a timeless look. A smart studio often keeps more than one option available.
Creative Ways to Use Paper Photography Backdrops
Layer Two Colors
Use one paper color as the background and another as the floor or tabletop surface. This creates a graphic set without complicated props. For example, use pale blue behind a product and warm beige beneath it. Or place red paper behind a model and pink paper on the floor for a bold editorial palette.
Cut Paper for Small Sets
Older damaged sections do not have to go straight to recycling. Clean portions can be cut into smaller sheets for flat lays, product risers, craft photography, mood boards, or color tests. This is a great way to stretch your investment and justify keeping that suspicious pile of “useful scraps” in the corner.
Use Distance to Change the Mood
The same backdrop can look completely different depending on lighting and distance. A gray paper lit evenly can feel corporate and clean. Move the light closer to the subject and let the background fall darker, and the same gray becomes dramatic. Add a colored gel to the background light, and it becomes a new creative setup without buying another roll.
Create Monochrome Sets
Match clothing, props, or products to the backdrop color for a monochrome effect. A cream outfit on cream paper looks soft and elegant. A red product on red paper feels bold and energetic. A black suit on black paper can look cinematic when rim lighting separates the subject from the background.
Experienced-Based Tips for Using Paper Photography Backdrops
After enough shoots with paper backdrops, you learn that the backdrop is never just “the background.” It is part of the set, the lighting plan, the client experience, and occasionally the comedy portion of the day. The first practical lesson is to set the paper before the subject arrives whenever possible. Nothing drains confidence like wrestling a nine-foot roll while a client watches politely and pretends not to notice your battle with gravity.
The second lesson is that clean floors matter. Before rolling paper out, sweep or vacuum the floor. Tiny bits of grit under the sweep can create bumps, scratches, and pressure marks. On white paper, even one small piece of dirt can become the star of the frame. It is not glamorous work, but neither is cloning out 47 specks in post-production while questioning your life choices.
Another experience-based trick is to plan the shoot order around the backdrop’s lifespan. Start with the cleanest, widest, most important shots. If you are photographing a model in full-body poses, do those before close-up portraits. If a child will be sitting, crawling, dancing, snacking, or conducting scientific experiments with a juice box, photograph the formal images first. Paper is patient, but it is not magic.
Color testing is also worth the extra five minutes. A backdrop color can look different under strobes, LEDs, window light, or mixed lighting. It can also shift depending on camera profile and white balance. Take a test shot with the actual subject or product before committing. A color that looks elegant on the roll may reflect strangely onto skin or packaging. Conversely, a color that looks boring in the box may become gorgeous when lit from the side.
For portraits, subject distance is one of the biggest upgrades. Beginners often place people right against the paper because they are trying to “stay on the backdrop.” The result is usually a hard shadow and a flat image. Move the subject forward and zoom or reframe. The background becomes smoother, the shadows soften or disappear, and the subject gains dimension.
For product photography, keep white cards and black cards nearby. Paper gives you the stage, but cards shape the reflections. A glossy bottle on a white paper sweep may need black cards to define its edges. A dark product on gray paper may need white cards to lift detail. The backdrop is only one ingredient; the reflections are the seasoning.
Storage is another place where experience saves money. Label the end of each roll with the color name, size, and purchase date. Keep a small swatch taped to the outside if the box is plain. When you own several neutral colors, “that nice gray one” becomes a surprisingly unhelpful inventory system. Good labeling prevents mistakes, especially when a client requests the same look from a previous shoot.
Finally, do not treat paper as too precious. Use it well, protect it intelligently, and accept that it is a consumable studio tool. The goal is not to keep the roll perfect forever. The goal is to make strong images efficiently. When paper gets dirty, cut it. When it gets creased, work around it or replace the section. When a fresh sweep hits the floor and the subject steps into beautiful light, you will remember why photographers keep buying these giant tubes in the first place.
Conclusion
Using paper photography backdrops is one of the easiest ways to make portraits, products, videos, and branding images look cleaner and more professional. The secret is not simply owning a roll of seamless paper; it is knowing how to choose the right size, support it safely, sweep it smoothly, tape it securely, light it intentionally, and maintain it between shoots.
Paper backdrops are affordable, versatile, and visually powerful. They can be bright and commercial, dark and dramatic, soft and neutral, or bold and playful. With a few smart habitsclean shoes, hard flooring, clamps, gaffer tape, subject distance, and careful storageyou can avoid most beginner mistakes and get polished results from a simple roll of paper.
In short, seamless paper is not just background material. It is a creative tool. Use it thoughtfully, and it can turn a spare room, garage, studio corner, or tabletop into a professional-looking set. Not bad for something that arrives looking like oversized gift wrap.