
Need a knot that holds just long enoughand then lets go like it has somewhere better to be?
That’s the magic trick behind the Highwayman’s Hitch, a classic quick release knot
often nicknamed the “bank robber’s knot.” (Because apparently even villains appreciate efficient rope work.)
In this guide, you’ll learn how to tie the Highwayman’s Hitch in clear, practical steps, plus how to test it,
when to use it, when to absolutely not use it, and what to tie instead when “moderately secure” isn’t secure enough.
What Is the Highwayman’s Hitch?
The Highwayman’s Hitch is a quick release hitch used to temporarily secure a rope to a post, rail, ring,
or similar anchor. It’s built from a series of loops (called bights) that lock under tension on the
standing part (the loaded side) and release when you tug the working end (the free end).
Translation: it’s great when you want a fast tie-off and an even faster getawaylike securing a small load,
tethering something lightly, or doing quick camp chores where you’ll untie soon anyway.
When to Use It (and When to Leave It in the History Books)
Good uses
- Temporary tie-offs where you’ll stay nearby and unload soon (light-to-moderate tension).
- Quick camp setups (non-critical lines where failure is annoying, not dangerous).
- Short-term tethering of non-critical itemswhen an easy release is the whole point.
Bad uses
- Anything life-safety related (climbing, rescue, rappel, suspension, human loadno exceptions).
- Heavy loads or situations where accidental release could cause injury or damage.
- “Set it and forget it” scenarios. This knot is more “set it and babysit it.”
The Highwayman’s Hitch can be released or slip accidentally, especially if the wrong end gets snagged or pulled.
If your brain is thinking, “Yeah but it’ll probably be fine,” that’s your cue to choose a more secure hitch.
Before You Tie: Know Your Rope Parts (So You Don’t Pull the Wrong One)
- Standing part: the side that takes the load (the “working” side under tension).
- Working end: the free end you hold and manipulate (also the end you’ll pull to release).
- Bight: a U-shaped fold in the rope (a loop made without using the rope end).
Quick-release knots are basically polite agreements between you and the rope:
“I’ll hold as long as you promise not to yank the wrong end.” The rope will not hesitate to enforce its terms.
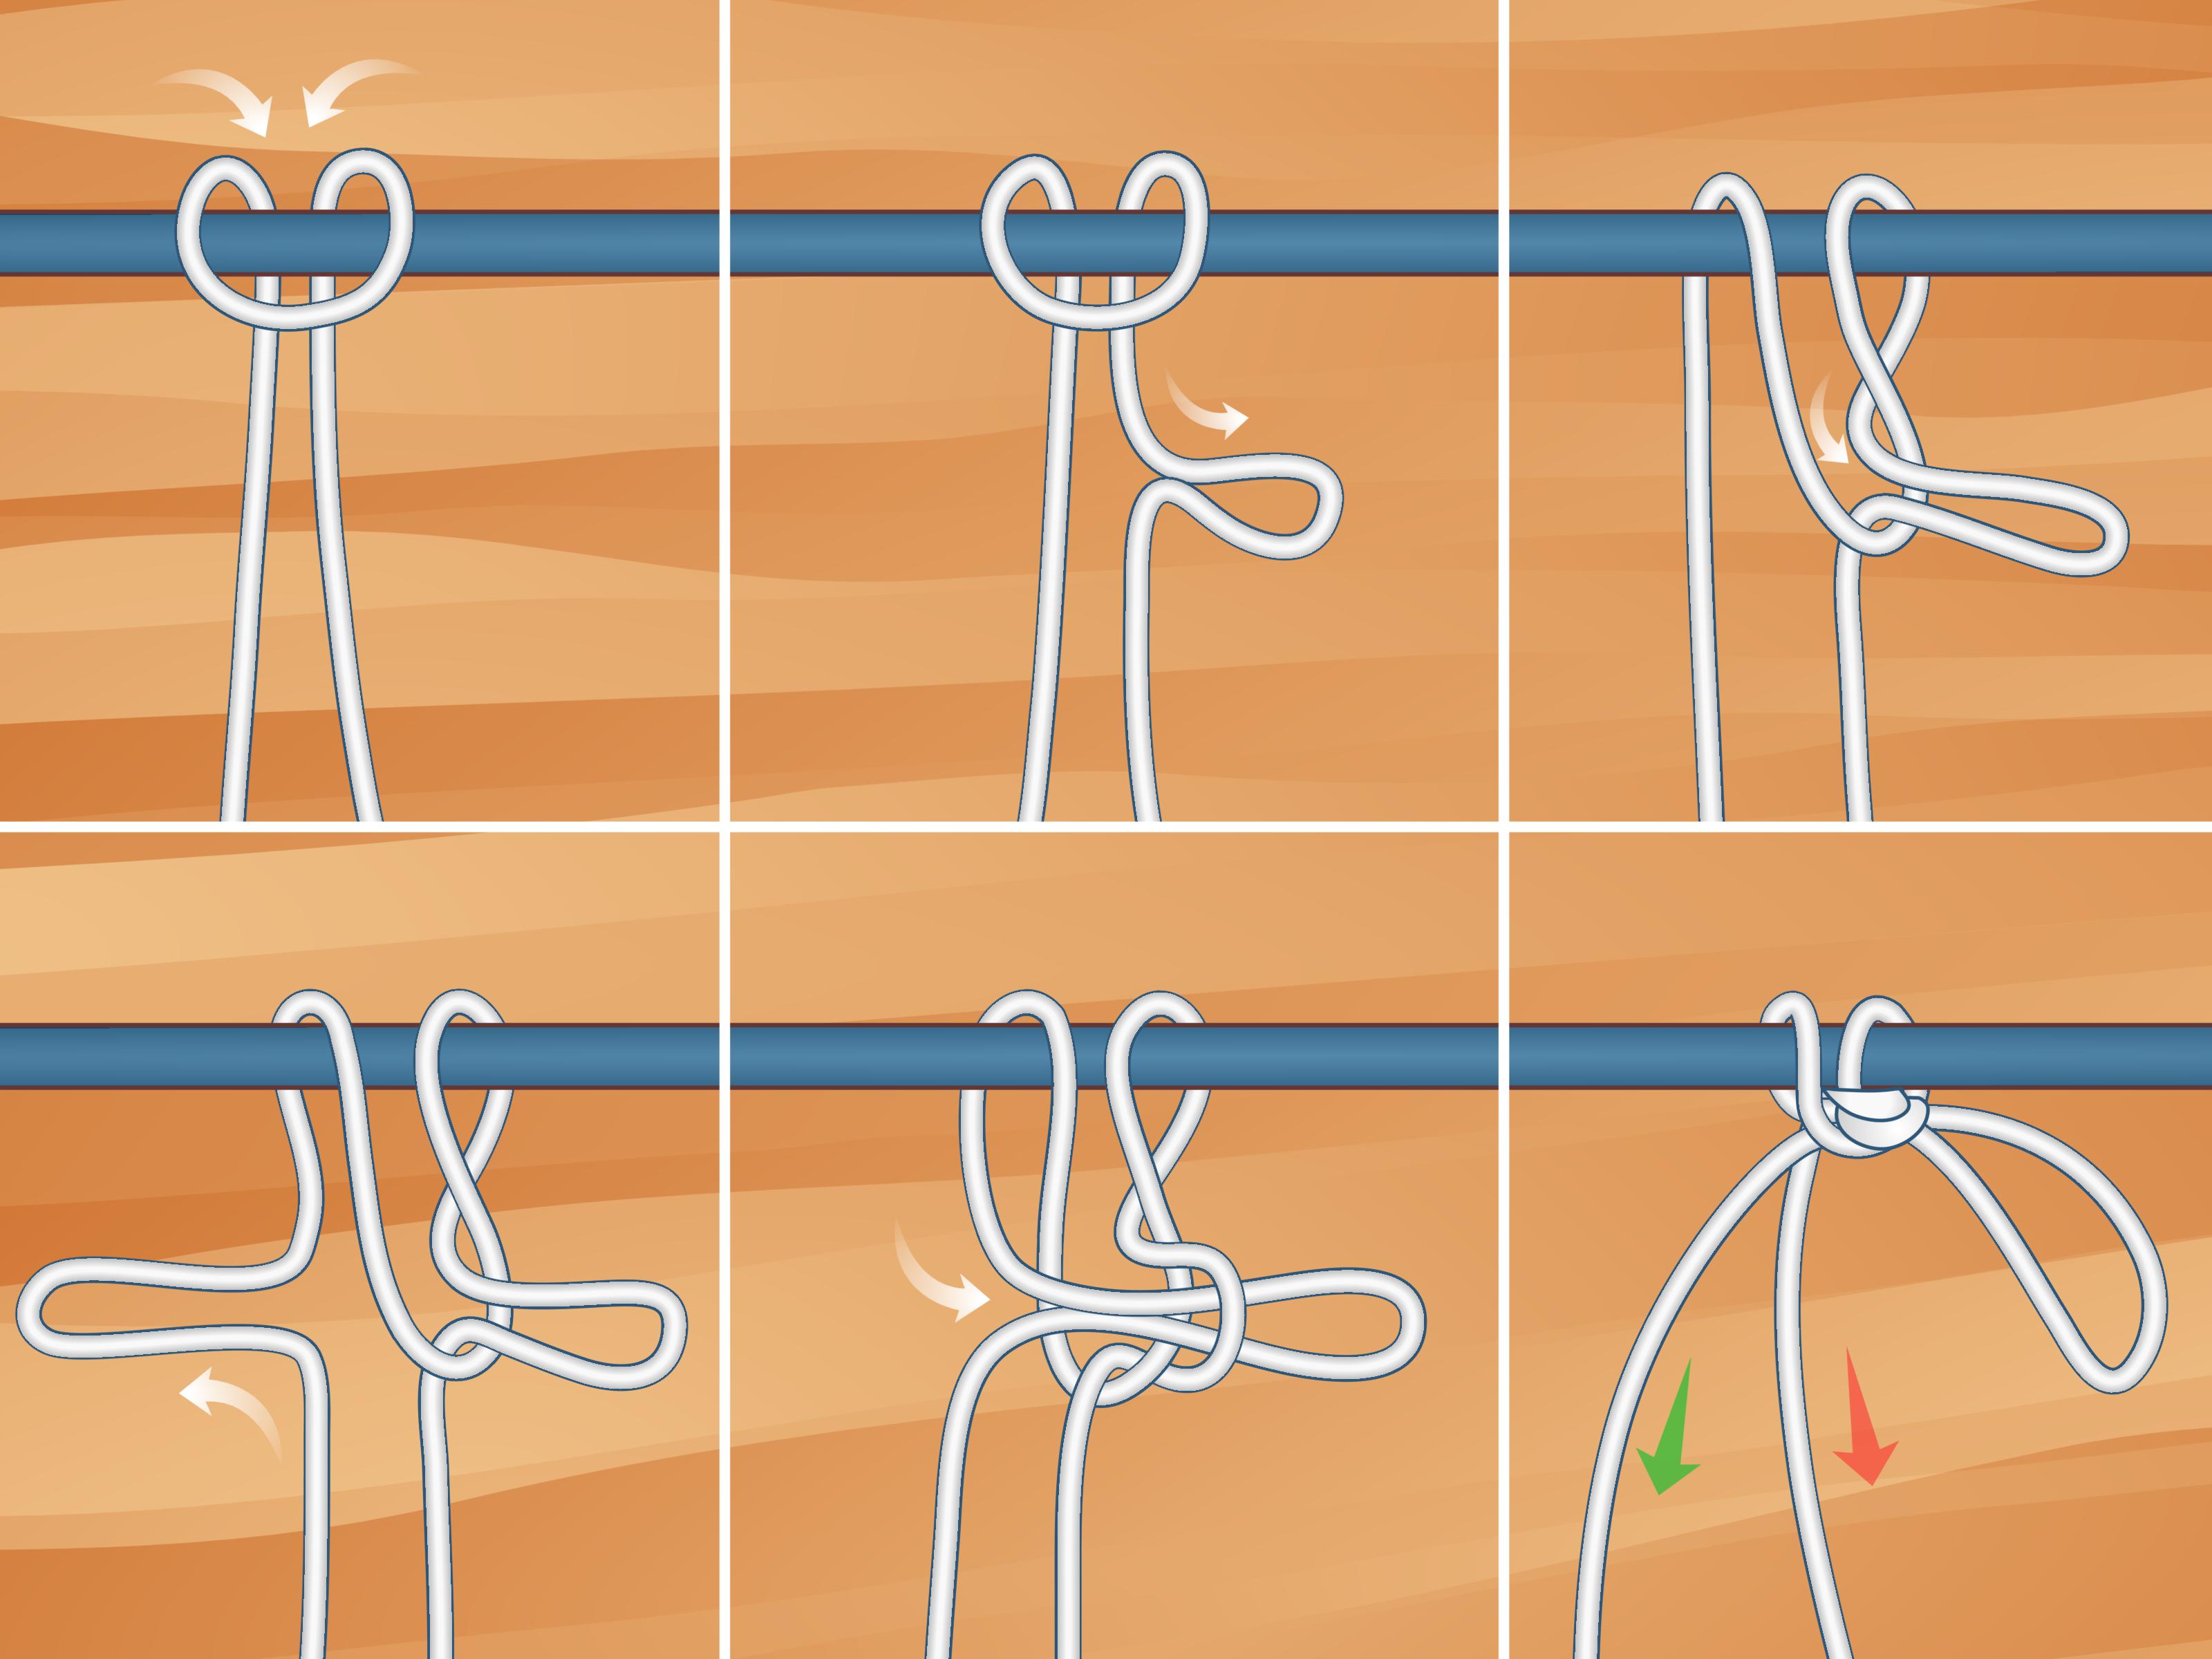
How to Tie a Quick Release Knot (Highwayman’s Hitch): 11 Steps
-
Choose a solid anchor.
Pick a post, rail, ring, or spar that won’t flex, spin, or splinter. Avoid sharp edges that could cut the rope.
If the anchor is slick (metal rail), expect more movement and test carefully. -
Decide which side will carry the load.
Hold the rope so the standing part points toward whatever will pull (your load, your line, your setup),
and the working end is the free tail you’ll use to tie and release. -
Create Bight #1 (the “anchor loop”).
Fold the rope to make a bight (a U-shaped bend). You’re not tying an overhand knotjust making a loop by doubling the rope.
-
Place Bight #1 behind the anchor.
Put that first bight behind the post/rail so the bight wraps around the back of the anchor.
You should now have a doubled loop sitting behind the anchor, with both rope legs coming forward. -
Create Bight #2 from the standing part.
On the standing side (the side that will take the load), fold another bight. This second bight is your first “locking” loop.
-
Pass Bight #2 through Bight #1.
Push Bight #2 forward through Bight #1 (the one around the anchor). You should see Bight #2 poking through in front.
-
Snug it gently.
Give a small pull on the working end to help seat the structure and keep Bight #2 from flopping around.
Don’t reef on itthis knot is about controlled tension, not brute force. -
Create Bight #3 from the working end.
Now fold the working end to make a third bight. Think of this as the “release bight.”
Make it big enough to handle easily (tiny loops are great for knitting, not emergencies). -
Pass Bight #3 through Bight #2.
Push the third bight through the second bight. You’ve now made a chain of bights:
anchor bight holds the structure; the second bight locks; the third bight becomes the quick-release. -
Set the hitch with tension on the standing part.
Pull on the standing part to load the knot and dress it neatly against the anchor.
The hitch should “lock” under tension, holding as long as the standing part stays loaded and the release end isn’t yanked. -
Test the releaseon purpose.
Before trusting it, pull the working end (or the release bight) to confirm it dumps cleanly.
Then retie and load it again. If you can’t reliably tie it and release it twice in a row, it’s not ready for real use.
How to Release It (Without Turning It into a Rope-Based Argument)
To release, tug the working end or pull the release bight you formed in Step 8.
The entire structure should collapse and the rope should come free from the anchor quickly.
Important: quick-release hitches may not release smoothly if the knot is jammed, capsized, or heavily loaded in an awkward direction.
If you anticipate high tension or unpredictable loading, choose a different knot.
Common Mistakes (a.k.a. How This Knot Becomes a Prank)
-
Pulling the wrong end. If someone grabs the working end “just to adjust it,” the knot may dump instantly.
Label your ends mentally before you label them emotionally. - Making the release bight too small. In stress, you want something you can grab with gloves or shaky hands.
- Messy dressing. Twisted bights and crossed strands reduce reliability. Make the loops lie flat and orderly.
-
Using it where you should use something else. The Highwayman’s Hitch is quick-release first, secure second.
If “secure” is the priority, pick a sturdier hitch.
Safety Notes (Especially If You’re Tying Animals)
If you’re tying a horse (or any animal that can panic)
In animal handling, quick-release knots are popular because you can free the animal quickly if something goes wrong.
But “quick release” is only safe when combined with smart setup.
- Tie to something solid that won’t break loose or move if the animal pulls.
- Tie at an appropriate height (often around eye level/withers height or higher, depending on the setting).
-
Use appropriate slack. Too much slack increases the risk of legs getting over the rope; too little can cause panic.
A common guideline is a short working distanceenough to hold the head normally, not enough to tangle. - Consider a breakaway layer (like safety twine) between rope and anchor so the system can fail safely if needed.
- Don’t leave a tied animal unattended unless your setup is designed for it (and even then, be cautious).
The Highwayman’s Hitch may show up in “quick release knot” discussions, but many horse-handling guides teach a dedicated quick-release
knot designed specifically for tying animals, often paired with breakaway twine. If animal safety is your goal, choose the method your
barn/trainer/vet program endorses and practice it until it’s automatic.
If you’re tying gear, tarps, or lines
- Assume it can snag. Keep the release end from dangling where people, packs, or brush can pull it.
- Test in your actual rope. Some ropes behave very differently depending on stiffness and surface texture.
- Plan a backup. If accidental release would be costly, add a simple safety half hitch (non-releasing) or choose another knot.
Want Quick Release but More Security? Try These Instead
Tumble Hitch (quick release, often considered more secure)
If you like the “pull-to-release” concept but want a hitch that many knot resources describe as more secure than the Highwayman’s Hitch,
the Tumble Hitch is worth learning. It’s still quick-release, but tends to be favored when you want a better balance of
hold and convenience.
Slipped versions of standard hitches
Another approach is to use a more traditional hitch and “slip” the final tuck so it can be released quickly.
This often keeps the structure familiar while still giving you a fast exit strategy.
Bottom line: the Highwayman’s Hitch is a neat tool, but it shouldn’t be your only tool.
A good knot tier collects options the way campers collect headlamps: more than one, because you know you’ll misplace one at the worst time.
Mini Practice Routine (5 Minutes, Big Confidence)
- Do 10 clean ties around the same post, slowly, focusing on neat bights.
- Do 10 releases without looking at your hands.
- Swap hands (or wear gloves) and do 5 more ties.
- Stress test lightly (moderate tension only), then release. Repeat.
FAQ
Is the Highwayman’s Hitch actually secure?
It can hold under light-to-moderate tension when tied correctly and loaded in a stable direction, but it’s also known for being
susceptible to accidental release or capsizing. Treat it as a temporary convenience hitch, not a critical hold.
Can I use it for climbing or supporting a person?
No. Quick-release hitches are not appropriate for human loads. Use climbing-rated systems and knots approved for life safety.
Why does mine fall apart when I pull?
Usually because you pulled the working end (release end) by accident, crossed your bights, or didn’t load the standing part cleanly.
Slow down, dress the knot neatly, and test before trusting it.
Conclusion
The Highwayman’s Hitch is a quick release knot with a big personality: fast to tie, faster to untie, and a little too eager to please.
Learn it for the right jobstemporary tie-offs where a clean release mattersand keep safer, more secure options in your toolkit for
anything that carries real risk.
Real-World Experiences & Lessons Learned (Extra )
The first time most people “use” a quick release knot, they’re not doing it in a calm, instructional mood with a cup of coffee and
perfect lighting. They’re doing it when it’s windy, the rope is stiff, their fingers are cold, and someone is saying,
“Hey… is that line supposed to be slipping?” That’s why practice mattersand why the Highwayman’s Hitch has a reputation for being
both helpful and occasionally hilarious (in the way that is only funny after everything is okay).
One of the most useful ways to understand this knot is to tie it on a simple rail and then deliberately recreate the “oops” moments.
Let the working end hang loose and brush it with your sleeve. Tug it lightly like a backpack strap catching it. Watch how easily
the hitch can dump if the release end gets pulled. That’s not a design flawit’s the design. The lesson is: if you use this hitch,
you also accept the job of managing the release end. Coil it, tuck it, or route it so it can’t be snagged by accident.
Another real-world moment: rope choice. Some ropes are grippy and forgiving; others are slick and springy and seem to hate your
entire hobby. The Highwayman’s Hitch often behaves better when the rope has enough texture to “stay dressed” and when the load
direction stays consistent. If you’re using a very smooth rope, you may notice the bights shift or the hitch capsizes more readily.
The practical takeaway is simple: don’t assume the knot will behave the same in every rope. Test it in the rope you’ll actually use,
under the kind of tension you’ll actually apply.
If you’re around animals, the experience lesson gets even louder. Horses (and other large animals) can go from calm to “absolutely not”
in half a second. That’s why many handlers lean on quick-release systemsbut they also layer safety into the setup: sturdy anchors,
reasonable tie height, controlled slack, and often a breakaway element. In practice, the “best knot” is the one you can tie correctly
every time, even when you’re stressed. If you can tie a standard quick-release knot for animals in your sleep, that consistency may
be safer than using a fancier hitch you only half-remember from a camping video.
Finally, the best “experienced” mindset is this: quick release doesn’t mean careless. It means intentional. You choose a quick release
knot because you’ve already pictured the moment you might need to undo it fast. When you tie the Highwayman’s Hitch, you’re not just
tying a knotyou’re also designing an escape plan. Make sure the escape plan can’t be triggered accidentally, and you’ll get the
convenience without the surprise.
SEO Tags