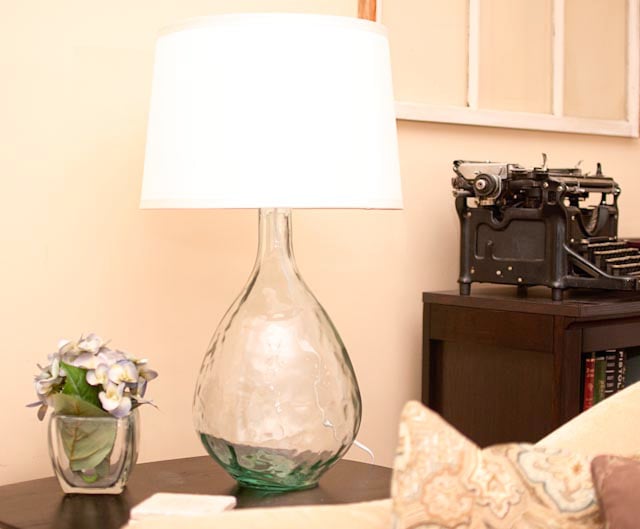

A glass vase has a strange little superpower: it can look wildly expensive while sitting in a thrift-store bin next to three chipped mugs and a suspiciously damp baskea custom table lamp that looks personal, polished, and far more interesting than something pulled from a big-box shelf.
This turning a glass vase into a lamp tutorial walks you through the project in a beginner-friendly way, including how to choose the right vase, decide whether you need to drill glass, assemble a lamp kit safely, select a shade, and avoid the classic DIY mistake of creating a lamp that looks fabulous but leans like it has had a long day.
The good news is that you do not need to be an electrician, a glassblower, or a person who owns twelve different kinds of clamps. For most DIY vase lamps, the easiest method uses a bottle-lamp adapter that sits securely in the neck of the vase. That means no drilling, no flying glass, and no need to explain to your family why there is a diamond drill bit in the dishwasher.
Why Turn a Glass Vase Into a Lamp?
A DIY glass vase lamp is one of those rare home projects that combines creativity with actual usefulness. Instead of displaying a vase only when it is holding flowers, you can give it a daily purpose as bedside lighting, an entryway accent, a reading lamp, or a cheerful glow-maker for a dark corner.
Glass is especially good for lamp projects because it plays nicely with light. Clear glass can make a room feel airy, colored glass adds personality, and textured or frosted glass creates softer visual interest. A blue vase can become a coastal lamp, amber glass can lean vintage, and a clear vessel filled with dry decorative objects can become a conversation piece.
This project also works beautifully for thrifted home decor. A vase that feels too plain on a shelf may suddenly look intentional once you add a brass socket, linen shade, and warm LED bulb. It is basically a tiny home makeover with a cord.
Choose Your DIY Vase Lamp Method
Method One: Use a Bottle Lamp Adapter
This is the easiest and most beginner-friendly option. A bottle lamp adapter kit usually includes a socket, harp hardware, and one or more rubber adapters designed to fit into the opening of a bottle or vase. The rubber creates a snug fit, allowing the socket assembly to sit on top of the vessel.
Use this method when your glass vase has a narrow enough opening to support an adapter securely. It is ideal for decorative bottles, ginger jars, narrow-neck vases, demijohn-style vessels, and sturdy glass containers with a centered opening.
The biggest advantage is obvious: you do not have to drill through glass. The cord comes from the socket and runs down the outside of the vase, usually along the back. Some people dislike seeing the cord, but a well-placed lamp against a wall or behind furniture makes it nearly invisible.
Method Two: Drill a Hole for a Hidden Cord
The drilled-cord method creates a cleaner, more professional-looking DIY vase lamp because the cord exits near the bottom or back of the vase. However, drilling glass takes patience, proper tools, protective gear, and a willingness to accept that glass is not emotionally available for rushing.
If you choose this method, use a drill bit specifically made for glass or tile, work slowly, use light pressure, and keep the drilling area cool with water. Never use hammer mode. Tempered glass should not be drilled, and thin or fragile antique glass is usually better left alone.
For first-time DIYers, the bottle adapter method is the smarter choice. You can always save the drilling adventure for a day when your confidence is high, your workspace is calm, and no one is asking where the scissors are every thirty seconds.
Supplies You Need for a Glass Vase Lamp
- A sturdy glass vase, bottle, or decorative vessel
- A DIY lamp kit or bottle lamp adapter kit
- A lampshade
- A harp and finial, if not included with the kit
- An LED light bulb compatible with the socket
- Rubber adapters or cork-style reducers, if needed
- Felt pads or a non-slip base pad
- Measuring tape or ruler
- Painter’s tape and permanent marker for the drilled-cord method
- A glass-specific drill bit, drill, water, safety glasses, gloves, and a dust mask if drilling
Before buying a lamp kit, check the opening of your vase. Measure the inside diameter of the neck, not just the outer edge. The adapter should fit snugly without forcing the glass. A too-loose adapter can wobble, while an overly tight one can put pressure on the vase opening.
How to Pick the Best Glass Vase
The prettiest vase is not always the best lamp candidate. A good glass vase lamp needs more than charm. It needs a stable base, enough height, and a shape that can support a lampshade without looking like the lampshade has swallowed it whole.
Look for a Wide, Stable Base
Choose a vase with a broad enough bottom to prevent tipping. Tall, narrow vessels can work, but they should have enough weight or width at the base to balance the socket, shade, and bulb. If the vase feels unstable before you add anything, it will not become more coordinated once it is wearing a lampshade.
Consider the Height
For a bedside table lamp, a vase between about 10 and 18 inches tall often works well before the socket and shade are added. For an entry table or console, a taller vase can create more drama. The final lamp height depends on the vase, harp, lampshade, and finial together.
Inspect the Glass Carefully
Skip any vase with cracks, severe chips, unstable seams, or a damaged rim. Small cosmetic imperfections may be fine for a decorative vase, but electrical projects deserve a stronger standard. The lamp should feel solid when you lift it, set it down, and lightly touch the socket area.
Step-by-Step: Turning a Glass Vase Into a Lamp Without Drilling
Step 1: Clean the Vase Thoroughly
Wash the vase inside and out, then dry it completely. Remove stickers, dust, old floral foam, and any mystery residue that has been living in the bottom since 2009. A clean vase lets the light reflect better and makes the finished lamp feel intentional rather than rescued from a garage sale during a rainstorm.
Step 2: Test the Adapter Fit
Place the rubber adapter into the vase opening and gently press the lamp socket assembly into place. It should sit level and feel secure. Do not force it. If it rocks, try a different adapter size or add a proper rubber reducer designed for bottle lamps.
The socket should sit centered over the vase opening. A crooked socket may look minor at first, but once the lampshade is attached, the entire lamp can appear as though it is quietly judging the room from one side.
Step 3: Assemble the Socket Hardware
Follow the instructions included with your lamp kit. Many bottle lamp kits arrive with the socket, threaded rod, harp saddle, and adapter already organized for simple assembly. Keep the lamp unplugged while assembling any electrical components.
Install the harp saddle if your lamp will use a harp-style lampshade. Tighten the hardware enough to feel secure, but avoid overtightening. Glass does not appreciate being treated like cast iron.
Step 4: Add the Harp
Attach the harp to the saddle. The harp holds the lampshade above the socket and creates the shape of a traditional table lamp. Harps come in different heights, so choose one that allows the shade to cover the socket while leaving enough room above the vase for a balanced look.
Step 5: Choose and Attach the Lampshade
A lampshade can make or break your DIY vase lamp. For a classic table lamp, choose a shade that is roughly two-thirds the height of the base. The shade should generally be wider than the widest part of the vase, but not so wide that it resembles a tiny umbrella hovering over your furniture.
Drum shades work well with modern, simple glass vessels. Empire shades suit traditional or vintage-inspired vases. Pleated shades add softness, while linen or woven shades create a relaxed, organic feel.
Place the shade over the harp and secure it with the finial. Step back before declaring victory. Look at the lamp from several angles. A two-minute adjustment now can save you from months of wondering why the lamp looks mildly haunted.
Step 6: Add an LED Bulb
Use an LED bulb that stays within the maximum wattage listed on the lamp socket or kit. LEDs are a strong choice for DIY vase lamps because they use less energy and produce much less heat than traditional incandescent bulbs.
For cozy bedroom lighting, choose a warm white bulb around 2700K. For a desk or reading corner, a brighter bulb around 3000K can provide clearer light without looking harsh. A dimmable LED bulb is useful if your lamp kit includes a dimmer-compatible socket.
Step 7: Finish the Base
Add felt pads or a non-slip pad under the vase to protect furniture and help prevent sliding. This small detail is especially useful for glass lamps placed on polished wood, marble, glass tables, or nightstands that get bumped during late-night water-glass retrieval missions.
How to Drill a Glass Vase for a Hidden Cord
Drilling a hole in a glass vase gives the lamp a cleaner finish because the cord can exit near the lower back of the base. This method is more advanced, but it can be worth it for a statement piece or a lamp that will sit in a visible location.
Prepare the Vase and Workspace
Place the empty vase on a stable, padded surface. Mark the drill location near the lower back of the vase with painter’s tape and a marker. The tape helps reduce slipping when you begin drilling.
Wear eye protection, gloves, and a dust mask. Keep water nearby to cool the drill bit and reduce friction. Make sure the vase is not tempered glass, cracked glass, or exceptionally thin glass.
Drill Slowly and Gently
Use a glass-specific drill bit at a low speed. Start gently and let the bit do the work. Keep the drilling area wet with water, and pause frequently to prevent overheating. Do not push hard. Pressure is not a personality trait that improves glass drilling.
Once the hole is complete, smooth any sharp edges carefully with a suitable glass-smoothing method or protective grommet. The cord should never rub directly against a sharp glass edge.
Thread the Cord and Assemble the Lamp
Use a lamp kit designed for corded table lamps and follow the manufacturer’s assembly instructions carefully. Thread the cord through the grommeted hole, connect the socket components as directed, and confirm that the cord exits without pinching, scraping, or pulling.
If wiring instructions feel confusing, stop and ask a qualified electrician or experienced lamp repair professional for help. This is not the moment for a bold “How hard can it be?” speech.
Creative Ways to Style a Glass Vase Lamp
Fillable Vase Lamp Ideas
Clear glass vases are especially fun because you can customize the inside. Use dry, lightweight decorative materials such as shells, faux greenery, decorative beads, dried citrus slices, small ornaments, wine corks, or a collection of sea glass. Keep all filler materials dry and away from electrical components.
For a coastal look, add pale shells and a natural linen shade. For a holiday lamp, use dried pinecones, miniature ornaments, or faux berries. For a modern look, leave the vase empty and let the clarity of the glass do its quiet, elegant thing.
Match the Hardware to Your Decor
Brass hardware brings warmth to amber, green, clear, and vintage-style glass. Brushed nickel works well with cool-toned blue, gray, or smoky glass. Matte black creates contrast against clear or white glass and can make a simple vase look more contemporary.
Use a Shade to Control the Mood
A white linen shade creates soft ambient light. A darker shade directs more light downward and can make the lamp feel moodier. A patterned shade adds character, but use it carefully if the vase itself is already colorful or textured. Two bold personalities can coexist, but they may need couples counseling.
Safety Tips for DIY Glass Vase Lamps
- Use a quality lamp kit with clearly labeled wattage guidance.
- Keep the lamp unplugged while assembling or adjusting hardware.
- Use an LED bulb within the socket’s maximum rating.
- Do not use a cracked, chipped, or unstable glass vase.
- Do not put water, fresh flowers, or damp filler materials inside a working lamp base.
- Keep cords away from sharp glass edges, heat sources, and walkways.
- Do not overload extension cords or use damaged cords.
- Stop using the lamp immediately if the socket feels loose, the cord is frayed, or the lamp flickers unexpectedly.
A DIY lamp should feel sturdy, not merely photogenic. Before putting it into daily use, gently test the vase, socket, harp, and shade. The lamp should remain upright when lightly touched, and the socket should not wiggle. Check the cord path and plug the lamp directly into a properly functioning wall outlet.
Common DIY Vase Lamp Problems and Fixes
The Adapter Is Too Loose
Try a larger rubber adapter, a bottle lamp reducer, or a kit with multiple stopper sizes. Do not wrap the opening with random tape until it resembles a tiny plumbing emergency. Use materials intended to create a secure fit.
The Lamp Looks Too Top-Heavy
Use a smaller shade, a shorter harp, or a wider vase. You can also add a discreet weighted base pad beneath the vase, provided it does not make the lamp unstable or damage furniture.
The Shade Sits Crooked
Check that the socket is centered, the harp is fully seated, and the finial is tightened evenly. Sometimes the issue is not the shade at all; it is the socket leaning slightly inside the vase opening.
The Cord Is Too Noticeable
Place the lamp near a wall, arrange furniture so the cord falls behind it, or use a cord cover that matches the wall color. For a more permanent solution, consider the drilled-cord method only if you are comfortable working with glass and electrical lamp components.
Conclusion: A Lamp With More Personality Than a Store-Bought Shade
Turning a glass vase into a lamp is a practical, creative way to make your home feel more collected and less copied from a showroom display. The right vase can become a bedside lamp, a statement piece for a console table, or a thoughtful handmade gift.
The easiest route is a bottle lamp adapter kit, which avoids drilling and lets you create a polished lamp in an afternoon. Once you understand the basics of balance, shade proportions, bulb selection, and socket safety, you can transform almost any sturdy glass vessel into functional decor.
Start with a vase you genuinely like, choose hardware that suits your style, and give yourself permission to experiment. The final lamp does not need to be perfect. It just needs to stand up straight, light the room, and make you smile every time someone asks, “Wait, you made that?”
My Experience Turning a Glass Vase Into a Lamp
The first thing most people learn when making a glass vase lamp is that the vase matters more than the lamp kit. It is easy to get distracted by pretty colors, textured glass, or an unusually dramatic shape. Then you place the socket on top, add a lampshade, and realize your “beautiful sculptural statement piece” has the balance of a giraffe on roller skates.
In my experience, the most successful vase lamps begin with a little restraint. A simple clear vase with a stable bottom can look far more expensive than a heavily decorated vessel trying to compete with every other object in the room. Once the lamp is assembled, the shade, bulb, hardware, and surrounding furniture all become part of the design. The vase is important, but it is not a one-vase show.
One of the most useful lessons is to test proportions before assembling anything permanently. I like placing the vase on the table where the lamp will live, then holding different lampshades over it to compare the silhouette. A shade that looks perfect in a store can look enormous on a small nightstand. A narrow shade can make a wide vase feel awkward. Taking a few phone photos from across the room helps because cameras are brutally honest about crooked lampshades and visual imbalance.
The bottle adapter method is also more satisfying than many people expect. At first, having the cord run down the outside of the vase can seem like a compromise. But once the lamp is placed against a wall or on a side table, the cord often disappears into the background. The no-drill method saves time, reduces stress, and gives you the freedom to swap the vase later without committing to a permanent hole.
Another discovery is that warm LED bulbs make a huge difference. The same glass vase can feel cold and sterile under a bright bluish bulb, then suddenly look rich and inviting with warm white light. Clear glass reflects the bulb and surrounding room, while tinted glass creates a softer, moodier glow. It is a small change with surprisingly large results.
I have also learned not to overfill clear vase lamps. A few shells, dried botanicals, or decorative beads can look charming. Too many objects inside the vase can make it look cluttered, especially when the lamp is switched on. The best fillable lamps usually leave a little breathing room. Think curated collection, not “I emptied the craft drawer because I panicked.”
The final lesson is that imperfect DIY projects often become favorites. A handmade glass vase lamp may have a tiny bubble in the glass, a slightly unusual shape, or hardware that is not identical to every lamp in a catalog. That is exactly why it feels special. It tells a story about something you found, imagined differently, and brought back to life with a little creativity and a very cooperative lampshade.
Note: This tutorial is intended for portable plug-in lamp kits. Do not improvise electrical wiring, use damaged parts, or allow water or damp decorative materials near the socket, bulb, or cord.